QA seven's blog


  • 首页

  • 分类

  • 关于

  • 归档

  • 标签

gatling官方文档翻译4

发表于 2016-06-15

第四篇

http://gatling.io/docs/2.2.1/migration_guides/2.0.0-M3a-to-2.0.html
Migrating from 2.0.0-M3a to 2.0
Global changes
Gatling requires at least JDK7u6
As targeting newer JDKs provides bug fixes, speed improvements and opens opportunities for optimization, Gatling now requires at least a JDK7u6 (released almost two years ago already).

Gatling is now available on Maven Central
Gatling releases are now available on Maven Central, and snapshots are deployed on each successful build by Travis CI to Sonatype’s snapshots repository. If you were using Gatling with its Maven plugin, you no longer need to add the Excilys repository in your pom.xml.

Simulation
Necessary imports
import bootstrap. and import assertions. are now unnecessary and have to be removed.
import io.gatling.http.Headers.Names. is now unnecessary, headers names are now directly available from HeaderNames.
import io.gatling.http.Headers.Values.
is now unnecessary, headers values are now directly available from HeaderValues.
Injection DSL
ramp(10 users) becomes rampUsers(10)
heaviside(10 users) becomes heavideUsers(10)
atOnce(10 users) becomes atOnceUsers(10)
constantRate(10 usersPerSec) becomes constantUsersPerSec(10)
rampRate(10 usersPerSec) becomes rampUsersPerSec(10)
split(10 users) becomes splitUsers(10)
Core
Structure Elements
In asLongAs, exitASAP now defaults to true. For more information on the change of behaviour it introduces, see asLongAs documentation.

Checks
whatever has been renamed to optional.
transform now no longer takes and returns an Option[T] and takes and returns plain types, but transformOption provides the same functionality as transform did.
HTTP
Form parameters (for POST requests)
Renamed

Methods for adding form parameters to the request have been renamed:

param => formParam
multiValuedParam => multiValuedFormParam
Misc
requestInfoExtractor and responseInfoExtractor have been merged into a single extraInfoExtractor, which takes a ExtraInfo => List[Any] function.
gatling.http.ahc.useRawUrl configuration parameter was removed, please use disableUrlEncoding instead, as described here.
For more information on extraInfoExtractor, please refer to its documentation.

Logs
simulation.log has been redesigned.

If you wrote your own specific simulation.log parser, you’ll need to migrate it to the new structure.

Recorder
Until now, when setting up the Recorder, you had to setup two ports for the Recorder’s local proxy: one for HTTP, one for HTTPS. This is not needed anymore, as the Recorder handles itself the switch to an HTTPS connection if necessary, and only a single port needs to be specified.

Maven Plugin
The … and … configuration options have been removed. Should you want to select a specific simulation to run, you can use the … config option to do so.

For more information, see the Maven plugin documentation.

Migrating from 2.0.0-M3a to 2.0
从2.0.0-M3a 合并到2.0

全局改变
Gatling 需要至少JDK7u6版本

因为心得JDKs修复一些问题,速度得到改善,优化了处理,gatling 现在需要至少JDK7u6(2年前已经发布)

gatling 现在同样在maven cetral 适用

gatling 现在同样在maven cetral 适用,并且快照都会部署到 Sonatype’s snapshots repository 当每次 Travis ci 构建成功后。如果你使用maven插件版gatling,你不需要添加the Excilys repository 在你的pom.xml中。

模拟器
Necessary imports
import bootstrap. and import assertions. 现在已经不需要并且被移除
import io.gatling.http.Headers.Names. 已经不需要, headers names被 HeaderNames代替.
import io.gatling.http.Headers.Values.
已经不需要, headers values 被 HeaderValues代替.

Injection DSL
ramp(10 users) 变为 rampUsers(10)
heaviside(10 users) 变为 heavideUsers(10)
atOnce(10 users)变为 atOnceUsers(10)
constantRate(10 usersPerSec) 变为 constantUsersPerSec(10)
rampRate(10 usersPerSec)变为 rampUsersPerSec(10)
split(10 users) 变为 splitUsers(10)
Core

Structure Elements
结构化组件

在 asLongAs, exitASAP 默认为trule。
有关的行为改变的更多信息介绍,请看asLongAs文档。

Checks

whatever 已经被重新命名为 optional.
transform now no longer takes and returns an Option[T] and takes and returns plain types, but transformOption provides the same functionality as transform did.
transform现在不再需要现在返回一个Option[T],并返回plain类型,但transformOption和transform提供了相同的功能。
HTTP
Form parameters (关于 POST 请求)
重命名

adding form parameters 方法请求已经被重命名:

param => formParam
multiValuedParam => multiValuedFormParam

Misc
requestInfoExtractor 和 responseInfoExtractor 已经合并为 extraInfoExtractor, which takes a ExtraInfo => List[Any] function.
gatling.http.ahc.useRawUrl 配置参数已经被移除, 请用 disableUrlEncoding 代替, 描述如下.
更多关于 extraInfoExtractor信息, 请参照这个文档.

Logs

simulation.log 已经被重新设计.

如果你写自己的simulation.log解析器,您需要它迁移到新结构

Recorder

Until now, 当你设置 Recorder时, 你必须设置两个端口记录器的当地代理:一个用于HTTP,HTTPS。 这再也不需要了, 因为record处理本身转向一个HTTPS连接如果必要,并且只需要指定一个单独的端口。

Maven Plugin

The <includes>...</includes> 和 <excludes>...</excludes> 配置项 已经被移除. 如果你需要选择一个特殊的模拟运行, 你可以使用 <simulationClass>...</simulationClass> 去配置.

更多的信息, 查阅 Maven plugin 文档.
gatling官方文档翻译3

发表于 2016-06-08

第三篇
http://gatling.io/docs/2.2.1/migration_guides/1.5.x-to-2.0.html

Migrating from 1.5.x to 2.0
Global changes
Gatling requires at least JDK7u6
As targeting newer JDKs provides bug fixes, speed improvements and opens opportunities for optimization, Gatling now requires at least a JDK7u6 (released almost two years ago already).

Scala 2.10
Gatling is built with Scala 2.10. If you’re using Scala IDE, make sure you’re using a version compatible with Scala 2.10.

Gatling is now available on Maven Central
Gatling releases are now available on Maven Central, and snapshots are deployed on each successful build by Travis CI to Sonatype’s snapshots repository. If you were using Gatling with its Maven plugin, you no longer need to add the Excilys repository in your pom.xml.

Package and GroupId changes
Gatling’s artifacts groupId and package are now io.gatling. You’ll have to :

Update your build scripts to change the groupId of Gatling’s dependencies from com.excilys.ebi.gatling to io.gatling
Update your simulations to replace the com.excilys.ebi.gatling part in the imports by io.gatling
Simulation
Necessary imports
akka.util.duration classes have been ported to the scala.concurrent.duration package. Simply replace import akka.util.duration. by import scala.concurrent.duration..
import bootstrap. and import assertions. are now unnecessary and have to be removed.
import com.excilys.ebi.gatling.http.Headers.Names. is now unnecessary, headers names are now directly available from HeaderNames.
import com.excilys.ebi.gatling.http.Headers.Values.
is now unnecessary, headers values are now directly available from HeaderValues.
Protocols setup
Protocols are no longer configured by scenario and are now configured by simulation, using the protocols method.

A 1.4.x-1.5.x setUp like this one:

setUp(scn.(…).protocolConfig(httpConfig))
would now be with Gatling 2.0:

setUp(scn.(…)).protocols(httpConfig)
Assertions setup
The assertThat method has been removed, assertions are now configured using assertions in the same fashion as protocols are, e.g.

setup(scn.(…).protocolConfig(httpConfig))

assertThat(global.responseTime.max.lessThan(1000))
becomes:

setup(scn.(…))
.protocols(httpConfig)
.assertions(global.responseTime.max.lessThan(1000)
New Injection DSL
The users, ramp and delay methods to configure the injection profile for your scenario have been removed in favor of a full-blown dedicated DSL.

Injection steps are now configured using the inject method available on your configured scenario.

Migrating users

// With Gatling 1.5.X
setUp(scn.users(10)…)

// With Gatling 2.0
setUp(scn.inject(atOnceUsers(10))…
Migrating ramp

// With Gatling 1.5.X
setUp(scn.users(10).ramp(30)…)

// With Gatling 2.0
setUp(scn.inject(rampUsers(10) over (30 seconds))…
Migrating delay

// With Gatling 1.5.X
setUp(scn.users(10).delay(5)…)

// With Gatling 2.0
setUp(scn.inject(nothingFor(5 seconds), atOnceUsers(10))…
For more information on the new Injection DSL, please consult the Injection DSL reference documentation.

Core
Checks
whatever has been renamed to optional.

Structure Elements
The first parameter of foreach is now an Expression (e.g. a Gatling EL string), not the name of the attribute to loop over.
For example, if you have a list attribute in the user’s session holding a list of values:

.foreach(“list”, “elem”) {
…
}
becomes:

.foreach(“${list}”, “elem”) {
…
}
In asLongAs, exitASAP now defaults to true. For more information on the change of behaviour it introduces, see asLongAs documentation.
Session
Session has been under major refactoring:

session.get(“foobar”) becomes session(“foobar”)
session.getTypedAttributeT becomes session(“foobar”).as[T]
session.getAttributeAsOptionT becomes session(“foobar”).asOption[T]
session.setAttribute(“foobar”, 1234) becomes session.set(“foobar”, 1234)
session.setAttributes(Map(“foo” -> 1, “bar” -> 2) becomes session.setAll(“foo” -> 1, “bar” -> 2)
session.removeAttribute(“foobar”) becomes session.remove(“foobar”)
session.isAttributeDefined(“foobar”) becomes session.contains(“foobar”)
HTTP
Protocol
HTTP protocol bootstrapper, httpProtocol, has been renamed to http.

Query parameters
Removed

Versions of queryParam and multivaluedQueryParam that took no other parameters than the key (resolving the value from the session, using the key’s name to find the attribute with the same name) have been removed.

Modified

multivaluedQueryParam can now resolve the values directly from the session, using Gatling’s EL.

Form parameters (for POST requests)
Renamed

Methods for adding form parameters to the request have been renamed:

param => formParam
multiValuedParam => multivaluedFormParam
Removed

Versions of queryParam and multivaluedQueryParam that took no other parameters than the key (resolving the value from the session, using the key’s name to find the attribute with the same name) have been removed.

Modified

multivaluedFormParam can now resolve the values directly from the session, using Gatling’s EL.

Request bodies
Scalate templates support has been dropped. ElFileBody (see below) is the best suited to replace your existing Scalate templates.
The API for setting request bodies on request has changed. Instead of having several methods like body, fileBody and byteArrayBody, there is a now a single method, body(…) in which you set the type of body to send.
Migrating .body(body)

.body(body) has been replaced by .body(StringBody(body)).

http(“my post request”)
.post(“http://www.example.org“)
.body(“Look Ma, I’m a request body !”)
becomes:

http(“my post request”)
.post(“http://www.example.org“)
.body(StringBody(“Look Ma, I’m a request body !”))
Migrating .fileBody(filePath)

.fileBody(filePath) has been replaced by .body(RawFileBody(filePath)).

http(“my post request”)
.post(“http://www.example.org“)
.fileBody(“my_upload.xslx”)
becomes:

http(“my post request”)
.post(“http://www.example.org“)
.body(FileBody(“my_upload.xslx”))
Migrating .fileBody(filePath, values)

.fileBody(filePath, values) has been replaced by .body(ElFileBody(filePath)). values are now directly resolved from the virtual user’s session’s content.

http(“my post request”)
.post(“http://www.example.org“)
.fileBody(“my_template.txt”, Map(“userName” -> “user123”)
becomes:

http(“my post request”)
.post(“http://www.example.org“)
.body(ElFileBody(“my template.txt”))
If my template.txt contains:

Hi, my name is ${userName}
and the virtual user’s session has an attribute userName set to user123,

Then the effectively sent request body would be:

Hi, my name is user123
Migrating .byteArrayBody(byteArray)

.byteArrayBody(byteArray) has been replaced by .body(ByteArrayBody(bytes)).

http(“my post request”)
.post(“http://www.example.org“)
.byteArrayBody(Array(1, 2, 3, 4))
becomes:

http(“my post request”)
.post(“http://www.example.org“)
.body(ByteArrayBody(Array(1, 2, 3, 4)))
For more information, see the Request bodies reference section.

Misc
ExtendedResponse has been renamed into Response.
requestInfoExtractor and responseInfoExtractor have been merged into a single extraInfoExtractor, which takes a ExtraInfo => List[Any] function.
For more information on extraInfoExtractor, please refer to its documentation.

Logs
simulation.log has been redesigned.

If you wrote your own specific simulation.log parser, you’ll need to migrate it to the new structure.

Recorder
Until now, when setting up the Recorder, you had to setup two ports for the Recorder’s local proxy: one for HTTP, one for HTTPS. This is not needed anymore, as the Recorder handles itself the switch to an HTTPS connection if necessary, and only a single port needs to be specified.

Maven Plugin
The … and … configuration options have been removed. Should you want to select a specific simulation to run, you can use the … config option to do so.

For more information, see the Maven plugin documentation.

从1.5迁移到2.0

全局变化
gatling至少需要JDK7u6

提供新jdk针对的是bug修复、优化速度和打开优化速度,gatling现在至少需要JDK7u6(大约两年前已经发布)。
Scala 2.10

gatling使用Scala 2.10。如果你使用Scala的IDE,确保您正在使用一个版本能与Scala 2.10兼容。
gatling现在可用在Maven中央库

galtling版本现在可以使用Maven中央,以及快照部署在每个成功构建了 Travis CI Sonatype快照存储库。如果你是使用gatling的Maven插件,您不再需要添加pom.xml Excilys存储库。

package和GroupId变化

gatling的groupId和package现在io.gatling组件。
你必须:
更新您的构建脚本改变从com.excilys.ebi groupId gatling的依赖关系。gatling,io.gatling更新你的模拟来代替com.excilys.ebi。io.gatling
更新你的模拟器来代替com.excilys.ebi.io.gatling部分通过引入io.gatling

akka.util.duration 类 已经移植到 scala.concurrent.duration 包中。简单从 import akka.util.duration. 替换到 import scala.concurrent.duration..

import bootstrap. 和 import assertions. 现在不是必须的,已经被移除.

import com.excilys.ebi.gatling.http.Headers.Names._ 现在不是必须的, headers 名字 直接使用HeaderNames.

import com.excilys.ebi.gatling.http.Headers.Values._ 现在不是必须的, headers 值 直接使用HeaderValues.

协议设置
协议已经不再配置场景,现在配置模拟器,使用协议的方法。

A 1.4.x-1.5.x 设置如下:

setUp(scn.(…).protocolConfig(httpConfig))
Gatling 2.0将会这样设置:

setUp(scn.(…)).protocols(httpConfig)

Assertions 设置

assertThat方法已经被移除,assertions配置使用assertions以相同的方式作为协议.如下

setup(scn.(…).protocolConfig(httpConfig))

assertThat(global.responseTime.max.lessThan(1000))

改变
setup(scn.(…))
.protocols(httpConfig)
.assertions(global.responseTime.max.lessThan(1000)
新的DSL语言注入

通过用户、增长和延迟来配置你的场景注入剖面的方法已被拆除,取而代之的是一个完整的专用的DSL。

注入步骤现在使用注射方法配置可用的配置。

合并 users

// With Gatling 1.5.X
setUp(scn.users(10)…)

// With Gatling 2.0
setUp(scn.inject(atOnceUsers(10))…
合并 ramp

// With Gatling 1.5.X
setUp(scn.users(10).ramp(30)…)

// With Gatling 2.0
setUp(scn.inject(rampUsers(10) over (30 seconds))…
合并 delay

// With Gatling 1.5.X
setUp(scn.users(10).delay(5)…)

// With Gatling 2.0
setUp(scn.inject(nothingFor(5 seconds), atOnceUsers(10))…

新注入的DSL的更多信息,请查阅注入DSL参考文档。

核心
Checks
whatever 现在被改名为 optional.

Structure Elements

The first parameter of foreach is now an Expression (e.g. a Gatling EL string), not the name of the attribute to loop over.

foreach现在是一个表达式的第一个参数(如gatling EL string),不是遍历属性的名称。

For example, if you have a list attribute in the user’s session holding a list of values:

例如,如果您有一个属性列表在用户的会话持有的值列表:

.foreach(“list”, “elem”) {
…
}
变为:

.foreach(“${list}”, “elem”) {
…
}
In asLongAs, exitASAP now defaults to true. For more information on the change of behaviour it introduces, see asLongAs documentation.

在 asLongAs exitASAP 现在默认设置是true.有关的行为改变的更多信息介绍,请看asLongAs文档。

Session

会话已经作为主要的重构:

session.get(“foobar”) becomes session(“foobar”)
session.getTypedAttributeT becomes session(“foobar”).as[T]
session.getAttributeAsOptionT becomes session(“foobar”).asOption[T]
session.setAttribute(“foobar”, 1234) becomes session.set(“foobar”, 1234)
session.setAttributes(Map(“foo” -> 1, “bar” -> 2) becomes session.setAll(“foo” -> 1, “bar” -> 2)
session.removeAttribute(“foobar”) becomes session.remove(“foobar”)
session.isAttributeDefined(“foobar”) becomes session.contains(“foobar”)

HTTP协议
HTTP协议启动加载器、httpProtocol已经更名为HTTP。
Query 参数
移除
版本的queryParam和multivaluedQueryParam,没有其他比的关键参数(解决会话中的值,使用关键的名字找到具有相同名称的属性)已被移除。

Modified

multivaluedFormParam现在可以解决直接从会话值,使用gatling的EL。

Request bodies

Scalate templates support has been dropped.
对Scalate templates 支持已经放弃。

ElFileBody (如下) 是当前代替Scalate templates最佳方案

api的请求体的设置意境改变。现在用这几个方法来代替body fileBody byteArrayBody.现在有一个单独的方法。body(…)通过你设置的类型的body来发送。
合并 .body(body)

body(body) 已经被 .body(StringBody(body))代替.

http(“my post request”)
.post(“http://www.example.org“)
.body(“Look Ma, I’m a request body !”)
变成:

http(“my post request”)
.post(“http://www.example.org“)
.body(StringBody(“Look Ma, I’m a request body !”))

合并 .fileBody(filePath)

.fileBody(filePath) 被 .body(RawFileBody(filePath))代替.

http(“my post request”)
.post(“http://www.example.org“)
.fileBody(“my_upload.xslx”)
becomes:

http(“my post request”)
.post(“http://www.example.org“)
.body(FileBody(“my_upload.xslx”))

合并 .fileBody(filePath, values)

.fileBody(filePath, values) 已经被 .body(ElFileBody(filePath))代替.
值现在直接解决虚拟用户会话的内容。

http(“my post request”)
.post(“http://www.example.org“)
.fileBody(“my_template.txt”, Map(“userName” -> “user123”)

变为

http(“my post request”)
.post(“http://www.example.org“)
.body(ElFileBody(“my template.txt”))

如果 template.txt 包含:

Hi, my name is ${userName}

和虚拟用户的会话属性的用户名设置为user123,

然后将发送有效地请求主体:
Hi, my name is user123

合并 .byteArrayBody(byteArray)

.byteArrayBody(byteArray) 被 .body(ByteArrayBody(bytes))代替.

http(“my post request”)
.post(“http://www.example.org“)
.byteArrayBody(Array(1, 2, 3, 4))

变为:

http(“my post request”)
.post(“http://www.example.org“)
.body(ByteArrayBody(Array(1, 2, 3, 4)))

更多有关信息,请参见请求机构引用部分。

Misc
ExtendedResponse已经重命名为响应。requestInfoExtractor和responseInfoExtractor已经合并成一个单一的extraInfoExtractor,ExtraInfo => List[Any] function.。
在extraInfoExtractor的更多信息,请参阅文档。

Logs
simulation.log 被重新设计。

If you wrote your own specific simulation.log parser, you’ll need to migrate it to the new structure.
如果你写自己的simulation.log解析器,您需要它迁移到新结构

Recorder
录制器
Until now, 当你设置 Recorder时, 你必须设置两个端口记录器的当地代理:一个用于HTTP,HTTPS。 这再也不需要了, 因为record处理本身转向一个HTTPS连接如果必要,并且只需要指定一个单独的端口。

gatling官方文档翻译2

发表于 2016-06-02

第二篇
http://gatling.io/docs/2.2.1/whats_new/2.2.html

What’s New in 2.2
JDK
Gatling now requires JDK8. JVM default tuning uses G1 Garbage Collector, so we strongly advice you use a very up-to-date JDK, not early versions.

Core
Feeder Shuffle
You can now shuffle a feeder content before enqueuing its content, see Feeder documentation for more details.

Assertions
Gatling now supports “per-million” assertions, similar to “percent” ones.

Conditional Checks (since 2.2.1)
It’s now possible to only perform a given check when a given condition is met. See Conditional Checks documentation for more details.

HTTP
Native Transport
Gatling is now based on Netty 4 that provide an optional native epoll-based NIO re-implementation (different from JDK NIO) which can give better throughput. This option is only available on Linux. See Netty documentation for more details.

Gatling ships with the required jar, but the option is turned down by default.

In order to enable it, set gatling.http.ahc.useNativeTransport to true in gatling.conf.

OpenSSL Support
Netty 4 also provides a support for OpenSSL and BoringSSL. See Netty documentation for more details.

Gatling doesn’t ship the required jar and it depends on your operating system and if you want static or dynamic binding. You’re expected to manually add the suited library to Gatling’s classpath.

In order to enable it, set gatling.http.ahc.useOpenSsl to true in gatling.conf.

Forms Support
You can now use the form(“cssSelector”).saveAs(“myForm”) check to capture a Map[String, Seq[String]] of all the inputs of an HTML form at once.

You can then feed them back to a later request. See HTTP request documentation for more details.

Polling Support
Gatling now supports HTTP polling, see HTTP polling documentation for more details.

Hostname Resolution
By default, virtual users now use a shuffled list of the DNS records Gatling gets from the JDK. If you use DNS round-robin, this will balance your virtual users amongst the nodes of a static cluster.

Alternatively, you can enable perUserNameResolution on the HTTP protocol and have each virtual user perform DNS resolution on its own. This, way, your virtual users would be properly balanced if your cluster grows elastically under load. See HTTP protocol documentation for more details.

We also support DNS fail-over, meaning that virtual users will try the next DNS record of they couldn’t connect to the first address.

Hostname Aliasing
You can bypass hostname resolution and define aliases in hostNameAliases on the HTTP protocol. See HTTP protocol documentation for more details.

Local Addresses
It’s now possible to pass multiple local addresses to the HTTP protocol in localAddresses. See HTTP protocol documentation for more details.

Reports
JUnit Format Report File
Gatling now generates a JUNIt format report file based on the assertions in your simulation. This file is generated as /js/assertions.xml.

Groups Duration
You can switch from Group cumulated response times to duration when generating the reports. See gatling.charting.useGroupDurationMetric option in gatling.conf

Maven Plugin
The Gatling Maven plugin now provides test and integration-test that are bound to the phases of the same name.

It also now provides a useOldJenkinsJUnitSupport that exposes our JUnit file to Jenkins. At some point, we’ll provide a native support.

在2.2的新增了那些功能
JDK
gatling现在需要JDK8支持。 JVM默认调整使用G1垃圾收集器,因此我们强烈建议您升级到最新的JDK,而不是早期版本。

核心
Feeder Shuffle(不会翻…)
现在,You can now shuffle a feeder content before enqueuing its content,请参阅Feeder文档了解更多信息。

断言
gatling现在支持“per-million”的断言,类似于“percent”。

条件检查(自2.2.1)
现在只要当给定条件满足时就可以执行一个给定的检查。有关详细信息,请参阅条件检查文档。

HTTP
本机传输
虽然我也不知道 epoll-based NIO是什么。。。

gatling现在基于Netty 4提供一个可选的基于原生的epoll-NIO重新实现(从JDK NIO不同),它可以提供更好的吞吐量。此选项仅在Linux上可用。详见的Netty文档,了解更多信息。

gatling不需要携带需要的jar包,它取决于你的操作系统,如果你想要静态或动态绑定。你需要手动配置需要的jar的path到gatling的classpath。
加特林附带所需的jar,但默认选项是关闭的。

为了启用它,设置gatling.http.ahc。在gatling.conf useNativeTransport为true。

为了启用他,需要在gatling.conf里将 gatling.http.ahc.useOpenSsl设置为true。

表单支持
您现在可以使用的form(“cssSelector”).saveAs(“myForm”)检查捕捉Map[String, Seq[String]]在HTML表单的所有输入。

然后,您可以传递给以后的请求。见HTTP请求的文档了解更多信息。

轮训支持
gatling现在支持HTTP轮询,请参阅HTTP轮询文档了解更多信息。

hostname解析
默认情况下,, virtual users now use a shuffled list of the DNS records Gatling gets from the JDK. If you use DNS round-robin。如果您使用DNS循环,这将你的虚拟用户的静态群集的节点之间平衡。

或者,也可以在HTTP协议使用perUserNameResolution,并让每个虚拟用户自身进行DNS解析。这样,如果你的集群负载下的弹性增长时,你的虚拟用户会保持良好的平衡。见HTTP协议文档了解更多信息。

我们也支持DNS故障转移,这意味着虚拟用户会尝试下一个DNS记录,当他们无法连接到第一个地址时。

别名主机名
您可以绕过主机名解析和HTTP协议定义hostNameAliases别名。见HTTP协议文档了解更多信息。

本地地址
它现在可以将多个本地地址传递给在localAddresses HTTP协议。见HTTP协议文档了解更多信息。

报告
JUnit的格式报告文件
加特林现在根据你的模拟断言产成一个JUnit格式的报告文件。此文件将生成如/js/assertions.xml。

group持续时间
您可以切换组累计响应时间当时间生成报告时。见gatling.conf gatling.charting.useGroupDurationMetric选项

Maven插件
gatling Maven插件现在提供测试和集成测试绑定到同名的阶段。

它还现在提供一个公开的JUnit我们的文件,jenkins一useOldJenkinsJUnitSupport。在某些时候,我们将提供原生支持。

gatling官方文档翻译

发表于 2016-05-31

第一篇

http://gatling.io/docs/2.2.1/index.html

Gatling is a highly capable load testing tool. It is designed for ease of use, maintainability and high performance.

Out of the box, Gatling comes with excellent support of the HTTP protocol that makes it a tool of choice for load testing any HTTP server. As the core engine is actually protocol agnostic, it is perfectly possible to implement support for other protocols. For example, Gatling currently also ships JMS support.

The Quickstart has an overview of the most important concepts, walking you through the setup of a simple scenario for load testing an HTTP server.

Having scenarios that are defined in code and are resource efficient are the two requirements that motivated us to create Gatling. Based on an expressive DSL, the scenarios are self explanatory. They are easy to maintain and can be kept in a version control system.

Gatling’s architecture is asynchronous as long as the underlying protocol, such as HTTP, can be implemented in a non blocking way. This kind of architecture lets us implement virtual users as messages instead of dedicated threads, making them very resource cheap. Thus, running thousands of concurrent virtual users is not an issue.

Migrating from a Previous Version of Gatling
If you’re migrating from Gatling 2.1 to Gatling 2.2, please check the dedicated migration guide.
Otherwise, please follow the previous migration guides.
User’s guide
What’s New
Migration Guides
Quickstart
Advanced Tutorial
General
Session
HTTP
JMS
Realtime monitoring
Extensions
Cookbook
Information for Gatling Developers
Project Information

gatling是一个的高性能压力测试工具。它设计的初衷是易用性、可维护性和高性能。gatling开箱即用的,并且很好的支持HTTP协议,使其成为你测试任何HTTP服务器负载的工具选择之一。作为核心引擎实际上是协议无关,这是完全有可能实现并支持其他协议。例如,gatling目前还对JMS支持。

快速入门是对于最重要的概念有一个回顾,通过设置一个简单的场景的来对一个HTTP服务器完成负载测试。
在代码中定义测试场景和资源利用率两方面的需求,激励我们创造gatling。基于可表述的DSL语言,所以场景易于叙述和理解的。他们很容易维护,并且可以保存在一个版本控制系统。

gatling的架构和底层协议均采用异步方式设计。比如HTTP、可以利用一个非阻塞的方式来实现。这种架构可以让我们实现虚拟用户的消息而不是专用的线程,让他们成为非常廉价资源。因此,运行数千并发虚拟用户不是什么问题。

从之前的版本中合并gatling

如果你从gatling2.1迁移到2.2gatling,请检查专用的合并指南。否则,请安装的合并指南。

用户手册

  • 新事物
  • 合并手册
  • 快速入门
  • 高级教程
  • 通用
  • 消息
  • Http
  • JMS
  • 实时监测
  • 扩展
  • cookbook
  • gatling 开发者信息
  • 项目信息

前端测试工具集锦

发表于 2016-05-24

front-end-tools

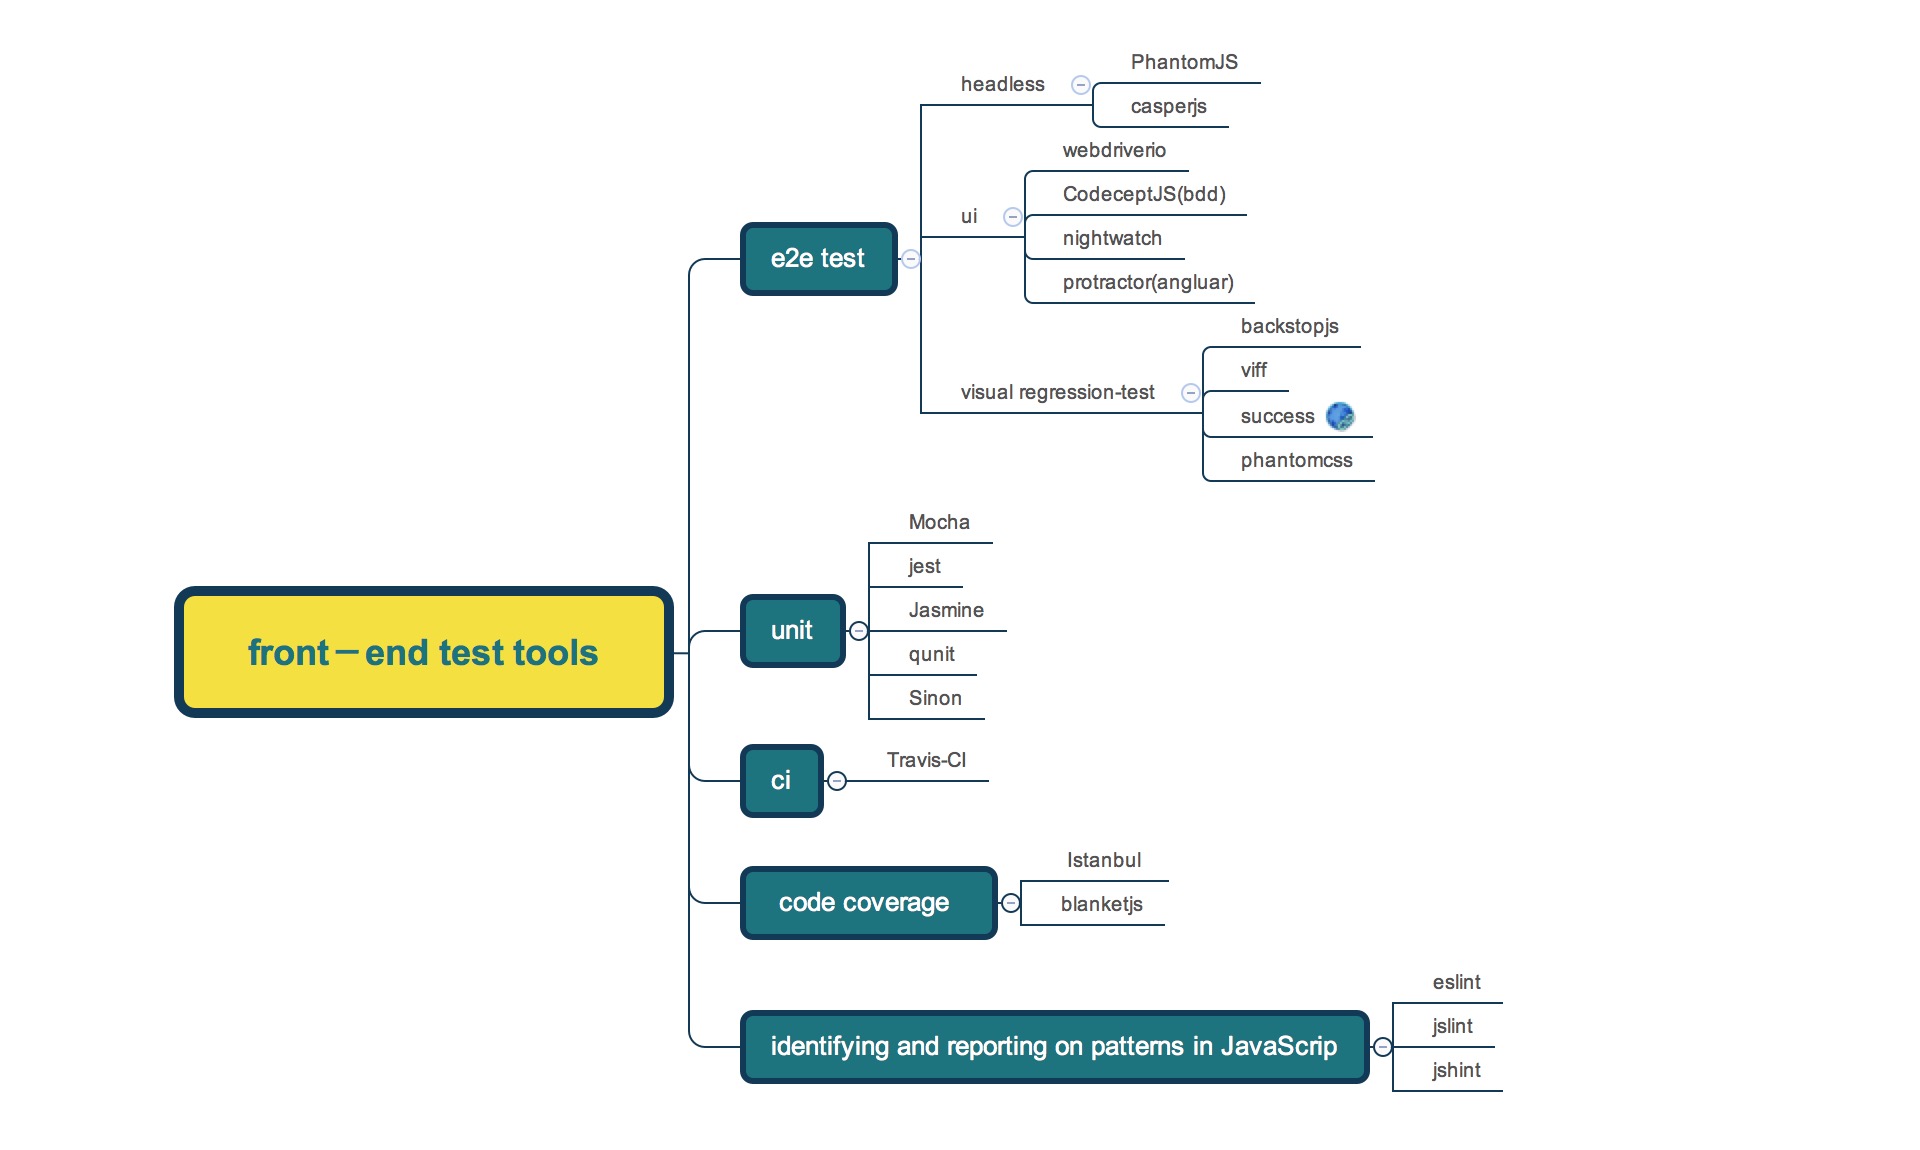
总结最近了解的前端测试的相关内容,发现前端这里真的是太庞大了,而且各种测试工具层出不穷,需要总结东西太多了,如有遗漏请大家见谅。

TDD vs BDD:

TDD与BDD概念不再描述了,直奔主题。

前端BDD测试框架

jasmine
Installation

install -g jasmine
1
2
3
4
5
```
Initializing
To initialize a project for Jasmine
```jasmine init

To seed your project with some examples

examples
1
2
3
4
```
Usage
To run your test suite
``` jasmine
1
2
3
4
5
describe("A suite", function() {
it("contains spec with an expectation", function() {
expect(true).toBe(true);
});
});

mocha(推荐,简洁明了)

Installation

Install with npm:

1
$ npm install -g mocha

Getting Started

1
2
3
$ npm install -g mocha
$ mkdir test
$ $EDITOR test/test.js

In your editor:

1
2
3
4
5
6
7
8
9
var assert = require('chai').assert;
describe('Array', function() {
describe('#indexOf()', function () {
it('should return -1 when the value is not present', function () {
assert.equal(-1, [1,2,3].indexOf(5));
assert.equal(-1, [1,2,3].indexOf(0));
});
});
});

you need to install chai.
Back in the terminal:

1
2
3
4
5
6
7
8
9
10
$ mocha
.
✔ 1 test complete (1ms)
```
### 前端TDD测试框架
Qunit
Installation

$ npm i qunit
1
2
3
4
5
6
7
8
9
10
11
12
13
14
15
16
17
18
19
20
21
22
23
24
25
26
27
28
29
30
31
32
33
34
35
36
37
38
API
http://api.qunitjs.com
Qunit是一款强大的用于帮助调试代码的,JavaScript单元测试框架。QUnit由jQuery团队成员编写,是jQuery的官方测试套件,不仅如此,QUnit还可以测试任何常规JavaScript代码,甚至可以通过一些像Rhino或者V8这样的JavaScript引擎,测试服务端JavaScript代码。
可以想象其跟jquery UI及jquery animation等库结局一样,逃脱不了各种被后来的库全方位的比较和“超越”.
## Unit Testing
Mocha && Jasmine
Mocha 跟 Jasmine 是目前最火的两个单元测试框架,基本上目前前端单元测试就在这两个库之间选了,下面是这两个库的区别,大家可以根据自己的需求进行选择:
mocha:
优点:
终端显示友好
灵活,扩展性好
缺点:
自身集成度不高(没有断言,spy,异步等),而且经常要配合Chai,Sinon等库使用
配置相对麻烦一点点
Jasmine:
优点:
集成度高,自带BBD,spy,方便的异步支持(2.0)
配置方便
缺点:
相对不太灵活
由于各种功能内建,断言方式或者异步等风格相对比较固定
没有自带mockserver, 如果需要这功能的得另外配置
jest
Jest 是Facebook的一个专门进行Javascript单元测试的工具.它是在Jasmine测试框架上演变开发而来,使用了我们熟知的expect(value).toBe(other) 这种断言格式。
First install Jest with npm by running:
npm install --save-dev jest-cli
1
2
Great! Now let's get started by writing a test for a hypothetical sum.js file:
function sum(a, b) {
  return a + b;
}
module.exports = sum;
1
Create a directory __tests__/ with a file sum-test.js:
jest.unmock('../sum'); // unmock to use the actual implementation of sum
describe('sum', () => {
  it('adds 1 + 2 to equal 3', () => {
    const sum = require('../sum');
    expect(sum(1, 2)).toBe(3);
  });
});
1
Add the following to your package.json:
"scripts": {
  "test": "jest"
}
1
Run npm test:
[PASS] __tests__/sum-test.js (0.010s)
1
2
3
4
5
6
7
8
9
10
11
12
13
14
15
16
17
18
19
20
21
22
## 代码覆盖率工具
jscover
jscover是一个用来显示JavaScript项目代码覆盖率的工具,它是继承于JSCoverage的,用C++/SpiderMonkey 取代了Java/Rhino
但是已经沦落到淘汰的边缘
Istanbul(推荐目前最强大前端代码覆盖率工具)
Istanbul 是 JavaScript 程序的代码覆盖率工具,
能产生 Statements/Lines/Functions/Branches 等指标报表,并以各种格式导出。
http://qaseven.github.io/2016/01/25/gulp_for_qa/ 这篇文章里已经详细介绍了。
blanketjs
blanketjs是一个易于安装,易于配置和易于使用的JavaScript代码覆盖库 对于nodejs和浏览器都支持的不错。
NodeJS (Powered by Mocha)
Install from npm.
npm install blanket
1
2
3
4
5
6
7
8
9
10
11
12
13
14
15
16
17
18
19
20
21
Make sure you require Blanket before you require or run any of the code you want covered
require("blanket")({ /* optional options */ }),
require("src/myscripttotest");
Run your tests using mocha and take advantage of the json-cov and html-cov reporters to output the coverage results.
## e2e test
ui
webdriverio
这个库是nodejs的一个webdriver模块(浏览器自动化)。你可以用它写超级简单Selenium测试在你最喜欢的BDD / TDD测试框架中,并且可以在本地运行或在云端中, Sauce Lab,BrowserStack或TestingBot。
webdriverio 支持 Cucumber, Jasmine and Mocha+Chai 这些测试框架
nightwatch
Nightwatch.js 是一个易于使用的,基于 Node.js 平台的浏览器自动化测试解决方案。它使用强大的 Selenium WebDriver API 来在 DOM 元素上执行命令和断言。 语法简单但很强大,使您可以快速编写测试。
只需使用 Javascript 和 CSS 选择器,不需要初始化其他对象和类,您只需要编写测试规范。内置命令行测试运行器,使您能够运行整体测试,分组测试或者单个测试。
this.demoTestGoogle = function (browser) {
browser
.url(“http://www.google.com”)
.waitForElementVisible('body', 1000)
.setValue('input[type=text]', 'nightwatch')
.waitForElementVisible('button[name=btnG]', 1000)
.click('button[name=btnG]')
.pause(1000)
.assert.containsText('#main', 'The Night Watch')
.end();
};
1
2
3
4
5
6
当涉及异步调用时,基于链式的队列是个糟糕的模式
CodeceptJS
CodeceptJS是一个基于WebDriver全新的端到端测试框架。它们从用户角度简单描述用户操作步骤来编写测试脚本
Feature('CodeceptJS Demonstration');

Scenario('test some forms', (I) => {
  I.amOnPage('http://simple-form-bootstrap.plataformatec.com.br/documentation');
  I.fillField('Email', 'hello@world.com');
  I.fillField('Password', '123456');
  I.checkOption('Active');
  I.checkOption('Male');  
  I.click('Create User');
  I.see('User is valid');
  I.dontSeeInCurrentUrl('/documentation');
});
1
2
3
4
5
protractor(angluarjs亲儿子,由angluarjs核心人物开发的e2e测试工具)
protractor 是 AngularJS 团队构建的一个端对端的测试运行工具,模拟用户交互,帮助你验证你的Angular应用的运行状况。
Protractor使用Jasmine测试框架来定义测试,当然你也可以选择其他测试框架来定义测试,如mocha。Protractor为不同的页面交互提供一套健壮的API。
var chai = require('chai');
var chaiAsPromised = require('chai-as-promised');

chai.use(chaiAsPromised);
var expect = chai.expect;

describe('angularjs 首页', function() {
  it('应该欢迎一个具名的用户', function() {
    //要求浏览器访问网址http://www.angularjs.org
    browser.get('http://www.angularjs.org');

    //找到ng-model名为'youname'的HTML元素,要求浏览器键入名字
    element(by.model('yourName')).sendKeys('tanshuai');

    var greeting = element(by.binding('yourName'));

     //取得结果并作断言测试
    expect(greeting.getText()).to.eventually.equal('Hello tanshuai!');
  });
});
1
2
3
4
5
6
7
8
9
10
11
## headless
PhantomJS
PhantomJS 是一个基于 WebKit 的服务器端 JavaScript API。它全面支持web而不需浏览器支持,其快速,原生支持各种Web标准: DOM 处理, CSS 选择器, JSON, Canvas, 和 SVG。 PhantomJS 可以用于 页面自动化 , 网络监测 , 网页截屏 ,以及 无界面测试 等。
很多其它的测试框架都是基于PhantomJS二次开发的,例如下面要讲的casperjs,nightmare
nightmare
nightmare是一个高级浏览器自动化依赖库。

var Nightmare = require(‘nightmare’);
var expect = require(‘chai’).expect; // jshint ignore:line

describe('test yahoo search results', function() {
it('should find the nightmare github link first', function*() {
  var nightmare = Nightmare()
  var link = yield nightmare
    .goto('http://yahoo.com')
    .type('form[action*="/search"] [name=p]', 'github nightmare')
    .click('form[action*="/search"] [type=submit]')
    .wait('#main')
    .evaluate(function () {
      return document.querySelector('#main .searchCenterMiddle li a').href
    })
  expect(link).to.equal('https://github.com/segmentio/nightmare');
});
});
1
2
3
4
casperjs
CasperJS 是一个开源的导航脚本和测试工具,使用 JavaScript 基于 PhantomJS 编写,用于测试 Web 应用功能,Phantom JS是一个服务器端的 JavaScript API 的 WebKit。其支持各种Web标准: DOM 处理, CSS 选择器, JSON, Canvas, 和 SVG.

var casper = require(‘casper’).create();
var fs = require(‘fs’)
casper.start(‘https://github.com/login/‘);
casper.waitForSelector(‘input.btn.btn-primary.btn-block’); // wait for the form node to be added
casper.then(function() {
this.fillSelectors(‘.auth-form-body’, {
‘#login_field’: ‘qileilove’,
‘#password’: ‘*‘
});
this.click(‘input.btn.btn-primary.btn-block’); // Click the login button instead of submitting the form
this.echo(‘Browser Cookie: ‘ + this.evaluate(function() {
return document.cookie;
}));

casper.run(function() {
  var cookies = JSON.stringify((this.page.cookies));
  fs.write('cookie.txt', cookies, 'w');
  this.exit();
});
casper.wait(3000); // Wait for ajax form submission
casper.then(function() {
  this.capture('logged-in.png')
});

casper.run();
1
2
3
4
5
6
## visual regression-test
backstopjs
BackstopJS 是自动 CSS 回归测试工具,它通过比较不同视窗大小的 DOM 截图来回应你所测试的 Web 界面。可以识别出两个不同视角上的网页差异。
"scenarios": [
  {
    "label": "My Local Test",
    "url": "../../index.html",
    "hideSelectors": [],
    "removeSelectors": [
    ],
    "selectors": [
      "nav",
      ".jumbotron",
      "body .col-md-4:nth-of-type(1)",
      "body .col-md-4:nth-of-type(2)",
      "body .col-md-4:nth-of-type(3)",
      "footer"
    ],
    "readyEvent": null,
    "delay": 0,
    "onReadyScript": null,
    "onBeforeScript": null
  }
],
1
2
3
4
5
6
7
8
9
10
11
12
13
14
15
16
viff
咱们公司的 基于selenium的,已经废了。。。 2年多没更新了
success
Succss is a command line tool built to find image-based differences between website updates. Succss relies on npm and is installed globally.
https://github.com/B2F/Succss
也一年没更新了..
phantomcss
PhantomCSS 是 CSS 回归测试工具。一个通过 PhantomJS 或者 SlimerJS 和 Resemble.js 进行自动视觉回归测试的 CasperJS 模块。
casper.
    start( url ).
    then(function(){        
// do something
        casper.click('button#open-dialog');        
// Take a screenshot of the UI component
        phantomcss.screenshot('#the-dialog', 'a screenshot of my dialog');

    });
1
2
3
4
5
6
7
8
9
10
11
12
13
14
15
16
17
18
19
20
21
22
23
24
25
26
##JavaScript验证工具
eslint
jshint
jslint
三者比较的文章
https://www.sitepoint.com/comparison-javascript-linting-tools/
## 前端mock工具
Mock.js
 Mockjs是个能够拦截页面ajax请求并模拟返回数据的小工具,借助Mockjs,前端开发中在后台测试接口还没有给的时候就可以自己拦截请求模拟数据进行愉快的开发了,所以只要制定好了协议,前后端分离开发的成本可以降到基本为0,也不需要联调工具了。
sinon.js
为Javascript提供独立的spies,stubs和mocks。没有任何依赖,可以与任何单元测试框架协同工作。
## api测试工具
SuperTest
基于SuperAgent ,提供对HTTP测试的高度抽象.
能嵌入各类测试框架,提供语义良好的断言.
var app = require('../app');
var request = require('supertest');

describe('router testing', function () {
    it('site root response', function (done) {
        request(app)
            .get('/')
            .expect('Content-Type', 'text/html; charset=utf-8')
            .expect(200)
            .end(function(err, res){
                if (err) throw err;
                done();
            });
    });

```
利用Mocha + Chai + SuperTest就可以搭建一套 前端rest-api测试框架

appium并发测试

发表于 2016-05-05

appium 介绍

Appium 是一个开源的,跨平台的自动化测试工具。 它支持模拟器(iOS,FirefoxOS,Android)和真机(iOS, Android, FirefoxOS)上的原生应用,混合应用和移动 web 应用。

appium 工作原理

appium

Android

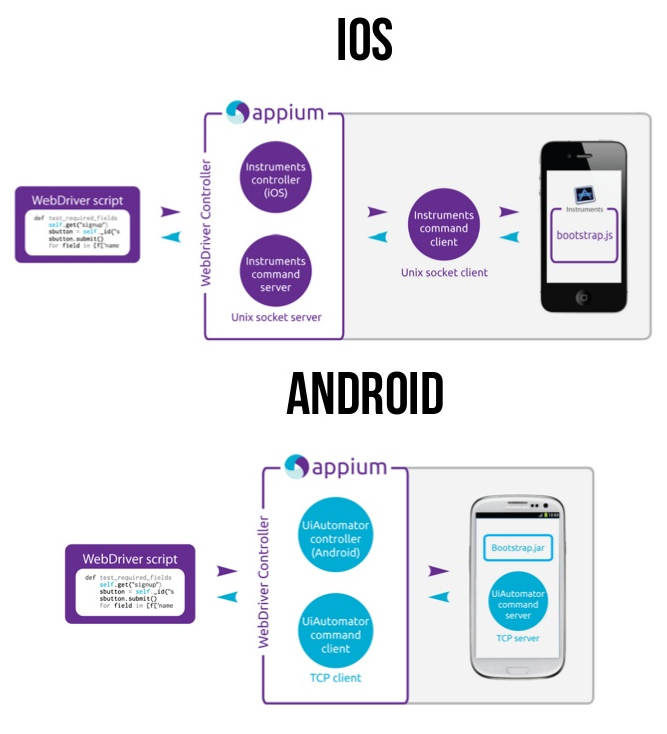
在Android端,appium基于WebDriver协议,利用Bootstrap.jar,最后通过调⽤用UiAutomator的命令,实现App的自动化测试。

UiAutomator测试框架是Android SDK自带的App UI自动化测试Java库。

另外由于UiAutomator对H5的支持有限,appium引入了chromedriver以及safaridriver等来实现基于H5的自动化。

appium 在android端工作流

  1. client端也就是我们 test script是我们的webdriver测试脚本。

  2. 中间是起的Appium的服务,Appium在服务端起了一个Server(4723端口),跟selenium
    Webdriver测试框架类似, Appium⽀持标准的WebDriver JSONWireProtocol。在这里提供它提供了一套REST的接口,Appium Server接收web driver client标准rest请求,解析请求内容,调⽤用对应的框架响应操作。

  3. appium server会把请求转发给中间件Bootstrap.jar ,它是用java写的,安装在手机上.
    Bootstrap监听4724端口并接收appium 的命令,最终通过调⽤用UiAutomator的命令来实现。

  4. 最后Bootstrap将执行的结果返回给appium server。

  5. appium server再将结果返回给 appium client。

    ios

    在IOS端,appium同样使⽤WebDriver的一套协议。

与Android端测试框架不同的是,appium ios封装了apple的 Instruments框架,主要用了Instrument里的UI Automation(Apple的⾃自动化测试框架),然后在设备中注⼊入bootstrap.js进⾏行监听。

appium 在ios端工作流

  1. client端 依然是 test script是我们的webdriver测试脚本。

  2. 中间是起的Appium的服务,Appium在服务端起了一个Server(4723端口),跟selenium
    Webdriver测试框架类似, Appium⽀持标准的WebDriver JSONWireProtocol。在这里提供它提供了一套REST的接口,Appium Server接收web driver client标准rest请求,解析请求内容,调⽤用对应的框架响应操作。

  3. appium server调用instruments.js 启动⼀一个socket server,同时分出一个⼦子进程运⾏instruments.app,将bootstrap.js(一个UIAutomation脚本)注⼊入到device⽤于和外界进行交互

  4. 最后Bootstrap.js将执行的结果返回给appium server

  5. appium server再将结果返回给 appium client。

所以我们可以看到android与ios区别在于appium 将请求转发到bootstrap.js或者bootstrap.jar.然后由bootstrap 驱动UIAutomation和UiAutomator去devices上完成具体的动作。

appium 并发

appium bingfa

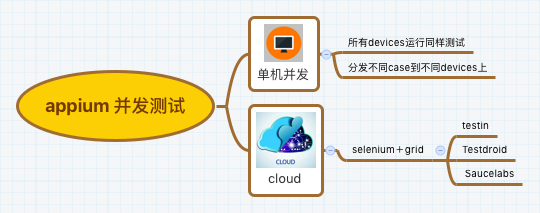
关于appium并发,我将之分为2类,第一类单机并发。第二类基于selenium grid 多节点并发测试,也可称之为云测。

appium 单机并发

Android并发测试
Appium提供了在一台设备上启动多个Android会话的方案。

appium -p 4492 -bp 2251 -U 32456

启动多个Android会话的重要指令包括:

指令 功能
-p Appium的主要端口
-U 设备id
-bp Appium bootstrap端口
–chromedriver-port chromedriver端口(当使用了webviews或者chrome)
–selendroid-port selendroid端口(当使用了selendroid)

iOS并发测试

不幸的是,IOS不能进行本地并发测试。跟Android不一样,IOS在同一时间只能启动一个版本的模拟器来运行多个测试。

总结:
单机并发目前只能在android实现,且必须启动n个appium server 对应不同devices,这里devices可以是真机或模拟器。但是必须保证端口后没有重复使用。
接下来工作就是利用测试框架(testng,jasmine,rspec,cucumber等)将测试分发到不同appium server上。

代码示例

github

代码解析:

  1. 首先让我们来看下代码中的AppiumParallelTest这个类,他们先判断操作系统,并获取操作系统上连接的devices。
    利用AndroidDeviceConfiguration.java 与 IOSDeviceConfiguration.java 中的getIOSUDID,getDevices方法分别获取真机与模拟器的id.

  2. 然后利用startAppiumServer方法启动appium server, 利用appiumServerForAndroid()或者appiumServerForIOS().

  3. aa

appium grid 分布式并发

  1. start selenium grid sever

    1
    java -jar selenium-server-standalone-2.47.1.jar -port 4444 -role hub -hub http://192.168.199.140:4444/grid/registe
  2. Registered appium server as the grid node

    1
    appium --nodeconfig appium_node_S3.json -p 4823 -bp 3356 -U "192.168.99.104:5555" --chromedriver-port 4738
  3. Configure the test script,run the tests

    1
    2
    3
    4
    5
    6
    7
    8
    9
    @BeforeTest
    @Parameters({"deviceName"})
    public void setUp(String deviceName) throws Exception {
    capabilities.setCapability("deviceName",deviceName);
    capabilities.setCapability("platformVersion", "5.0");
    capabilities.setCapability("app", getApp("ContactManager.apk"));
    setUpAndroidDriver();
    }

GRID NODE CONFIGURATION EXAMPLE JSON FILE

1
2
3
4
5
6
7
8
9
10
11
12
13
14
15
16
17
18
19
20
21
22
23
24
25
{
"capabilities":
[
{ "deviceName": "192.168.56.101:5555",
"browserName": "<e.g._iPhone5_or_iPad4>",
"version":"<version_of_iOS_e.g._7.1>",
"maxInstances": 1,
"platform":"<platform_e.g._MAC_or_ANDROID>"
}
],
"configuration":
{
"cleanUpCycle":2000,
"timeout":30000,
"proxy": "org.openqa.grid.selenium.proxy.DefaultRemoteProxy",
"url":"http://<host_name_appium_server_or_ip-address_appium_server>:<appium_port>/wd/hub",
"host": <host_name_appium_server_or_ip-address_appium_server>,
"port": <appium_port>,
"maxSession": 1,
"register": true,
"registerCycle": 5000,
"hubPort": <grid_port>,
"hubHost": "<Grid_host_name_or_grid_ip-address>"
}
}

未完待续

前端性能分析优化

发表于 2016-02-23

分析问题

我们并不仅仅关注页面资源的解析和展示响应时间,而是要关注总时间;我们进行web前端性能测试的目的是计算出包含页面渲染、网络传输以及服务器端解析等综合因素在内的加载时间等指标,对该页面性能进行评估分析,找出影响性能的主要因素和瓶颈,并在此结果的基础上,给出一定的优化建议和解决方案,从而提升用户体验。

根据雅虎团队经验:网站页面性能优化的34条黄金守则,我们逐条分析。

性能黄金法则

只有10%-20%的最终用户响应时间花在接收请求的HTML文档上,剩下的80%-90%时间花在HTML文档所引用的所有组件(图片,script,css,flash等等)进行的HTTP请求上。

  1. 尽量减少HTTP请求次数

    • 合并文件.

      例如将项目中用的资源文件合并。所有的CSS文件都放入一个样式表中.或者将js文件合并压缩

      利用gulp,grunt,webpack等构建工具将项目资源文件整合

    • 利用CSS Sprites 减少图像请求.

      通过使用合并图片,通过指定css的backgroud-image和backgroud-position来显示元素。

  2. 启用浏览器缓存

    • 要利用浏览器缓存存储可缓存的资源

      在HTTP标头中为静态资源设置有效期或最长存在时间,可指示浏览器从本地磁盘中加载以前下载的资源而不是从网络中加载。

  3. 减少DNS查找

    • DNS缓存

      当客户端的DNS缓存为空时,DNS查找的数量与Web页面中唯一主机名的数量相等。减少唯一主机名的数量就可以减少DNS查找的数量。

  4. 使用内容分发网络

    • 页面静态化,取决于发布系统

      按页面内容划分域名,在合适的资源服务器上存放文件

  5. 避免404错误

    • 避免内部无效的链接
  6. 避免重定向

  7. 压缩组件

  8. 精简Javascript和Css

  9. 尽量缩减页面大小

    • 页面必须小于150K(不含图片)

      a) 静态文件是否gzip

      b) 图片是否压缩优化过

  10. 预处理

    • 浏览器空闲时请求将来可能会用到的页面内容

    无条件加载:触发onload事件时,直接加载额外的页面内容

    有预期的加载:载入重新设计过的页面时使用预加载。

  11. 移除重复脚本

  12. 使iframe的数量最小

    • 异步加载
  13. js 开发规范

    • 代码逻辑分层
    • 避免全局变量
    • 便于多人协作开发
    • 各部分代码模块化,可以按需加载 利用requirejs和seajs等模块化工具加载
    • 保持全局变量的清洁
    • 可进行单元测试

参考

yahoo前端性能优化指南中文版

yahoo前端性能优化指南

前端性能测试之分析篇

发表于 2016-02-23

引言

前一章,我们讲了browser的工作原理,那么怎么样才能让了解整个主站前端的性能呢?监控! 对,是的,我们可以利用各种工作对我们的website进行实时的监控,目前监控的方式有两种。

类型 优点 缺点 示例
非侵入式 指标齐全、客户端主动监测、竞品监控 无法知道性能影响用户数、采样少容易失真、无法监控复杂应用与细分功能 Pagespeed、yslow、PhantomJS、webpagetest、sitespeedio
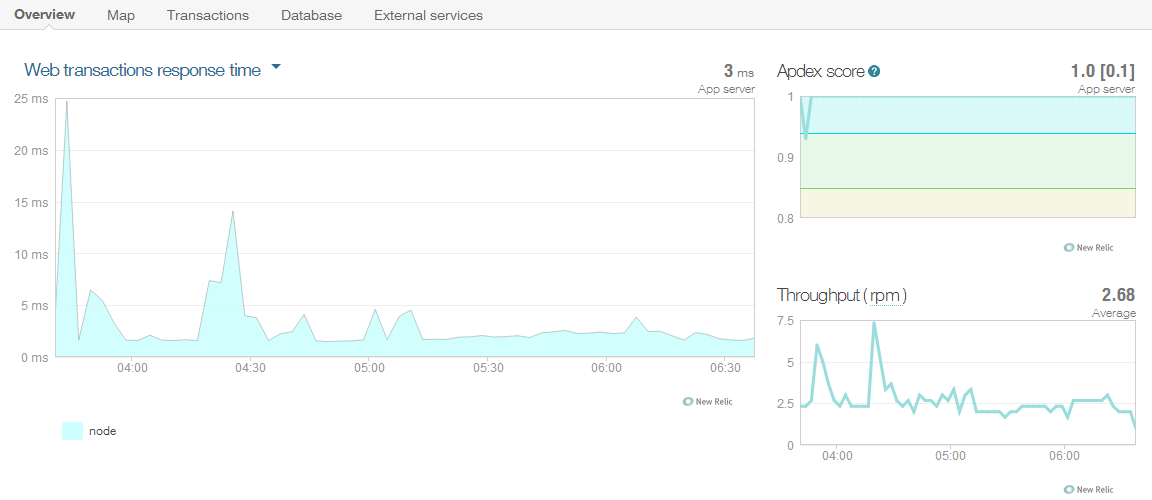
侵入式 真实海量用户数据、能监控复杂应用与业务功能、用户点击与区域渲染 需插入脚本统计、网络指标不全、无法监控竞品 new relic、Google analyse、oneapm

前端性能分析工具

那有哪些简易便利的工具能帮助我们更好的进行测试呢?
ok,工具集锦来临。

浏览器插件类

  1. FireBug
    它可以对页面进行调试,可以记录所有网页的访问耗时,下载的资源等
  2. Page Speed
  3. Yslow
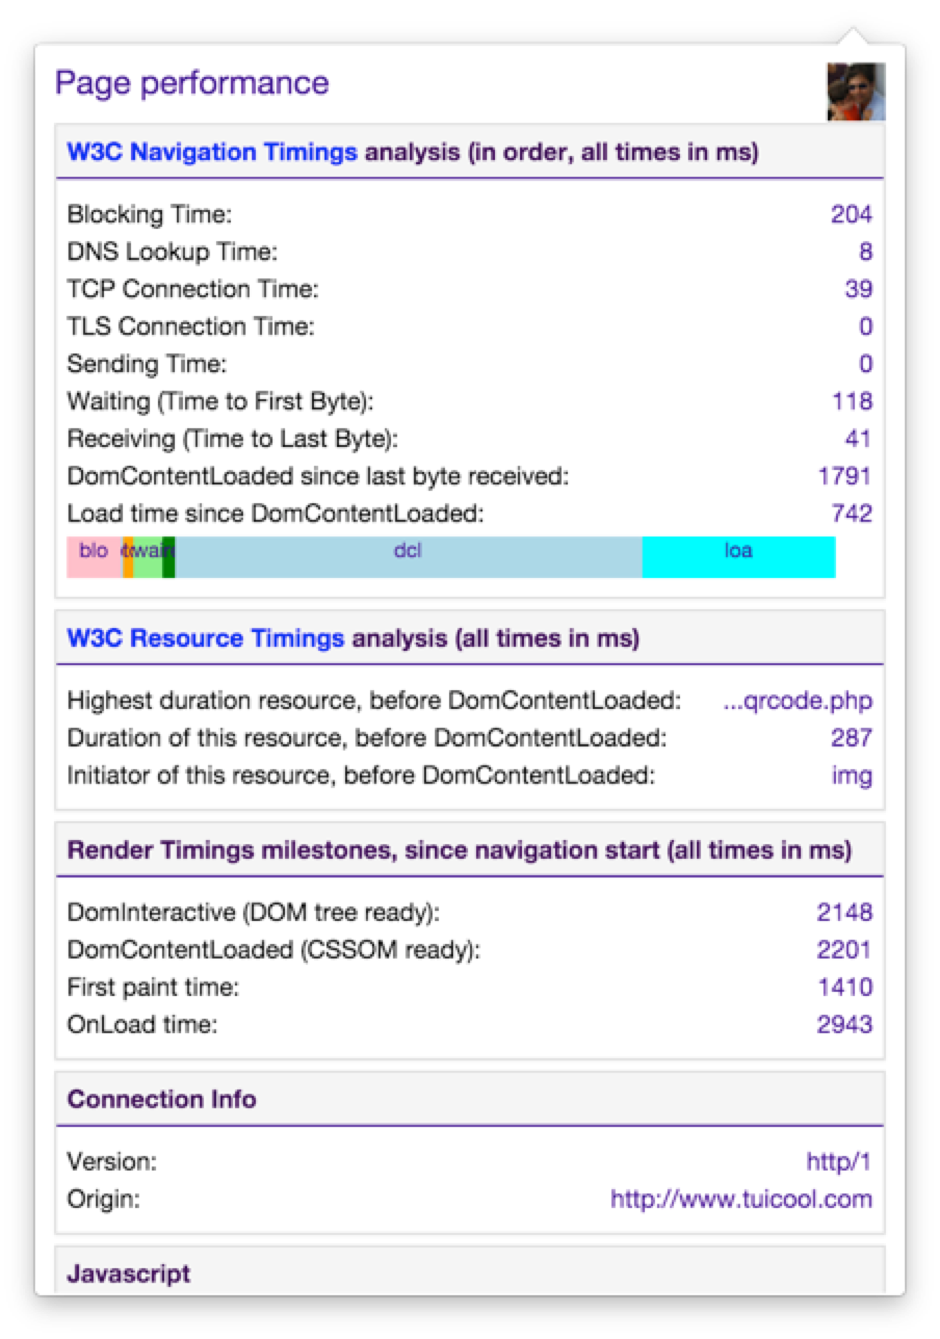
  4. page performance
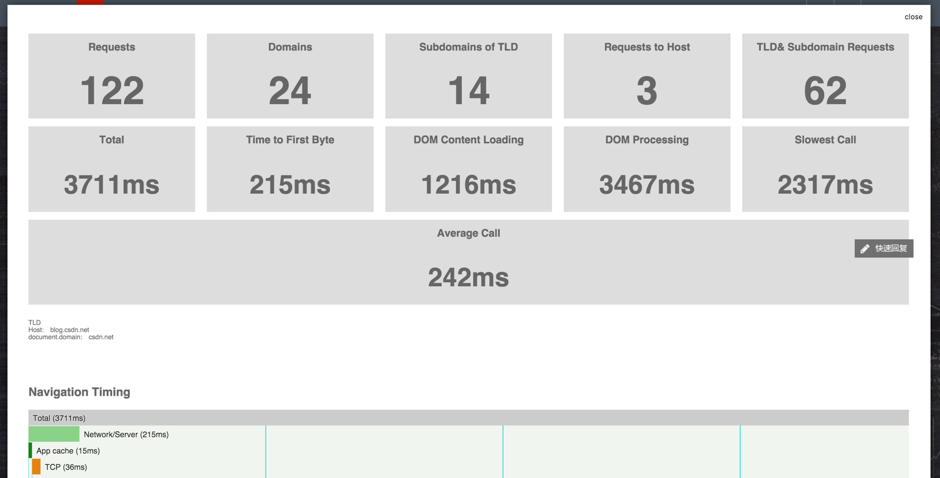
  5. performance analyse

在线网站类

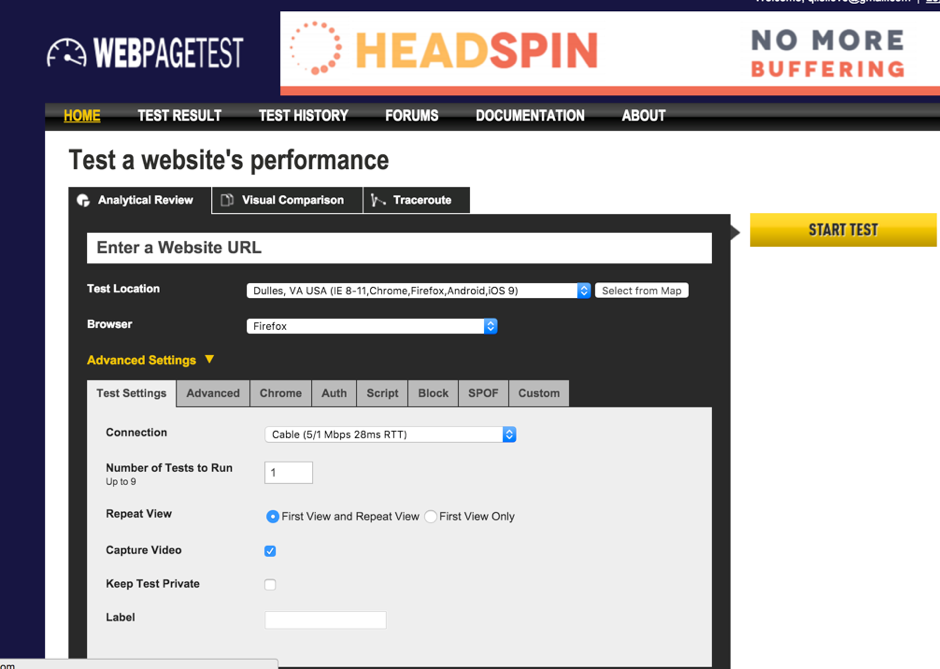
  1. WebPageTest
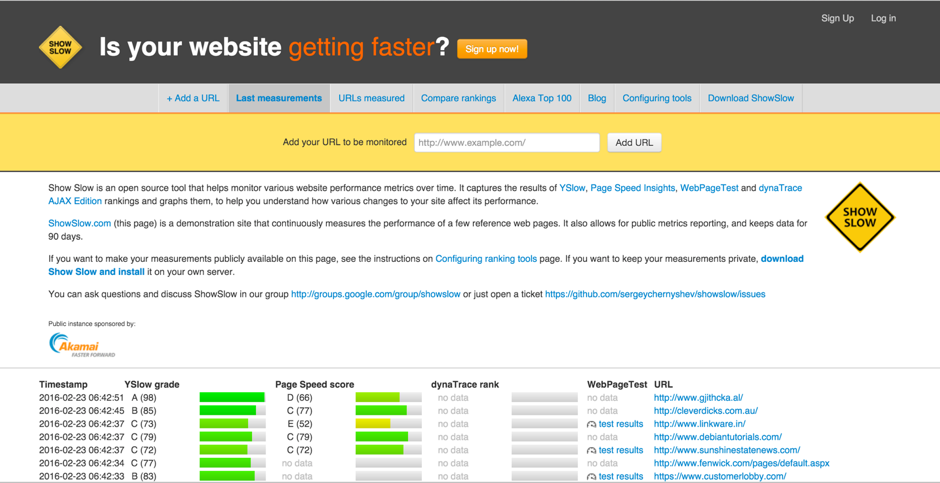
  2. showslow
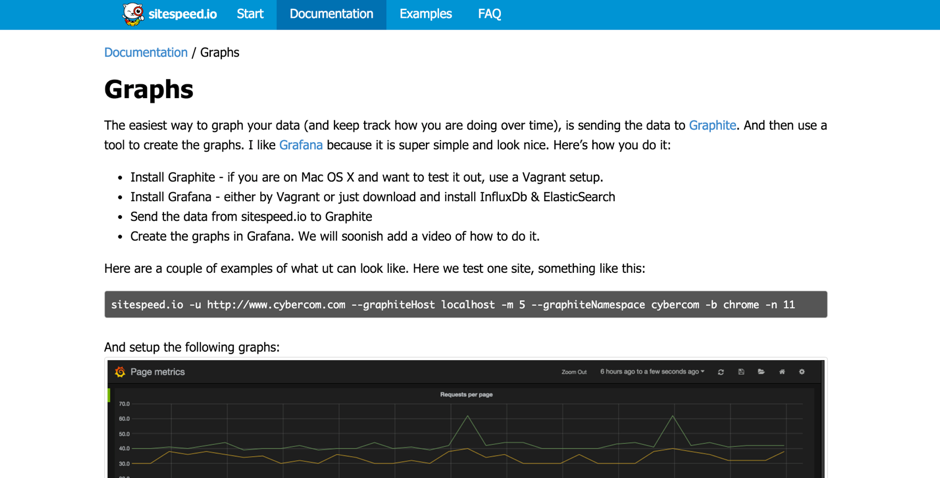
  3. sitespeed.io

    平台类

    收费服务平台

  4. google_analytics

  5. new relic
  6. oneapm

开源平台

  1. InfluxDB + Grafana
    参考文章

InfluxDB + Grafana 快速搭建自己的 NewRelic,分析应用运行情况
OBIEE Monitoring and Diagnostics with InfluxDB and Grafana

  1. Nagios
  2. Zabbix

前端性能测试分析

发表于 2016-02-23

原理篇

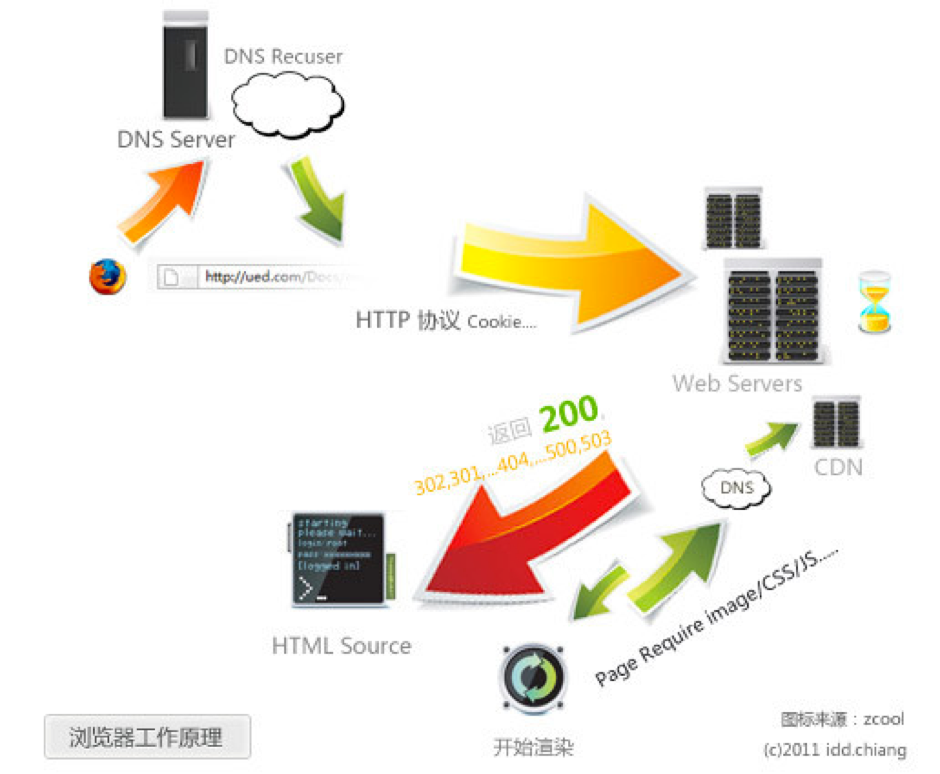
browser工作原理

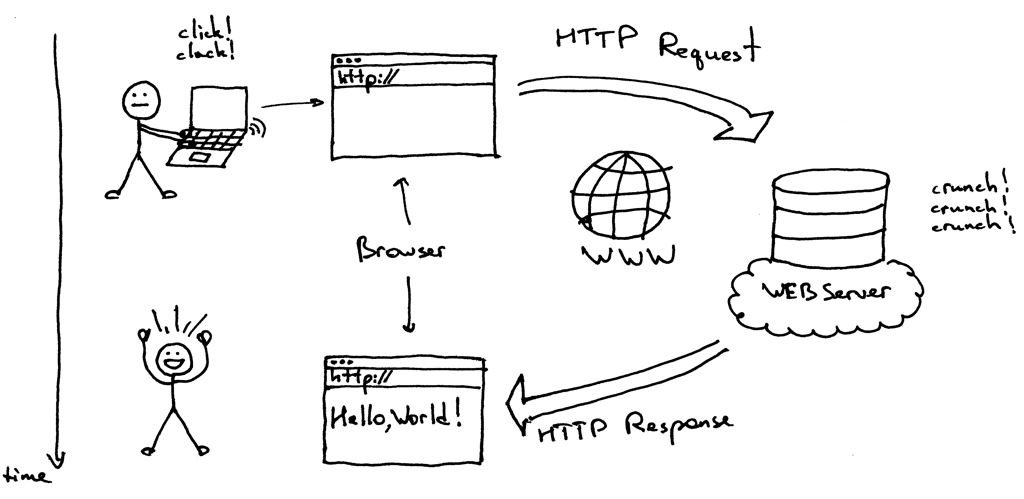
web浏览器与web服务器之间通过HTTP协议进行通信的过程。所以,web C/S之间握手的协议就是HTTP协议。

页面的请求过程

请求阶段

  1. browser send url request

  1. 递归寻找DNS server

  1. 连接目标IP并建立TCP连接

  2. 向目标服务器发送http请求

  3. web服务器接收请求后处理

  4. web服务器返回相应的结果【无效、重定向、正确页面等】

  5. 浏览器接收返回的http内容

前端解析阶段

渲染引擎—通过网络获得所请求文档的内容, 解析html以构建dom树->构建render树->布局render树->绘制render树

  1. 开始解析html文件,当然是自上而下,先是头部,后是body

  2. 当解析到头部css外部链接时,同步去下载,如果遇到外部js链接也是下载【不过js链接不建议放在头部,因为耽误页面第一展现时间】

  3. 接着解析body部分,边解析边开始生成对应的DOM树,同时等待css文件下载

  4. 一旦css文件下载完毕,那么就同步去用已经生成的DOM节点+CSS去生成渲染树

  5. 渲染树一旦有结构模型了,接着就会同步去计算渲染树节点的布局位置

  6. 一旦计算出来渲染的坐标后,又同步去开始渲染

  7. 4-6步进行过程中如果遇到图片则跳过去渲染下面内容,等待图片下载成功后会返回来在渲染原来图片的位置

  8. 同7步,如果渲染过程中出现js代码调整DOM树结构的情况,暂停其它渲染,再次重新来过,从修改DOM那步开始

  9. 最终所有节点和资源都会渲染完成

    分析结束

  10. 渲染完成后开始page的onload事件

  11. 整个页面load完成

    参考

浏览器工作原理

前端测试进化论2

发表于 2016-01-26

前端测试进化论2

=============

说完了,前端技术的发展史,那么对应的前端测试发展史也随之发展。

石器时代——纯手工测试

早期的页面基本都是静态化的页面,只有几个链接或者图片,那么相对测试工作量不大,只需要我们打开页面查看加载是否正确。

铁器时代–xunit

到了javascript时代,随着其他语言xunit 风靡天下,js 也出现了它的xunit 框架。

Jsunit,以往在测试js的时候,都是以alert方式来检测错误,很不专业。

2001年 jsunit 出现,让js调试称为可能。

Jsunit 主要参考junit的设计,只要你会使用junit 那么jsunit 对你来说,根本不是什么事,具体使用参考

http://llying.iteye.com/blog/258605
DEMO:

测试代码

1
2
3
4
5
6
7
8
9
10
11
12
13
14
15
16
17
18
19
20
21
22
23
24
25
26
27
28
29
30
31
32
33
34
35
36
37
38
39
40
41
42
43
44
45
46
47
48
49
50
51
52
<!DOCTYPE HTML PUBLIC "-//W3C//DTD HTML 4.0 Transitional//EN">
<HTML>
<HEAD>
<TITLE>testHtml</TITLE>
</HEAD>
<script type="text/javascript" src="myjs.js"></script>
<script type="text/javascript" src="jsunit\app\jsUnitCore.js"></script>
<script type="text/javascript">
<!--
function testAdd(){
var result = add(arg1,arg2);
warn("result", result);
debug("result", result);
info("result", result);
assertEquals(6,result);
}
function testMinus(){
var result = minus(arg1,arg2)
assertEquals(2,result);
}
function testMultiply(){
var result = multiply(arg1,arg2)
assertEquals(8,result);
}
function testDivide(){
var result = divide(arg1,arg2)
assertEquals("4 divide 2 is 2",2,result);
}
function setUpPage(){
arg1 = 4;
arg2 = 2;
setUpPageStatus = "complete";
}
function exposeTestFunctionNames(){
var tests = new Array();
tests[0]="testAdd";
tests[1]="testMinus";
tests[2]="testMultiply";
return tests;
}
//-->
</SCRIPT>
<BODY>
</BODY>
</HTML>

测试驱动

1
2
3
4
5
6
7
8
9
10
11
12
13
14
15
16
17
18
19
20
21
22
23
24
25
26
27
28
29
30
<!DOCTYPE HTML PUBLIC "-//W3C//DTD HTML 4.0 Transitional//EN">
<HTML>
<HEAD>
<TITLE>suit test</TITLE>
</HEAD>
<script type="text/javascript" src="jsunit\app\jsUnitCore.js"></script>
<script type="text/javascript">
<!--
function suite()
{
var testSuite = new top.jsUnitTestSuite();
//增加的测试页面的路径是相对于测试运行器的路径的(testRunner.html),而不是相对于当前的页面
testSuite.addTestPage("../mytest1.html");
//套件里还可以在包含套件
testSuite.addTestSuite(Suite2());
return testSuite;
}
function Suite2() //需要与suite定义在同一个页面中
{
var testSuite = new top.jsUnitTestSuite();
testSuite.addTestPage("../mytest2.html");
return testSuite;
}
//-->
</SCRIPT>
<BODY>
</BODY>
</HTML>

http://www.jsunit.net/

工业革命–ajax流行

随着ajax的流行,jquery框架在前端开发中的普及,让开发者看到了前端的新纪元,
jquery 团队也为广大开发人员开发了Qunit.QUnit 是一款强大而且容易使用的JavaScript 测试框架,它被用于jQuery 与其插件的测试,同时它也同样可以测试普通的JavaScript 代码.

TDD的时代来临 QUnit框架版本

将要被测试的代码需要添加到myProject.js中,并且你的测试用例应该插入到myTest.js。要运行这些测试,只需在一个浏览器中打开这个html文件。现在需要写一些测试用例了。

1
2
3
4
5
6
7
8
9
10
11
12
13
14
15
16
17
18
19
<!DOCTYPE html>
<html>
<head>
<title>QUnit Test Suite</title>
<link rel="stylesheet" href="http://github.com/jquery/qunit/raw/master/qunit/qunit.css" mce_href="http://github.com/jquery/qunit/raw/master/qunit/qunit.css" type="text/css" media="screen">
<mce:script type="text/javascript" src="http://github.com/jquery/qunit/raw/master/qunit/qunit.js" mce_src="http://github.com/jquery/qunit/raw/master/qunit/qunit.js"></mce:script>
<!-- Your project file goes here -->
<mce:script type="text/javascript" src="myProject.js" mce_src="myProject.js"></mce:script>
<!-- Your tests file goes here -->
<mce:script type="text/javascript" src="myTests.js" mce_src="myTests.js"></mce:script>
</head>
<body>
<h1 id="qunit-header">QUnit Test Suite</h1>
<h2 id="qunit-banner"></h2>
<div id="qunit-testrunner-toolbar"></div>
<h2 id="qunit-userAgent"></h2>
<ol id="qunit-tests"></ol>
</body>
</html>

参考
http://www.cnblogs.com/nuaalfm/archive/2010/02/26/1674235.html
http://qunitjs.com/

现代化技术-BBD

紧着angluar react 等框架大行其道的同时,bdd也在开发中兴起,基于bdd的测试框架开始在前端如雨后春笋般冒出,jasmine,mocha,karma都是其中的代表,但是各得其道,到底谁好,没惹能说得清楚。但google 在前端测试的贡献,绝对是业界良心。


http://jasmine.github.io/


https://karma-runner.github.io/0.13/index.html


https://mochajs.org/

这些框架本人就不举列子了,会在以后的篇章里面一一介绍。

前端的未来

未来,我希望有一种框架能够解救苦逼的qa,简单的语法与api,使得我们能够处理所有前端框架而不用考虑控件问题,良好的性能,支持并发,跑ui和单元测试都在秒级,当然越快越好,最好能够自动更新ui自动化中页面对象的路径等等。也许只是个梦。Qa 还需努力。

1…345
seven

seven

小qa 在thoughtworks苦苦挣扎中

42 日志
16 标签
RSS
© 2017 seven
由 Hexo 强力驱动
主题 - NexT.Pisces