QA seven's blog


  • 首页

  • 分类

  • 关于

  • 归档

  • 标签

espresso系列3--测试实践

发表于 2016-12-08

前言

前2篇我们已经详细介绍了espresso的架构以及相应的API,相信大家也有了一定的了解,理论讲的再多,还是不如手上自己敲一遍代码。
还是深入浅出系列的套路,让我这个小司机带大家一步一步进入espresso的世界吧。

环境准备

github
github,如果你还用svn的话,请放弃阅读本系列文章,太low了,而且本系列的code都是采用google官方的espresso的demo,都来源于github。
android studio
android studio,这个不用说,目前android开发者最好的工具,并且他有很多帮助espresso测试的插件或功能,比如录制功能等。
android sdk
android sdk,这个更不用说,如果你连这个都没,还学什么android。
genymotion
genymotion,android目前来说最好的模拟器,虽然原生的也很不错,但是开发者首先得还是genymotion

首先使用android studio创建项目

最好你已经拥有了项目源码,espresso并不是单纯的黑盒ui测试工具,它能干得事情很多,包括单元测试,集成测试,甚至在mock服务,以及将你需要的内容注入到代码中,所以我把称为灰盒工具。
如果之前没有做个android项目的话,也可以在github上找一些开源的android app 练手。不过建议大家从espresso demo库入手。

创建项目

android_studio

如上图,我们可以创建新的项目,导入已经存在android项目,从版本管理软件中导入,从gradle等其他工具中导入,以及获取android代码样例导入。
google android 所有的测试demo都在以下github地址
https://github.com/googlesamples/android-testing.git
下载完成后,我们进入espresso目录,可以看到espresso的demo还是很丰富的。

1
2
3
4
5
6
7
8
9
10
11
12
13
14
15
16
17
# lqi @ CNlqi-3 in ~/work/test/android/android-testing on git:master x [0:19:24]
$ cd ui/espresso
# lqi @ CNlqi-3 in ~/work/test/android/android-testing/ui/espresso on git:master x [0:19:31]
$ ls
BasicSample CustomMatcherSample EspressoSpoonDemo IntentsAdvancedSample MultiWindowSample WebBasicSample
BasicSampleBundled DataAdapterSample IdlingResourceSample IntentsBasicSample RecyclerViewSample spoon-gradle-plugin
# lqi @ CNlqi-3 in ~/work/test/android/android-testing/ui/espresso on git:master x [0:19:37]
$ cd BasicSample
# lqi @ CNlqi-3 in ~/work/test/android/android-testing/ui/espresso/BasicSample on git:master x [0:19:40]
$ pwd
/Users/lqi/work/test/android/android-testing/ui/espresso/BasicSample
# lqi @ CNlqi-3 in ~/work/test/android/android-testing/ui/espresso/BasicSample on git:master x [0:20:42]
$

导入项目

选择BasicSample导入或者直接命令行studio .打开该项目。
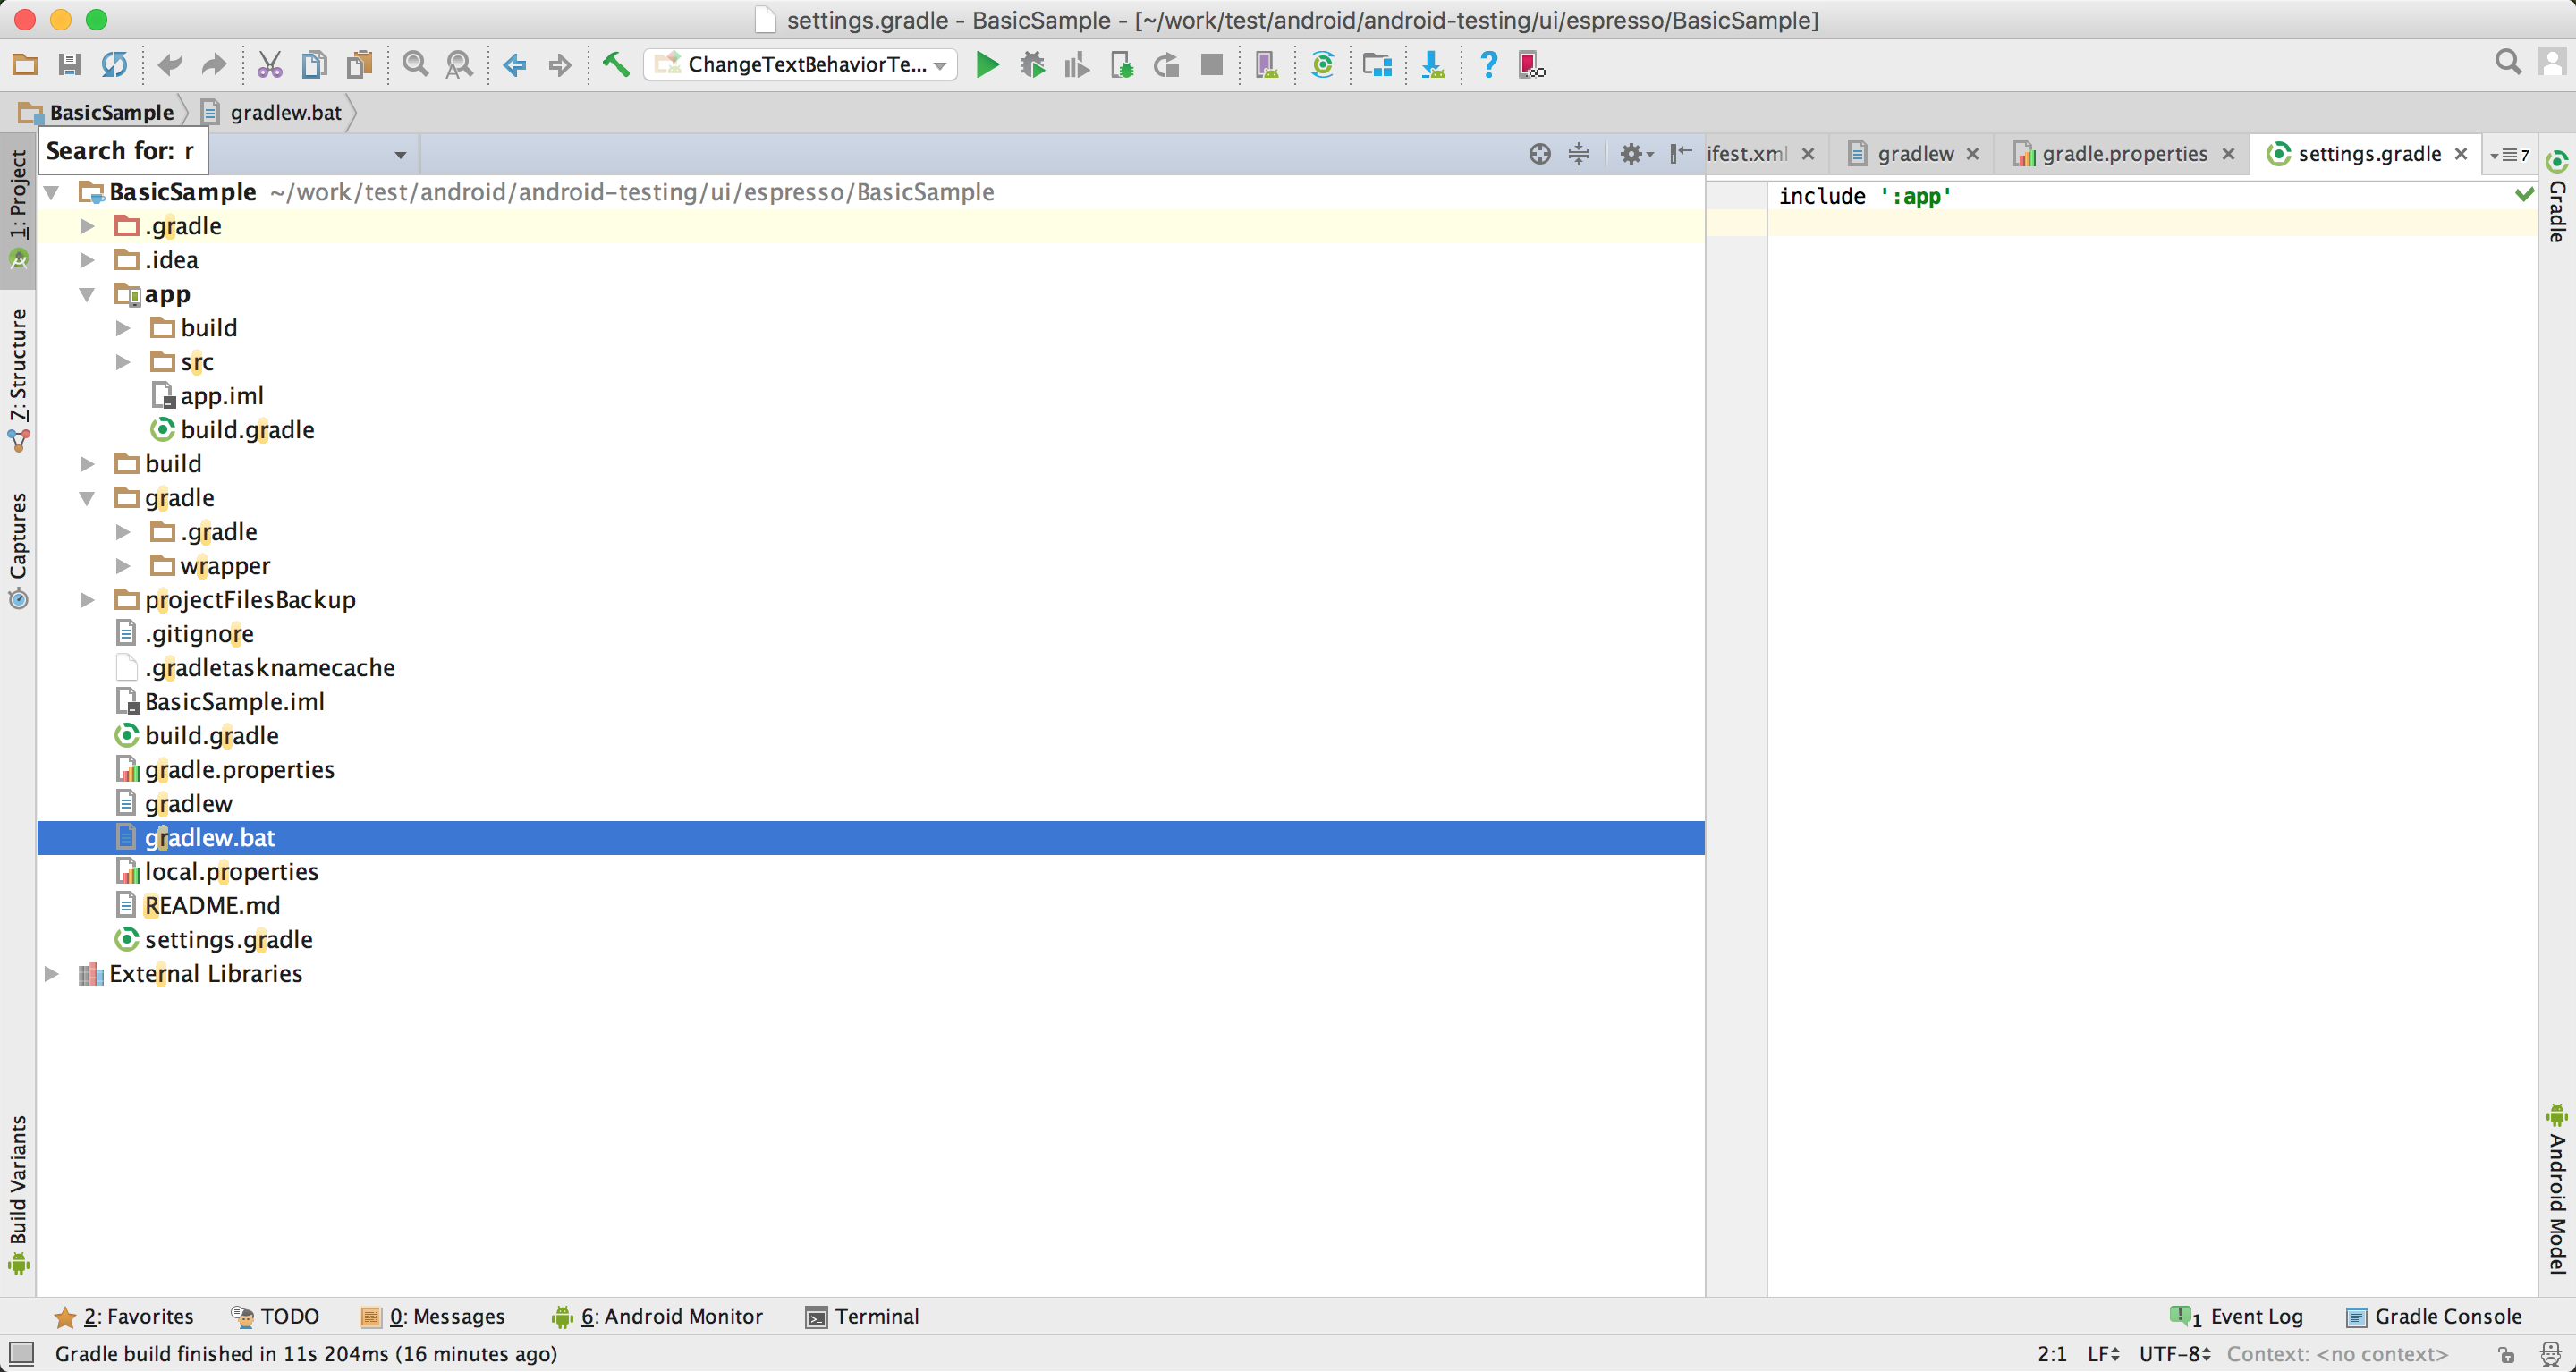
android_menu·
外层的build.gradle文件设置的是整个项目的一些配置,例如依赖的类库,远程的仓库repositories。编译器的版本,espresso的版本等。

1
2
3
4
5
6
7
8
9
10
11
12
13
14
15
16
17
18
19
20
21
22
23
24
25
26
27
// Top-level build file where you can add configuration options common to all sub-projects/modules.
buildscript {
repositories {
jcenter()
}
dependencies {
classpath 'com.android.tools.build:gradle:2.1.2'
// NOTE: Do not place your application dependencies here; they belong
// in the individual module build.gradle files
}
}
allprojects {
repositories {
jcenter()
}
}
ext {
buildToolsVersion = "24.0.1"
supportLibVersion = "24.2.0"
runnerVersion = "0.5"
rulesVersion = "0.5"
espressoVersion = "2.2.2"
}

目录结构

app目录为项目主目录包含项目源代码以及测试代码
app里面也包含build.gradle文件,有时候项目可能包含几个主目录,那么各个目录的下的build.gradle文件都继承自顶层的build.gradle文件。
app下的build.gradle文件配置了android的配置信息,以及会用到的依赖。

1
2
3
4
5
6
7
8
9
10
11
12
13
14
15
16
17
18
19
20
21
22
23
24
25
26
27
28
29
30
31
apply plugin: 'com.android.application'
android {
compileSdkVersion 24
buildToolsVersion rootProject.buildToolsVersion
defaultConfig {
applicationId "com.example.android.testing.espresso.BasicSample"
minSdkVersion 10
targetSdkVersion 24
versionCode 1
versionName "1.0"
testInstrumentationRunner "android.support.test.runner.AndroidJUnitRunner"
}
lintOptions {
abortOnError false
}
productFlavors {
}
}
dependencies {
// App dependencies
compile 'com.android.support:support-annotations:' + rootProject.supportLibVersion;
compile 'com.google.guava:guava:18.0'
// Testing-only dependencies
// Force usage of support annotations in the test app, since it is internally used by the runner module.
androidTestCompile 'com.android.support:support-annotations:' + rootProject.supportLibVersion;
androidTestCompile 'com.android.support.test:runner:' + rootProject.runnerVersion;
androidTestCompile 'com.android.support.test:rules:' + rootProject.rulesVersion;
androidTestCompile 'com.android.support.test.espresso:espresso-core:' + rootProject.espressoVersion;
}

BasicSample APP就长样子。
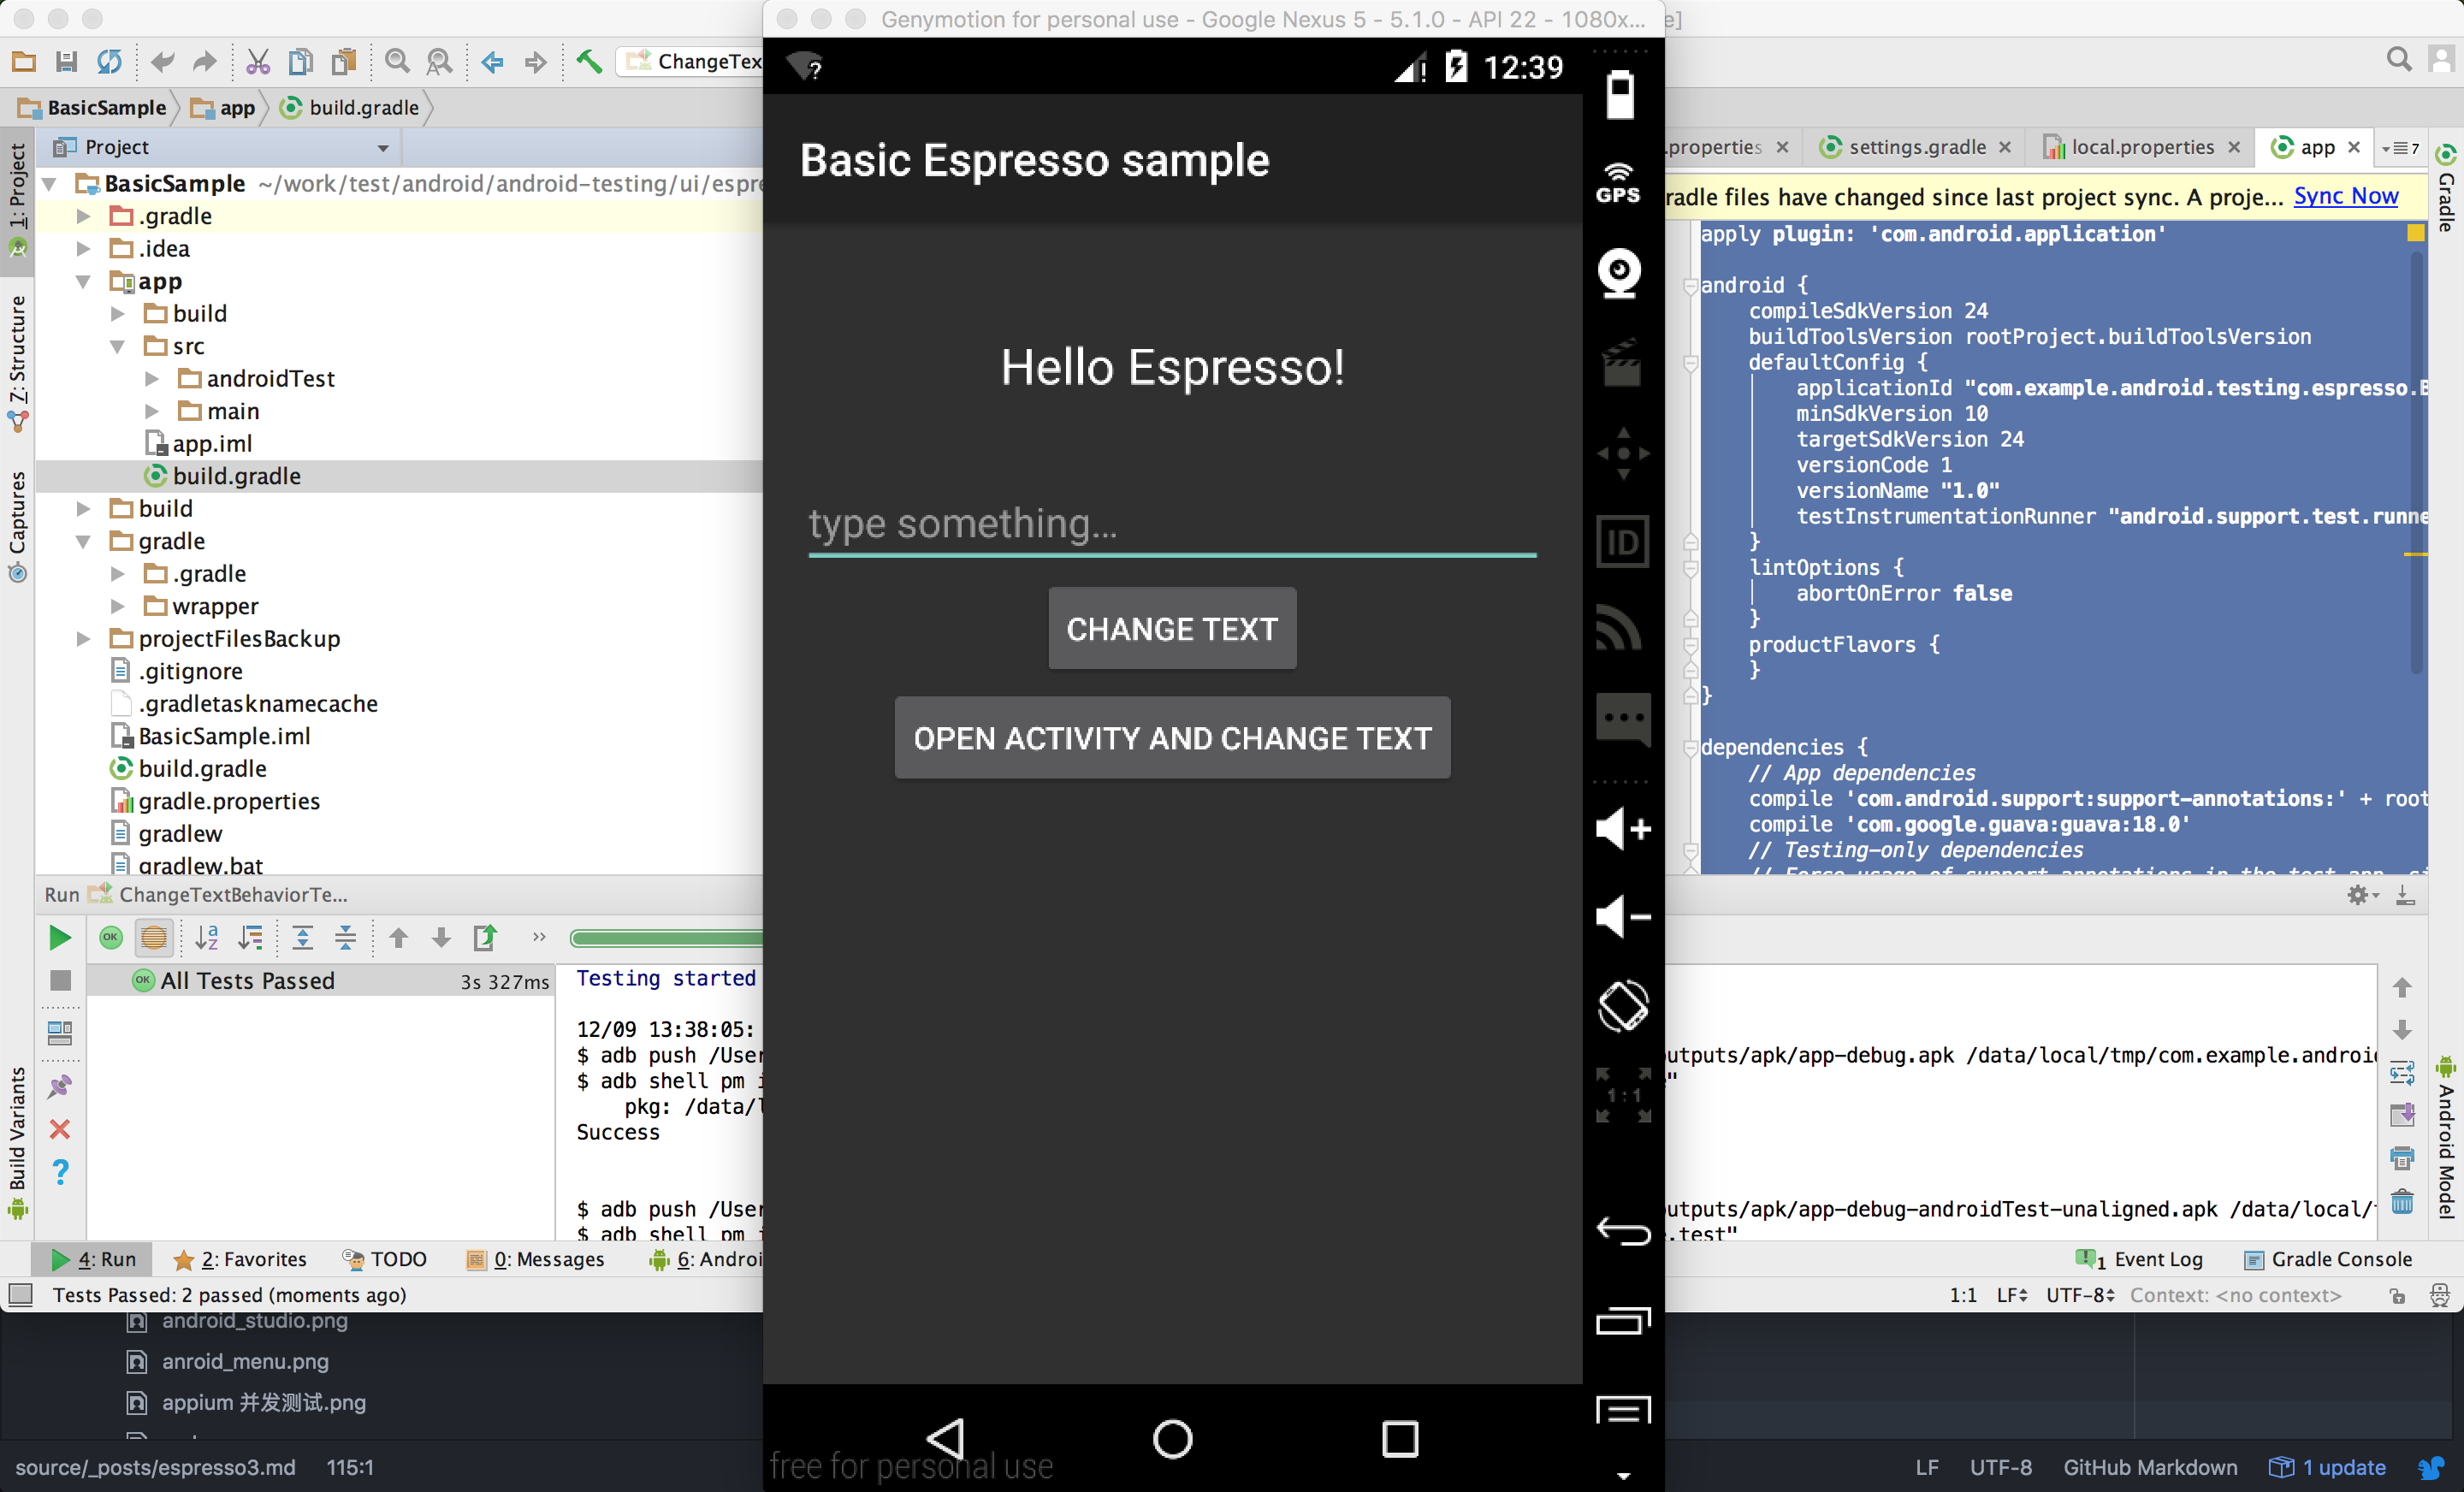
启动espresso

启动模拟器

首先启动android emulator/genymotion,之后直接点击run按钮就能部署app到模拟器上。
log如下.

1
2
3
4
5
6
7
8
9
10
11
12
13
14
15
16
17
18
19
20
21
Testing started at 2:32 PM ...
12/09 14:32:04: Launching ChangeTextBehaviorTe...
$ adb push /Users/lqi/work/test/android/android-testing/ui/espresso/BasicSample/app/build/outputs/apk/app-debug.apk /data/local/tmp/com.example.android.testing.espresso.BasicSample
$ adb shell pm install -r "/data/local/tmp/com.example.android.testing.espresso.BasicSample"
pkg: /data/local/tmp/com.example.android.testing.espresso.BasicSample
Success
$ adb push /Users/lqi/work/test/android/android-testing/ui/espresso/BasicSample/app/build/outputs/apk/app-debug-androidTest-unaligned.apk /data/local/tmp/com.example.android.testing.espresso.BasicSample.test
$ adb shell pm install -r "/data/local/tmp/com.example.android.testing.espresso.BasicSample.test"
pkg: /data/local/tmp/com.example.android.testing.espresso.BasicSample.test
Success
Running tests
$ adb shell am instrument -w -r -e debug false -e class com.example.android.testing.espresso.BasicSample.ChangeTextBehaviorTest com.example.android.testing.espresso.BasicSample.test/android.support.test.runner.AndroidJUnitRunner
Client not ready yet..
Started running tests
Tests ran to completion.

编写测试

此实例BasicSample包含1个textView,1个EditText和2个button,当点击change text 按钮时,会将edittext的值填入textview中。当点击open activity and change text 按钮时,将打开一个新的页面(姑且叫这样吧)并将edittext内容显示在这个页面。
@RunWith(AndroidJUnit4.class)
采用了JUnit 4风格进行编写

  • 首先我们需要新建一个测试类。
    ChangeTextBehaviorTest
1
2
public class ChangeTextBehaviorTest {
}
  • 首先创建一个@Rule,ActivityTestRule用来指明被测试的Activity;
    @Rule: 简单来说,是为各个测试方法提供一些支持。具体来说,比如我需要测试一个Activity,那么我可以在@Rule注解下面采用一个ActivityTestRule,该类提供了对相应Activity的功能测试的支持。该类可以在@Before和@Test标识的方法执行之前确保将Activity运行起来,并且在所有@Test和@After方法执行结束之后将Activity杀死。在整个测试期间,每个测试方法都可以直接对相应Activity进行修改和访问。
1
2
3
@Rule
public ActivityTestRule<MainActivity> mActivityRule = new ActivityTestRule<>(
MainActivity.class);
  • 标识一个测试方法。一个测试类中可以有多个测试方法,每个测试方法需要用一个@Test注解来标识。
    以下代码找到editTextUserInput输入‘Espresso’,关闭键盘。点击changeTextBt按钮。检查textToBeChanged的值是否为‘Espresso’。
    1
    2
    3
    4
    5
    6
    7
    8
    9
    10
    @Test
    public void changeText_sameActivity() {
    // Type text and then press the button.
    onView(withId(R.id.editTextUserInput))
    .perform(typeText(STRING_TO_BE_TYPED), closeSoftKeyboard());
    onView(withId(R.id.changeTextBt)).perform(click());
    // Check that the text was changed.
    onView(withId(R.id.textToBeChanged)).check(matches(withText(STRING_TO_BE_TYPED)));
    }

顺便说说其他junit4注解的用法

@Before: 标识在运行测试方法之前运行的代码。可以支持同一个Class中有多个@Before,但是这些方法的执行顺序是随机的。该注解替代了JUnit 3中的setUp()方法。
@After: 标识在运行测试方法结束之后运行的代码。可以在其中做一些释放资源的操作。该注解替代了JUnit 3中的tearDown()方法。
@BeforeClass: 为测试类标识一个static方法,在测试之前只执行一次。
@AfterClass: 为测试类标识一个static方法,在所有测试方法结束之后只执行一次。
@Test(timeout=<milliseconds>): 为测试方法设定超时时间。

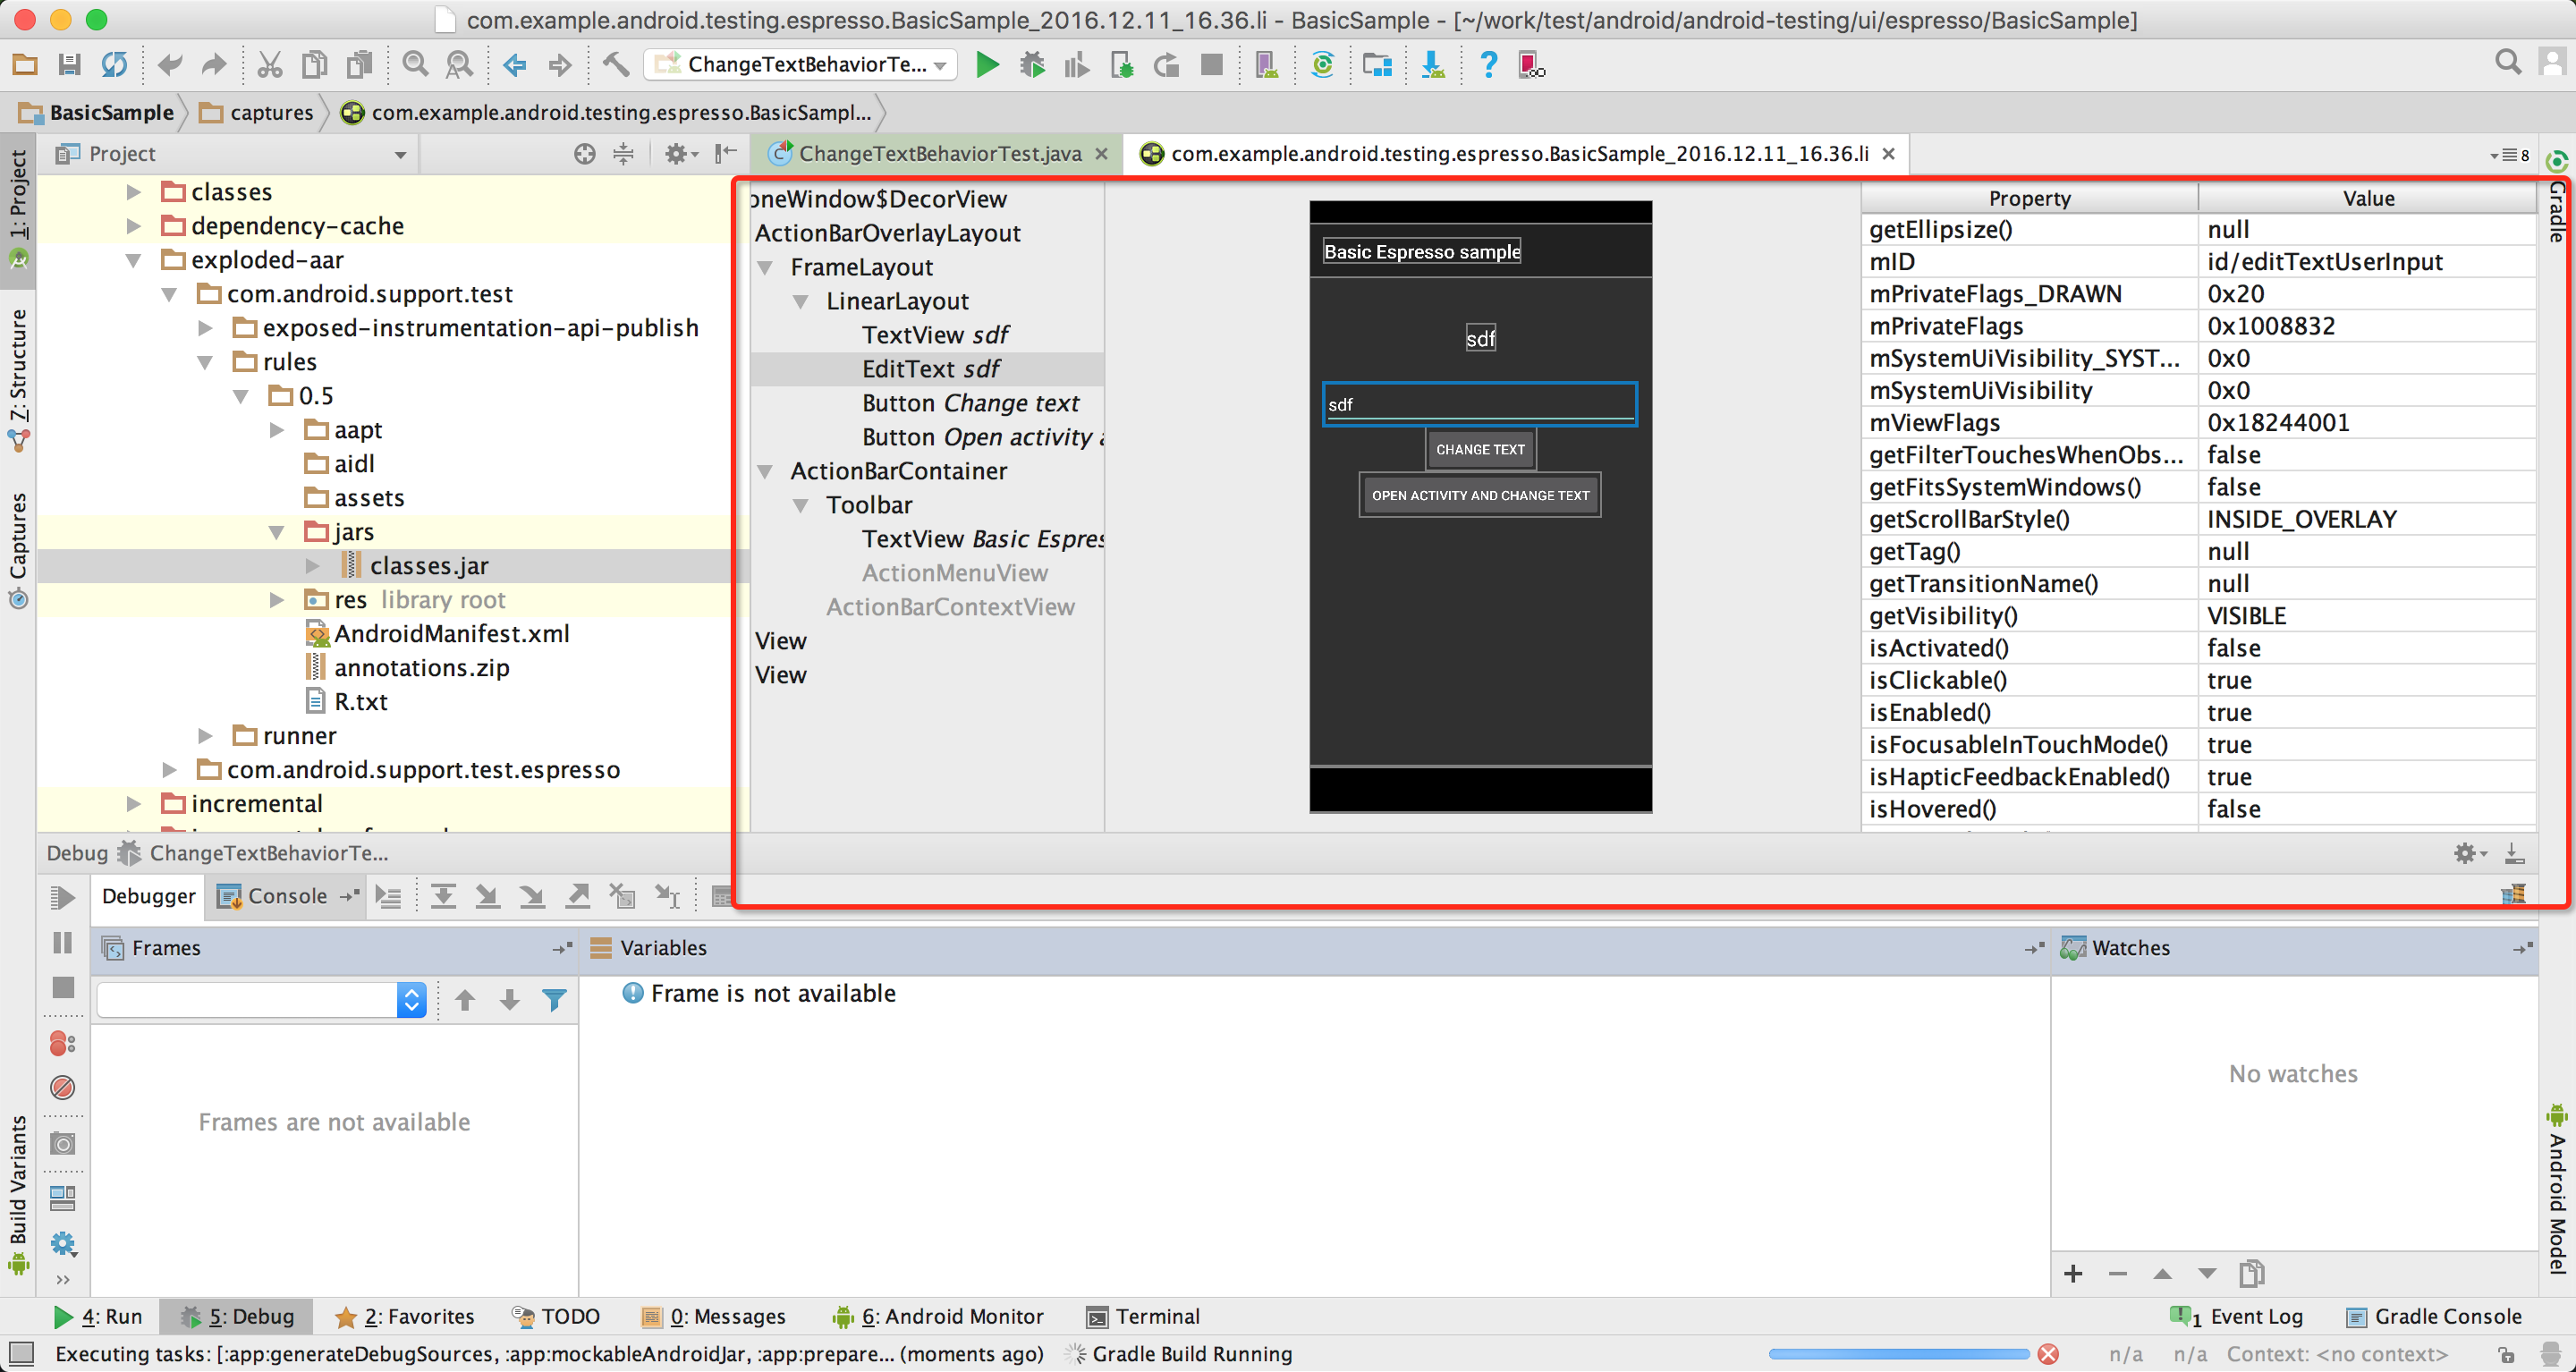
到了这里我们要说下怎么定位所需的元素,其实和web差不多,我们可以利用layout inspector与android device monitor工具。
android_device_monitor
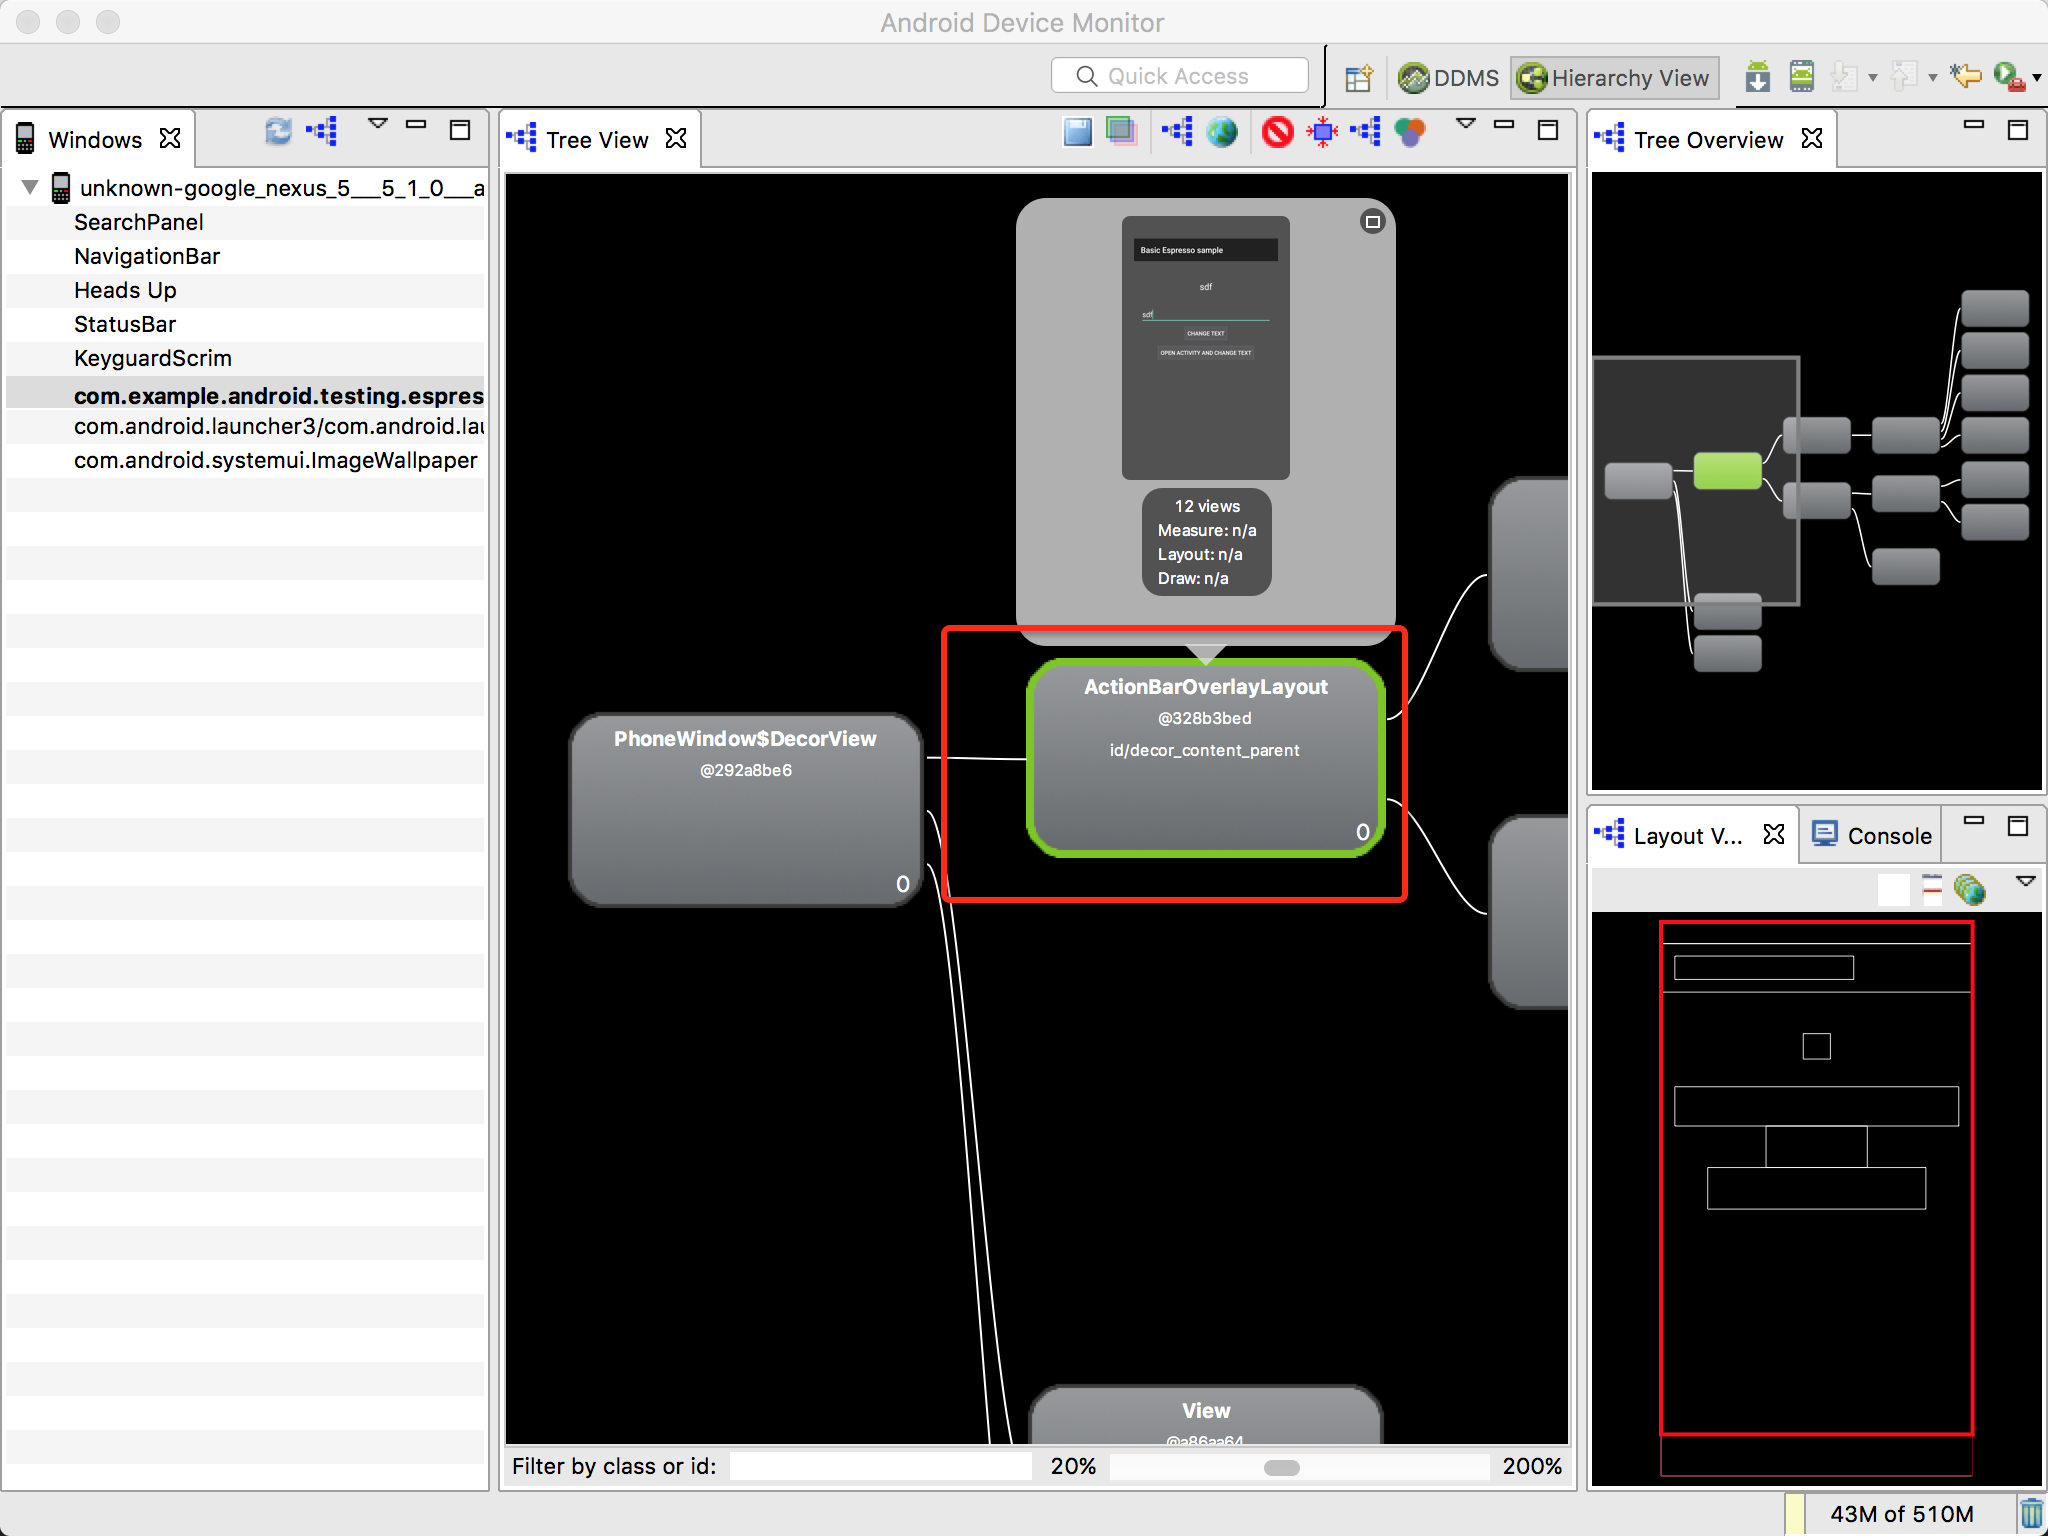
在写一个测试,在editTextUserInput输入‘Espresso’,之后关闭键盘。点击activityChangeTextBtn按钮,查看show_text_view的值是否为‘Espresso’。

1
2
3
4
5
6
7
8
9
10
@Test
public void changeText_newActivity() {
// Type text and then press the button.
onView(withId(R.id.editTextUserInput)).perform(typeText(STRING_TO_BE_TYPED),
closeSoftKeyboard());
onView(withId(R.id.activityChangeTextBtn)).perform(click());
// This view is in a different Activity, no need to tell Espresso.
onView(withId(R.id.show_text_view)).check(matches(withText(STRING_TO_BE_TYPED)));
}

以上是espresso最常见的测试,希望大家能够好好理解。

接下来我们看看espresso如何对AdapterView控制器测试。

​AdapterView​ 是一个从适配器中动态加载数据的特殊控件。最常见的 ​AdapterView​ 是 ListView​。与像 ​LinearLayout​ 这样的静态控件相反,在当前视图结构中,可能只加载了 ​AdapterView​ 子控件的一部分, 简单的 ​onview()​ 可能会找不到当前没有被加载的视图。Espresso 通过提供单独的 onData()​方法来切入点处理此问题,它可以在操作适配器中有该问题的条目或该条目的子项之前将其加载(使其获取焦点)。
导入espresso demo中的MultiWindowSample项目
该测试是从ArrayAdapter类型的dropdown_item控件中选出需要的值,类似我们用搜索引擎时,显示的list。

1
2
3
4
5
6
7
8
9
10
11
12
13
14
15
16
17
@Test
public void autoCompleteTextView_onDataClickAndCheck() {
// NB: The autocompletion box is implemented with a ListView, so the preferred way
// to interact with it is onData(). We can use inRoot here too!
onView(withId(R.id.auto_complete_text_view))
.perform(typeText("S"), closeSoftKeyboard());
// This is useful because some of the completions may not be part of the View Hierarchy
// unless you scroll around the list.
onData(allOf(instanceOf(String.class), is("Baltic Sea")))
.inRoot(withDecorView(not(is(mActivity.getWindow().getDecorView()))))
.perform(click());
// The text should be filled in.
onView(withId(R.id.auto_complete_text_view))
.check(matches(withText("Baltic Sea")));
}

,AutoCompleteText的选择等。 这些测试项都有一个共同的特点。即不在主UI布局的结构(layout,及其include的layout)之中,是不能直接定位的。 所以这里就需要使用inRoot( ) 了。
onData(allOf(instanceOf(String.class), is("Baltic Sea"))) .inRoot(withDecorView(not(is(mActivity.getWindow().getDecorView())))) .perform(click());
以上代码就解决了之前UiAutomator不支持Toast的验证的问题。

运行测试

运行测试的方法很多,第一种命令行执行。
切换到当前项目目录,终端运行
./gradlew cAT
其中,cAT意为connectedAndroidTest。

另一种方式是在android studio中,点击run按钮,或者右键执行单一测试。
android_device_monitor

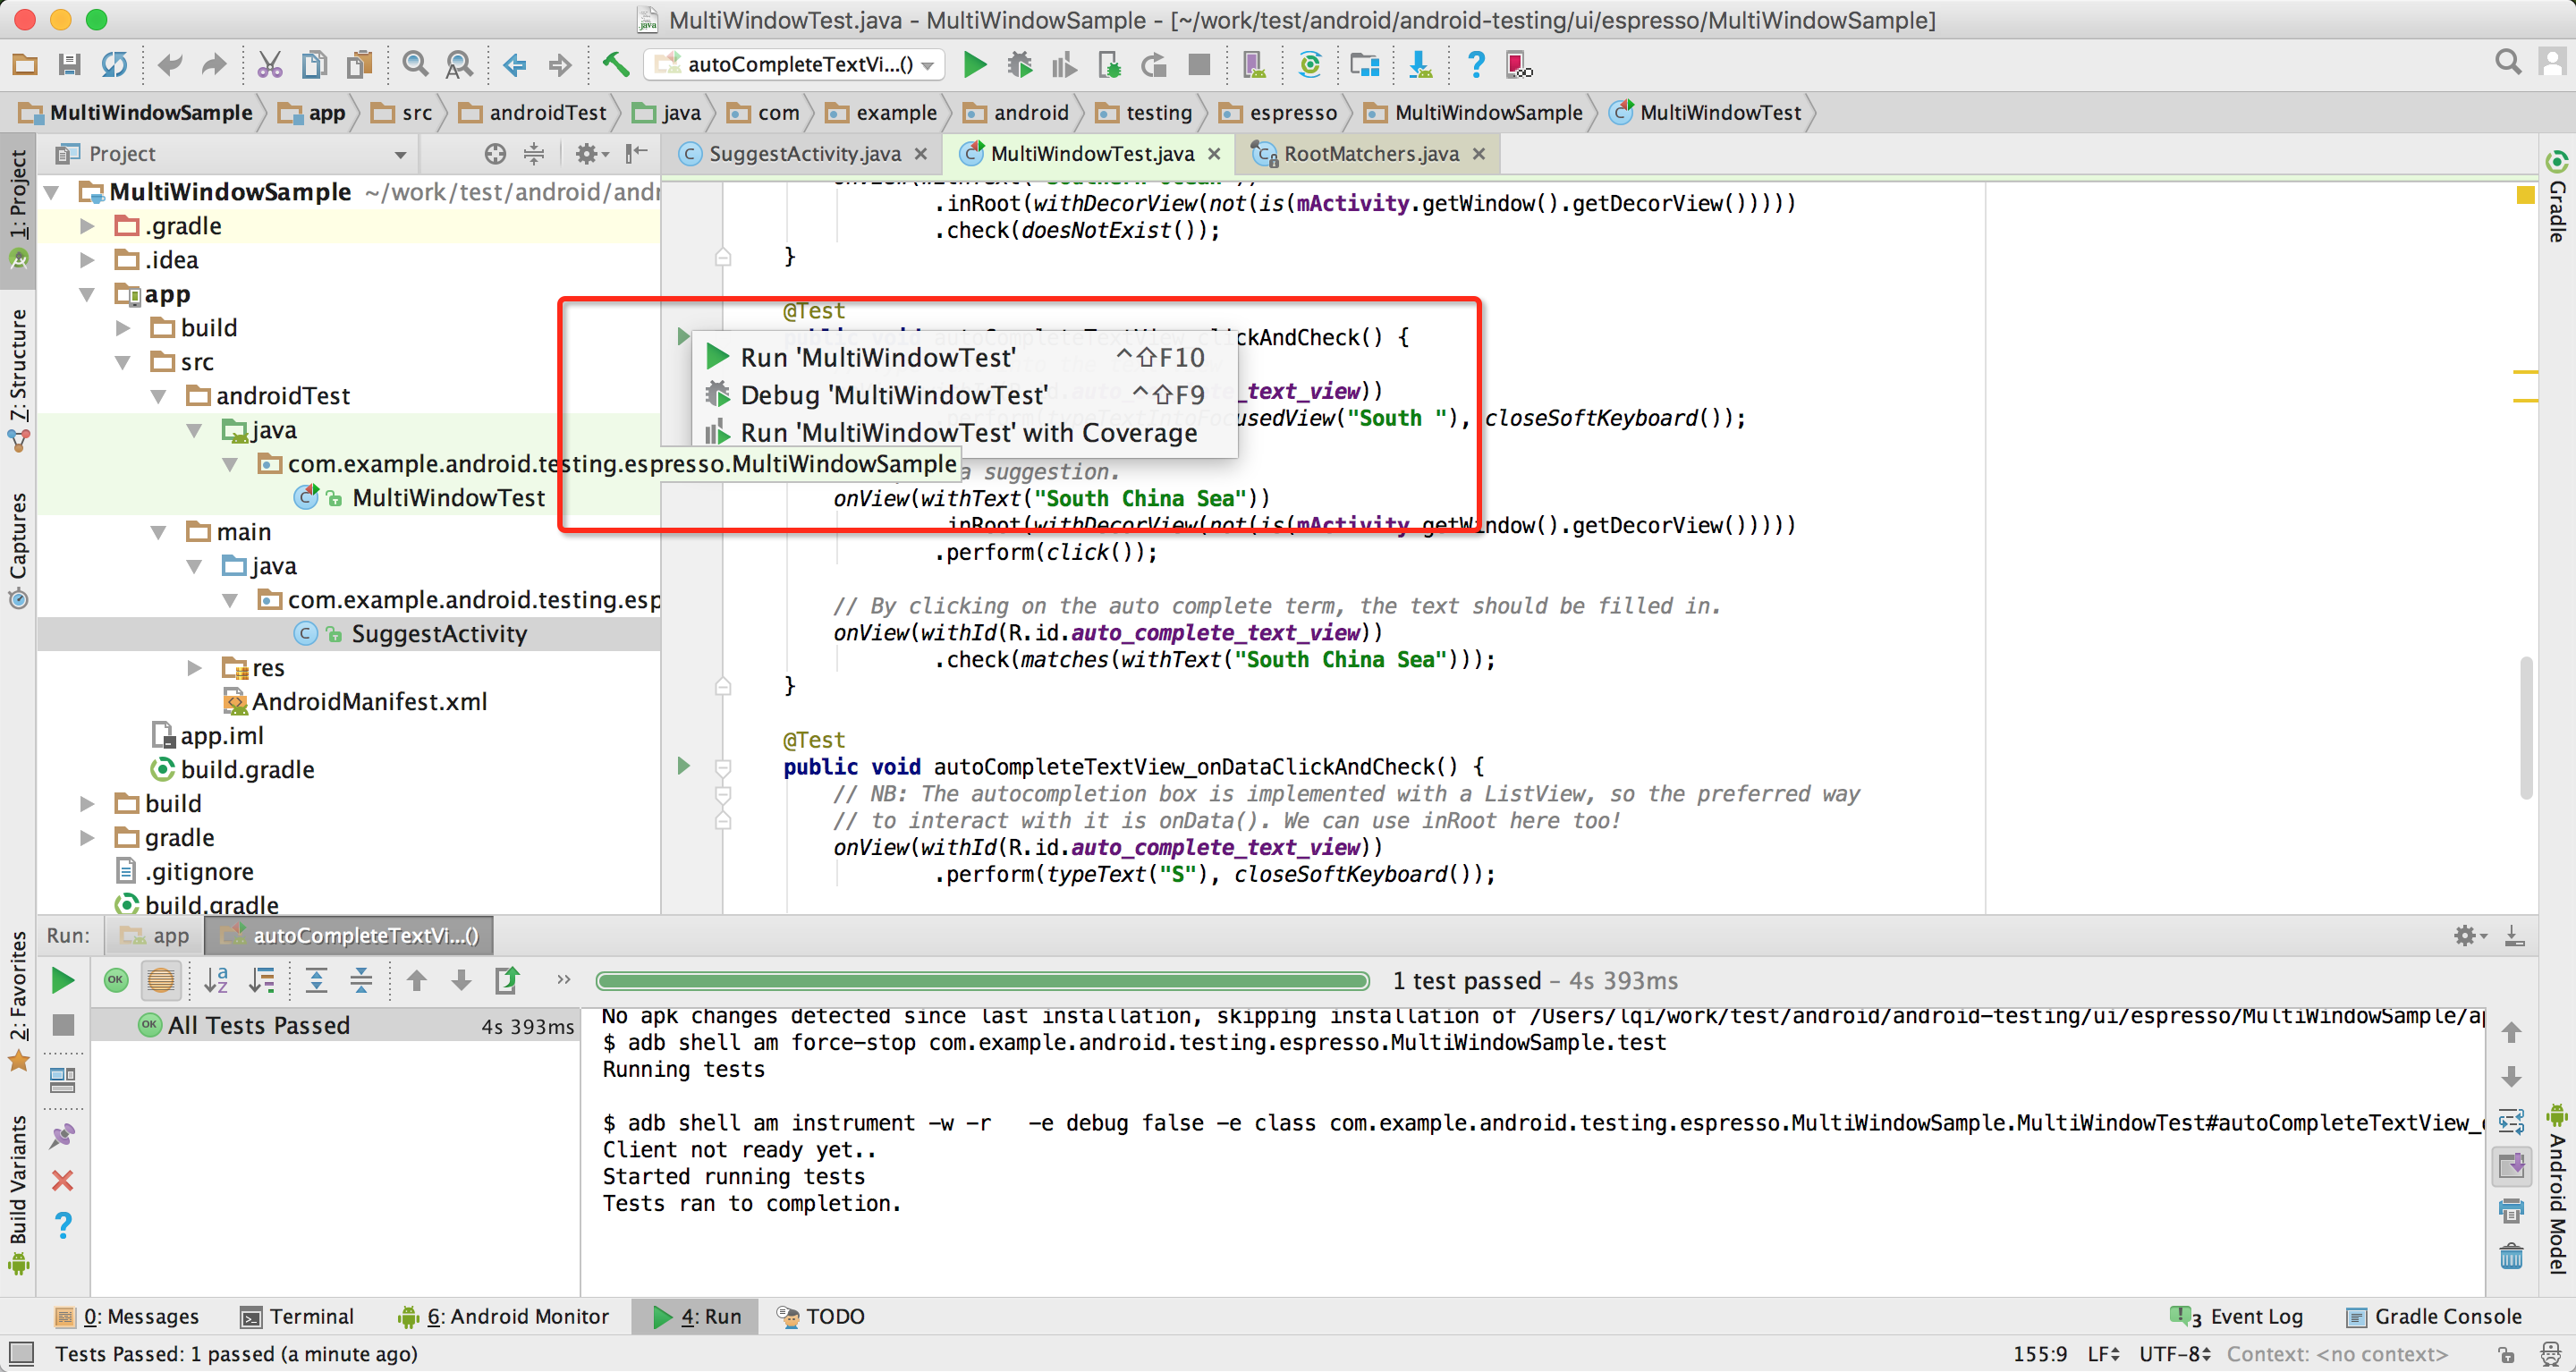
这一章还是以基础的实践为主,之后我们将深入架构,来看看espresso的API 方法,帮助大家理解API 更好更快的编写测试。

espresso基础架构与API分析

发表于 2016-12-02

espresso基础架构与API分析

Espresso测试框架提供了一组API来构建UI测试,以测试应用程序内的用户流。 这些API让您能够编写简洁,运行可靠的自动化UI测试。 Espresso非常适合编写白盒式自动化测试,其中测试代码使用来自所测试的应用程序的实现代码细节。

Espresso测试框架的主要功能包括:

用于在目标应用程序中查看和适配器匹配的灵活API。 有关详细信息,请参阅View matching。
一组广泛的操作API,用于自动化UI交互。 有关更多信息,请参阅 Action APIs。
UI线程同步提高测试的可靠性。 有关更多信息,请参阅 UI thread synchronization。
可以作为参数传入 ​ViewInteraction.check()​方法中的 ViewAssertion 的集合。通常,你会使用带有视图匹配器的匹配断言来判断当前被选中视图的状态,请参阅ViewAssertions
需要Android 2.2(API级别8)或更高版本。

View matching

onView()

Espresso.onView()方法允许您访问目标应用程序中的UI组件并与其进行交互。 该方法接受Matcher参数并搜索视图层次以定位满足某些给定标准的对应View实例。 您可以通过指定以下条件来优化搜索:

  • 视图的类名
  • 视图的内容描述
  • 视图的R.id
  • 视图中显示的文本
    例如,要定位ID值为my_button的按钮,您可以指定一个匹配器,如下所示:

onView(withId(R.id.my_button));
如果搜索成功,onView()方法返回一个引用,该引用允许您对目标视图执行用户操作和测试断言。

1
2
3
public static ViewInteraction onView(final Matcher<View> viewMatcher) {
return BASE.plus(new ViewInteractionModule(viewMatcher)).viewInteraction();
}

ViewMatchers

onView方法需要传入类型为Matcher泛型viewMatcher对象.

ViewMatchers类中方法有

1
isAssignableFrom,withClassName,isDisplayed,isCompletelyDisplayed,isDisplayingAtLeast,isEnabled,isFocusable,hasFocus,isSelected,hasSibling,withContentDescription,withContentDescription,withContentDescription,withId,withResourceName,withTagKey,withTagValue,withText,withCharSequence,withHint,isChecked,isNotChecked,withCheckBoxState,hasContentDescription,hasDescendant,isClickable,isDescendantOfA,withEffectiveVisibility,withParent,withChild,isRoot,supportsInputMethods,hasImeAction,hasImeAction,hasLinks,assertThat,withSpinnerText,isJavascriptEnabled,hasErrorText,withInputType。

这些方法能够帮助我们快速定位到特定的视图。
我们来看看常用的几个方法
withId
返回基于资源ids匹配视图的匹配器。
withText
返回基于TextView的文本属性值匹配TextView的匹配器。
onView(allOf(withId(R.id.my_view), withText("Hello!")))
isDisplayed
返回与当前显示在屏幕上的视图匹配的匹配器给用户。
如下

Espresso.onView(ViewMatchers.withId(R.id.mpu_summary_send_receipt_button)) .check(ViewAssertions.matches(ViewMatchers.isDisplayed()));
其他API方法可以在以下文档中找到具体用法和解释,我们并不需要记住每个方法,遇到具体的场景的时候再过来查询也来得及
viewmatchers-API

ViewMatchers与hamcrest匹配器配合使用

什么是hamcrest?

Hamcrest框架是junit4框架新引入的断言框架,Hamcest提供了一套匹配符Matcher,这些匹配符更接近自然语言,可读性高,更加灵活。
我们可以通过各种viewmatchers与Hamcrest组合匹配器来缩小搜索的范围。
如以下示例所示:

onView(allOf(withId(R.id.button_signin), withText("Sign-in")));

你也可以使用 ​not​ 反转匹配:

onView(allOf(withId(R.id.button_signin), not(withText("Sign-out"))));
注意:
一个工程化的应用中,所有用户可与之交互的视图都应该包含说明文字或有一个内容描述(参考 Android 可访问性指导)。如果你不能通过使用 ‘withText’ 或 ‘withContentDescripiton’ 来缩小onView的搜索范围,可以认为这是一个可访问性的 bug。

请使用最少的匹配器来定位视图。不要过指定,因为这将强制框架做无用功。例如,如果一个视图可以通过它的文字唯一确定,你不需要说明该视图也可以通过 ​TextView​ 指定。对许多视图而言,使用它的​R.id​值就足够了。

更多的hamcrest api请查看
hamcrest api

###onData
当espresso在AdapterView中查找视图时需要用onData方法,例如在AdapterView小部件中,视图在运行时动态填充子视图。如果要测试的目标视图位于AdapterView(例如ListView,GridView或Spinner)中,则onView()方法可能无法工作,因为只有一部分视图可能会加载到当前视图层次结构中。

相反,调用onData()方法可获取DataInteraction对象以访问目标视图元素。 Espresso处理将目标视图元素加载到当前视图层次结构中。 Espresso还负责滚动到目标元素,并将放在焦点元素。

注意:onData()方法不检查您指定的项目是否与视图对应。 Espresso仅搜索当前视图层次结构。如果没有找到匹配,该方法将抛出NoMatchingViewException异常。

下面的代码片段展示了如何使用onData()方法和Hamcrest匹配来搜索包含给定字符串的列表中的特定行。在此示例中,LongListActivity类包含通过SimpleAdapter公开的字符串列表。

1
2
onData(allOf(is(instanceOf(Map.class)),
hasEntry(equalTo(LongListActivity.ROW_TEXT), is("test input")));

Performing Actions

调用ViewInteraction.perform()或DataInteraction.perform()方法来模拟UI组件上的用户交互。您必须传入一个或多个ViewAction对象作为参数。Espresso按照给定的顺序依次触发每个动作,并在主线程中执行它们。
ViewActions类提供了指定常用操作的帮助方法列表。您可以使用这些方法作为方便的快捷方式,而不是创建和配置单个ViewAction对象。您可以指定以下操作:

  • ViewActions.click():点击视图。
  • ViewActions.typeText():点击视图并输入指定的字符串。
  • ViewActions.scrollTo():滚动到视图。目标视图必须是来自ScrollView的子类,它的android:visibility属性的值必须是VISIBLE。对于扩展AdapterView(例如,ListView)的视图,onData()方法为您处理滚动。
  • ViewActions.pressKey():使用指定的键码执行键按下。
  • ViewActions.clearText():清除目标视图中的文本。
    如果目标视图位于ScrollView内部,请先执行ViewActions.scrollTo()操作,以在其他操作进行之前在屏幕中显示视图。如果视图已显示,ViewActions.scrollTo()操作将不起作用。

例如,要模拟输入字符串值并按按钮提交值,您可以编写类似这样的自动测试脚本。 ViewInteraction.perform()和DataInteraction.perform()方法采用一个或多个ViewAction参数,并按提供的顺序运行操作。

//将文本键入EditText视图,然后关闭软键盘

1
2
onView(withId(R.id.editTextUserInput))
     .perform(typeText(STRING_TO_BE_TYPED),closeSoftKeyboard());

//按按钮提交文本更改
onView(withId(R.id.changeTextBt)).perform(click());

其他action api 请查看
https://developer.android.com/reference/android/support/test/espresso/action/package-summary.html

Verifying Results

调用ViewInteraction.check()或DataInteraction.check()方法来断言UI中的视图匹配一些预期状态。 您必须传递一个ViewAssertion对象作为参数。 如果断言失败,Espresso会抛出一个AssertionFailedError。
ViewAssertions类提供了用于指定公共断言的帮助程序方法的列表。 您可以使用的断言包括:
doesNotExist:断言没有与当前视图层次结构中指定的条件匹配的视图。
matches:断言指定视图存在于当前视图层次结构中,并且其状态与某个给定的Hamcrest匹配器匹配。
selectedDescendentsMatch:存在指定的孩子为父视图查看的声明,它们的状态与某个给定的Hamcrest匹配器匹配。

以下代码段显示了如何检查UI中显示的文本的值与之前在EditText字段中输入的文本的值相同。

1
2
3
4
5
6
7
8
9
public void testChangeText_sameActivity() {
// Type text and then press the button.
...
onView(withText(R.string.item_1_text))
.check(doesNotExist());
// Check that the text was changed.
onView(withId(R.id.textToBeChanged))
.check(matches(withText(STRING_TO_BE_TYPED)));
}

ViewMatchers, ViewActions, ViewAssertions 组成了espresso的基础架构,所以要真正的掌握espresso必须将这3部分基础熟悉。
上一节espresso基础

espresso系列一简介

发表于 2016-11-30

espresso是什么?

Espresso 测试框架提供了一系列的API用于构建UI测试来测试app内用户流操作。这些API让你可以编写简洁可靠的自动化UI测试。Espresso非常适合用来编写白盒测试,其中测试代码的编写是利用了被测试app中程序代码实现细节。

Espresso测试可运行android 2.3.3(API 10 level)以及更高版本的设备上。使用Espresso的主要好处是,当你运行测试时它提供了自动的同步测试动作与应用程序UI。Espresso会检测你的主线程是否为空闲状态,如果你的没有被利用,这时候他就会抢占主线程运行测试,所以它能够在恰当的时间运行您的测试命令,提高测试的可靠性。这种能力也使您无须添加任何额外的措施,例如在测试代码中加入thread.sleep()。

Espresso测试框架基于 instrumentation-based API 并且使用 AndroidJUnitRunner测试驱动运行测试。

Espresso测试框架的关键特性包括:

  • [ ] 提供了灵活的API用于匹配目标app中view和adapter。更多的信息,见View匹配
  • [ ] 大而全的 行为 api(action APIs) 用于自动化UI交互。更多的信息,见行为APIs
  • [ ] UI线程同步来提高测试可靠性。更多信息,见UI线程同步

版本兼容

Espresso 支持如下 API:

代号 API
Froyo 8
Gingerbread 10
Ice Cream Sandwich 15
Jelly Bean 16, 17 ,18
KitKat 19
Lollipop 21

注意:
切记 espresso 有版本断层,并不是全版本支持,请注意你设备android系统的版本,以免造成不必要的免费。
不过最新的android系统版本 espresso都是支持的。

配置espresso

官方文档建议我们在开始配置之前,先看看如何开始测试,我觉得非常有必要,很多新手上来就拿着不知道那找来的例子运行下,就以为自己真的什么都会。这样的真的很不好,官方文档才是最好的老师,让我们一步一步慢慢来。

android是基于JUnit测试框架,单元测试,您可以运行任意本地的单元测试在JVM或instrumented tests在Android设备上。

测试类型

当使用Android studio 编写任何你的测试时,你的测试代码必须进入两个不同的代码目录(源集)。每个模块在您的项目中,Android Studio都包括源集,对应于以下测试类型:

本地单元测试

位于 module-name/src/test/java/.

这些测试运行在本地JVM并没有访问Android框架api功能的权限。
让我们首先开始如何构建本地单元测试。

构建本地单元测试

如果您的单元测试没有依赖或只有简单的依赖Android系统,你应该在本地开发机器上运行您的测试。这种测试方法是有效的,因为它可以帮助你避免加载目标应用程序时的开销以及单元测试需要在一个物理设备或模拟器运行。因此,运行单元测试的时间将大大的减少。使用这种方法,您通常使用mocking 框架,列如Mockito、这可以帮助我们mock测试需要的依赖。

设置测试环境

在你的Android Studio项目时,您必须为本地单元测试存储源文件在 module-name/src/test/java/。当你创建一个新项目,这个目录就已经存在。您还需要为您的项目配置测试依赖,因为需要使用JUnit 4的框架提供标准的api。
如果您的测试需要与Android依赖关系,包括使用Mockito来简化你的单元测试。更多地使用 mock objects在本地的单元测试中,请查看Mocking Android依赖关系。在你的应用程序的顶层目录的build.gradle文件里,您需要指定这些库的依赖关系:

1
2
3
4
5
6
dependencies {
// Required -- JUnit 4 framework
testCompile 'junit:junit:4.12'
// Optional -- Mockito framework
testCompile 'org.mockito:mockito-core:1.10.19'
}

创建本地单元测试类

你当地的单元测试类应该写成一个JUnit 4测试类。JUnit是最受欢迎和广泛使用为Java单元测试框架。这个框架的最新版本,JUnit4,允许您在一个比之前的版更清洁和更灵活的方法中编写测试。之前的Android单元测试基于JUnit3框架,使用JUnit4,您不需要扩展junit.framework。TestCase类。你也不需要在测试方法名称包含“test”关键字,或者使用junit的任何类在junit.framework或junit.extensions包。

创建一个基本的JUnit 4测试类,首先需要创建一个Java类,它包含一个或多个测试方法。一个测试方法以@Test annotation标注并且包含代码的实现和验证的代码中包含您想要测试的一个功能组件。

下面的例子展示了如何实现一个本地的单元测试类。测试方法emailValidator_CorrectEmailSimple_ReturnsTrue验证isValidEmail()方法,应用程序返回正确的结果。

1
2
3
4
5
6
7
8
9
10
11
12
13
import org.junit.Test;
import java.util.regex.Pattern;
import static org.junit.Assert.assertFalse;
import static org.junit.Assert.assertTrue;
public class EmailValidatorTest {
@Test
public void emailValidator_CorrectEmailSimple_ReturnsTrue() {
assertThat(EmailValidator.isValidEmail("name@email.com"), is(true));
}
...
}

测试组件在应用程序返回预期的结果,使用junit.Assert方法来执行验证检查(或断言)来对比测试组件的状态和一些期望值。为了使测试具有更好的可读的,您可以使用Hamcrest matchers(如 is()和equalTo()方法)来匹配返回的结果与预期的结果。

Mock Android依赖关系

默认情况下,Android插件Gradle执行本地的单元测试与修改后的版本的Android.jar库,它不包含任何实际的代码。相反,从你的单元测试方法调用安卓类抛出异常。这确保你的测试代码和不依赖于任何特定的行为的Android平台(你没有显式地mock)。
您可以使用模拟框架在代码中存根外部依赖关系,以便轻松测试您的组件是否按照预期的方式与依赖关系交互。 通过用模拟对象替换Android依赖项,您可以将单元测试与Android系统的其余部分隔离,同时验证这些依赖关系中的正确方法是否被调用。 Java的Mockito mocking框架(1.9.5及更高版本)提供了与Android单元测试的兼容性。 使用Mockito,您可以配置模拟对象以在调用时返回一些特定值。

要使用此框架将mock对象添加到本地单元测试,请遵循以下编程模型:

  • 在build.gradle文件中包含Mockito库依赖关系,如设置测试环境中所述。
  • 在单元测试类定义的开始,添加@RunWith(MockitoJUnitRunner.class)注释。 这个注释告诉Mockito测试运行器验证你的框架的使用是正确的,并简化了你的模拟对象的初始化。
  • 要为Android依赖项创建模拟对象,请在字段声明之前添加@Mock注释。
  • 要存根依赖关系的行为,可以使用when()和thenReturn()方法指定条件并返回值。

以下示例显示如何创建使用mock上下文对象的单元测试。

1
2
3
4
5
6
7
8
9
10
11
12
13
14
15
16
17
18
19
20
21
22
23
24
25
26
27
28
29
30
31
import static org.hamcrest.MatcherAssert.assertThat;
import static org.hamcrest.CoreMatchers.*;
import static org.mockito.Mockito.*;
import org.junit.Test;
import org.junit.runner.RunWith;
import org.mockito.Mock;
import org.mockito.runners.MockitoJUnitRunner;
import android.content.SharedPreferences;
@RunWith(MockitoJUnitRunner.class)
public class UnitTestSample {
private static final String FAKE_STRING = "HELLO WORLD";
@Mock
Context mMockContext;
@Test
public void readStringFromContext_LocalizedString() {
// Given a mocked Context injected into the object under test...
when(mMockContext.getString(R.string.hello_word))
.thenReturn(FAKE_STRING);
ClassUnderTest myObjectUnderTest = new ClassUnderTest(mMockContext);
// ...when the string is returned from the object under test...
String result = myObjectUnderTest.getHelloWorldString();
// ...then the result should be the expected one.
assertThat(result, is(FAKE_STRING));
}
}

要了解有关使用Mockito框架的更多信息,请参阅示例代码中的Mockito API参考和SharedPreferencesHelperTest类。
如果Android.jar中的Android API抛出的异常对于测试有问题,您可以更改行为,以使方法通过在项目的顶级build.gradle文件中添加以下配置来返回null或零:
android { ... testOptions { unitTests.returnDefaultValues = true } }

警告:将returnDefaultValues属性设置为true应该小心。 null/zero 返回值可以在测试中引入回归,这难以调试,并且可能允许失败的测试通过。 只能使用它作为最后的手段。

运行本地测试

要运行本地单元测试,请按照下列步骤操作:

  1. 通过单击工具栏中的 Sync Project,确保您的项目与Gradle同步。
  2. 使用以下方法之一运行测试:
  • 要运行单个测试,请打开“Project”窗口,然后右键单击测试,然后单击RUN。
  • 要测试类中的所有方法,请右键单击测试文件中的类或方法,然后单击Run。
  • 要在目录中运行所有测试,请右键单击目录并选择Run test。
    Gradle的Android插件编译位于默认目录(src / test / java /)中的本地单元测试代码,构建一个测试应用程序,并使用默认的测试运行器类在本地执行它。 然后,Android Studio将在“运行”窗口中显示结果。

Instrumented tests

位于module-name/src/androidTest/java/。
这些都是必须在Android硬件设备或Android模拟器上运行的测试。

仪表化测试内置于在测试下的应用旁边的设备上运行的APK。 系统在同一个过程中运行测试APK和您的应用程序,因此您的测试可以调用方法和修改应用程序中的字段,并自动化用户与您的应用程序的互动。

有关如何创建检测测试的信息,请参阅以下主题:

构建测试单元测试:使用Android依赖项构建复杂的单元测试,这些测试不能满足模拟对象。
自动化用户界面测试:创建测试以验证用户界面在单个应用程序内的用户交互或多个应用程序之间的交互操作正确。
测试应用程序组件集成:验证用户不直接与之交互的组件(例如服务或内容提供者)的行为。

但是,上述的本地单元测试和instrumented tests只是用于区分在本地JVM上运行的测试和在Android平台(在硬件设备或模拟器上)运行的测试之间的术语。 在构建完整测试套件时应该理解的真实测试类型在下表中描述。

Type 子类型 描述
Unit tests Local Unit Tests 本地单元测试在Java虚拟机(JVM)上本地运行的单元测试。当您的测试没有Android框架依赖项或者可以模拟Android框架依赖项时,使用这些测试来最小化执行时间。
Unit tests Instrumented unit tests 测试单元测试在Android设备或模拟器上运行的单元测试。这些测试可以访问Instrumentation信息,例如您要测试的应用程序的上下文。当你的测试有Android依赖,模拟对象不能满足时,使用这些测试。
Integration Tests Components within your app only 您的应用程序中的组件仅当用户执行特定操作或在其活动中输入特定输入时,此类型的测试验证目标应用程序的行为如预期。例如,它允许您检查目标应用程序返回正确的UI输出,以响应用户在应用程序活动中的互动。 Espresso等UI测试框架允许您以编程方式模拟用户操作并测试复杂的应用内用户交互。
Integration Tests Cross-app Components 跨应用程序组件此类型的测试验证不同用户应用程序之间或用户应用程序和系统应用程序之间的交互的正确行为。例如,当用户在Android设置菜单中执行操作时,您可能需要测试您的应用是否正确运行。支持跨应用程序交互的UI测试框架(如UI Automator)允许您为这些场景创建测试。

Test APIs

以下是用于在Android上测试应用的常见API。
JUnit
您应该将您的单元或集成测试类写为JUnit 4测试类。 该框架提供了一种方便的方法来在测试中执行常见的setup, teardown, and assertion操作。

基本的JUnit 4测试类是包含一个或多个测试方法的Java类。 测试方法以@Test注释开始,包含练习和验证要测试的组件中的单个功能(即逻辑单元)的代码。

以下代码段显示了一个示例JUnit 4集成测试,它使用Espresso API对UI元素执行单击操作,然后检查是否显示预期的字符串。

1
2
3
4
5
6
7
8
9
10
11
12
13
14
15
@RunWith(AndroidJUnit4.class)
@LargeTest
public class MainActivityInstrumentationTest {
@Rule
public ActivityTestRule mActivityRule = new ActivityTestRule<>(
MainActivity.class);
@Test
public void sayHello(){
onView(withText("Say hello!")).perform(click());
onView(withId(R.id.textView)).check(matches(withText("Hello, World!")));
}
}

在您的JUnit 4测试类中,您可以通过使用以下注释调用测试代码中的部分进行特殊处理:

  • @Before:使用此注释来指定包含测试设置操作的代码块。测试类在每次测试之前调用此代码块。你可以有多个@Before方法,但是测试类调用这些方法的顺序不能保证。
  • @After:此注释指定一个包含测试拆分操作的代码块。测试类在每个测试方法之后调用这个代码块。您可以在测试代码中定义多个@After操作。使用此注释从内存释放任何资源。
  • @Test:使用此注释标记测试方法。单个测试类可以包含多个测试方法,每个测试方法都以此注释作为前缀。
  • @Rule:规则允许您以可重用的方式灵活地添加或重新定义每个测试方法的行为。在Android测试中,将此注释与Android测试支持库提供的测试规则类之一一起使用,例如ActivityTestRule或ServiceTestRule。
  • @BeforeClass:使用此注释为每个测试类指定仅调用一次的静态方法。此测试步骤对于消耗大的操作(例如连接到数据库)很有用。
  • @AfterClass:使用此注释为测试类指定静态方法,仅在类中的所有测试运行后调用。 这个测试步骤对释放在@BeforeClass块中分配的任何资源很有用。
  • @Test(timeout =):一些注释支持传递元素的能力,您可以为其设置值。 例如,您可以为测试指定超时期限。 如果测试开始,但没有在给定的超时期间内完成,它会自动失败。 您必须以毫秒为单位指定超时期限,例如:@Test(timeout = 5000)。
    使用JUnit Assert类来验证对象状态的正确性。 assert方法将您从测试所期望的值与实际结果进行比较,如果比较失败,则抛出异常。 断言类更详细地描述这些方法。

    Android测试支持库

    Android测试支持库提供了一组API,允许您快速构建和运行应用程序的测试代码,包括JUnit 4和功能UI测试。 库包括以下基于工具的API,当您想要自动化测试时,这些API是有用的:

AndroidJUnitRunner
适用于Android的JUnit 4兼容测试运行器。
espresso
一个UI测试框架; 适用于在应用程序内的功能UI测试。
UI automator
适用于系统和已安装应用程序之间跨应用程序功能UI测试的UI测试框架。

断言类

由于Android测试支持库API扩展JUnit,因此可以使用断言方法显示测试结果。断言方法将测试返回的实际值与预期值进行比较,如果比较测试失败,则抛出AssertionException异常。使用断言比记录更方便,并提供更好的测试性能。

为了简化测试开发,您应该使用Hamcrest库,它允许您使用Hamcrest匹配器API创建更灵活的测试。

Monkey 和 monkeyrunner
Android SDK包含两个用于功能级应用测试的工具:

Monkey
这是一个命令行工具,用于向设备发送按键,触摸和手势的伪随机流。您使用Android Debug Bridge(adb)工具运行它,并使用它来压力测试您的应用程序,报告所遇到的错误,或通过使用相同的随机数种子多次运行该工具来重复事件流。
monkeyrunner
此工具是用Python编写的测试程序的API和执行环境。 API包括用于连接到设备,安装和卸载包,截取屏幕截图,比较两个图像以及针对应用运行测试包的功能。使用API​​,您可以编写大量,强大和复杂的测试。您使用monkeyrunner命令行工具运行使用API​​的程序。

构建Android测试的指南

以下文档提供了有关如何构建和运行各种测试类型的更多详细信息:

建立本地单元测试
构建单元测试没有依赖或只有简单的依赖,你可以mock,它运行在本地JVM上。
建筑仪表单元测试
使用Android依赖项构建复杂的单元测试,这对于在硬件设备或模拟器上运行的模拟对象无法满足。
自动化用户界面测试
创建测试以验证用户界面在单个应用程序内的用户交互或多个应用程序之间的交互正确运行。
测试应用程序集成
验证用户不直接与之交互的组件(例如服务或内容提供者)的行为。
测试显示性能
编写测试应用程序UI性能的测试,以确保持续流畅的用户体验。
ok 我们已经看完了 怎么开始android测试,我想大家一定有了很深入的了解了吧
让我们进入正题 配置espresso
在Android应用程序模块的build.gradle文件中,必须为Espresso引入jar依赖:

1
2
3
4
dependencies {
// Other dependencies ...
androidTestCompile 'com.android.support.test.espresso:espresso-core:2.2.2'
}

关闭测试设备上的动画 - 在测试设备中打开系统动画可能会导致意外的结果,或可能导致测试失败。 通过打开开发者选项并关闭所有以下选项,从设置中关闭动画:

  • 在设备上的设置->开发者选项中禁用一下三项设置: > 窗口动画缩放 > 过渡动画缩放 > 动画程序时长缩放
  • 确保你已经安装了最新的 Extras 下的 Android Support Repository
    设置junit为测试驱动框架
    在build.gradle 中 添加
    testInstrumentationRunner "android.support.test.runner.AndroidJUnitRunner"

    完整的build.gradle 示例文件如下

    1
    2
    3
    4
    5
    6
    7
    8
    9
    10
    11
    12
    13
    14
    15
    16
    17
    18
    19
    20
    21
    22
    23
    24
    25
    26
    27
    28
    29
    30
    31
    32
    ​android.defaultConfigpply plugin: 'com.android.application'
    android {
    compileSdkVersion 24
    buildToolsVersion rootProject.buildToolsVersion
    defaultConfig {
    applicationId "com.example.android.testing.espresso.BasicSample"
    minSdkVersion 10
    targetSdkVersion 24
    versionCode 1
    versionName "1.0"
    testInstrumentationRunner "android.support.test.runner.AndroidJUnitRunner"
    }
    lintOptions {
    abortOnError false
    }
    productFlavors {
    }
    }
    dependencies {
    // App dependencies
    compile 'com.android.support:support-annotations:' + rootProject.supportLibVersion;
    compile 'com.google.guava:guava:18.0'
    // Testing-only dependencies
    // Force usage of support annotations in the test app, since it is internally used by the runner module.
    androidTestCompile 'com.android.support:support-annotations:' + rootProject.supportLibVersion;
    androidTestCompile 'com.android.support.test:runner:' + rootProject.runnerVersion;
    androidTestCompile 'com.android.support.test:rules:' + rootProject.rulesVersion;
    androidTestCompile 'com.android.support.test.espresso:espresso-core:' + rootProject.espressoVersion;
    }

之后我们只需要在命令行中输入gradle就会帮我们下载依赖运行测试了,对了记着要安装gradle到你的系统中.

从QA的角度来谈谈代码质量的改进

发表于 2016-10-31

大部分人看到这个题目时,直接的反应是QA关心代码质量干嘛,能看懂代码吗?怎么给dev feedback?

qa

如果还有人持这样的观点后,那么我只能说too young too simple。
首先我们得谈谈什么是代码质量?
创建优秀的代码涉及到正确性、可维护性甚至优美性。
正确性,最起码你的代码实现的业务逻辑是正确的。
可维护性,公司中其他的小伙伴能看看懂你的代码逻辑,便于修改代码。
优美性,符合各种代码规范,其他人看到代码后惊为天人。
但是要做到以上几点绝非易事,首先你得有高超的编程能力,其次你对前端或后端的代码规范有深刻的理解,但是能有这样能力的人又有多少呢?
我们都知道软件开发是团队合作才能完成的工作。
那么项目的质量与客户的需求才是项目生存下去的关键。
所以怎么才能改进项目代码的质量?我们先看看业界巨头公司都是如何做的?

microsoft怎么做?

microsoft

我们都知道微软是做操作系统出身的,其实微软的测试能力与测试工具都是业界中领先的,以下是两张表展示的是微软如何从visual studio与开发过程中提高代码质量

Visual Studio

标准 描述
使用代码分析工具分析应用程序质量 静态代码分析工具可查找 C++ 和托管代码里的设计、使用、可维护性和样式问题。 其中的许多问题可能导致难以在标准测试环境中重现的 bug。
单元测试代码 “测试资源管理器”可以在开发实践中轻松地集成单元测试。 可以使用 Microsoft 单元测试框架或若干第三方和开源框架之一。
测量托管代码的复杂性和可维护性 代码度量是一组软件度量值,使开发人员可以更好地了解他们正在开发的代码。 度量值包括函数和类的可维护性指数、函数的圈复杂度、类的继承深度和类耦合度的数值。
使用代码克隆检测功能查找重复代码 代码克隆工具可用于在整个 Visual Studio 解决方案内搜索 Visual C# 和 Visual Basic 项目中重复或高度相似的代码。 可以经常重构代码以消除重复代码,从而创建更易于维护的解决方案。
PreEmptive Analytics for Team Foundation Server PreEmptive Analytics for TFS CE 有助于将反馈驱动的开发过程集成到开发工作流中。 当应用程序在执行过程中发生错误时,它会自动将异常报告数据发回给 PreEmptive Analytics 服务。 然后,该服务将根据你定义的规则和阈值创建或更新 Microsoft Team Foundation Server 中的工作项。
PreEmptive Dotfuscator 和 Analytics CE PreEmptive Dotfuscator 是 .NET 模糊处理程序和压缩程序,有助于防止程序遭遇反向工程,同时使程序更小更高效。

开发过程中改进代码质量

标准 描述
设计和代码的检查准则 提供若干帮助进行设计和代码检查的技术,通过让其他同事检查代码来发现 bug 和不正确的假设。
安全代码编写准则 描述编写安全代码的技术和策略。
高质量代码签入准则 列出以不同方式检查代码以确保代码实现您的预期高质量设计目的的准则。
代码分析工具使用准则 提供几条使用代码分析工具的准则。
检测和更正 C/C++ 代码缺陷 描述如何使用用于托管代码的代码分析工具检测和更正代码缺陷。
代码分析签入策略 描述如何创建与 Team Foundation 源控件签入关联的自定义签入策略。
调试准则 提供几条查找代码缺陷的准则。

google 又是怎么做?

google

  • 代码审查。在你提交任何代码改动之前,你得找去代码“主人”签字确认。为了实现,评审者(被鼓励去)建议大修代码,而不是让它成为根本没有经过思考的“图章”代码。

  • 按语言可读性要求坚持代码风格指南(请参阅这里)。除了让我们代码有统一的外观(所以我们能快速识别方法、变了等),我们的风格指南禁止了一些复杂、混乱、易出错的 C++ 特性(比如:class 类型的静态和全局变量)。

  • 整个团队都致力改进我们代码库的质量,维护我们的核心库,不断做出更好的工具。

  • 一个活跃的“code health”课题组。

  • 发布软件时,不对外部期限承担责任。一般而言,这让我们可以正确做事,而非为了期限内完成任务把乱七八糟的代码拼凑起来。
  • “Fix it.” 例如,一个工程师或许说,“我认为我们真应该别再用过时的 Cruft Map 类(class)了。我打算在 1 月 20 日组织一次 Fix it。” 当 1 月 20 日来临时,大家应当暂停其正常运作,把他们代码中的 Cruft Maps 都换掉。在 1 月 21 日,Google 就永远和 Cruft Map 说拜拜了!不过最近,核心库团队已经很优秀了,貌似没有啥东西可再值得类似的 fix it 了。
  • 测试文化。单元测试覆盖率可能接近 100%,我们有持续构建/整合/测试,还有知名的 “Testing on the Toilet” (请参见Google Testing Blog)

facebook 呢? 又有什么不一样

facebook

  • 开发对质量负责: 开发从设计,实现,测试,到部署都要自己做。其它做工具,流程的工程师通过开发工具和流程来帮助开发人员更为简单方便地做测试,做部署和做监控。每个开发人员有自己单独的测试环境,测试环境就是运行在开发本地机器上,部署非常简单快速。测试环境用的是真实的用户数据。
  • 持续集成和测试自动化:每周发布一次。星期天晚上,要发布的构建从主线上分支出来到发布分支,到星期二的中午如果没有大的问题,就可以上线了。所有的测试运行控制在10分钟以内,所以不需要考虑不运行哪些测试用例。运行所有测试用例。 (只是听说,没有经过考证。)
  • 严格实施代码审计:在Facebook 做 code review时间大约占50%,管理者对代码质量负有一定责任 。甚至代码质量高于一切:Facebook Code review是重点KPI考核的对象,实行连坐制,如果因为代码质量问题,那么产生的KPI责任包括领导30%、程序员50%、审核人员20%。 在代码checkin之前,都要由专人进行review。Facebook 创始人兼 CEO 马克扎克伯格会亲自对 News Feed 每个代码更新把关。在 Facebook,所有重大升级的代码都进行强制评估,任何一个改动都至少由一人把关。但是,无论工程师对 News Feed 做出任何改动,都将由扎克伯格亲自把关。
  • 内测 (dog food):发布之前,公司员工使用要发布的功能。2-3天之内可以有几百个或上千个人在使用新功能。负责要发布功能的开发人员在星期天晚上到星期二中午之间会做大量的测试 。
  • 通过灰度发布控制风险:新功能本身质量可能有问题,新功能也可能影响其它现有功能。为了减少或控制这些风险。Facebook开发了一整套完善的发布,控制,监控流程和工具。做到:1.测试通过后,产品质量基本有保证。2.即使有漏测的bug,只会影响很少量的用户。3.及时监控到问题。4.及时修复。
  • 产品监控:通过社区讨论的正负面舆情,及与历史应用数据的对比情况,监控产品的系统的运行状态技术修复。

    thoughtworks 业界以敏捷著称的软件企业又是如何改进的

    thoughtworks
  • 项目的初期,dev,BA,QA就会做到一起IPM,让不同的角色都能了解story,让dev尽早的分析story以及采用那种技术去完成工作。
    pair
  • 开发阶段,dev会采用pair的方式,和QA,其他dev共同完成story,这样的好处是,一让不熟悉的新人尽快的了解项目架构,二与QApair,QA将会提供dev考虑不足的点,一起编写单元测试以及feature test。
  • 当dev完成代码工作后,会在github上发出pull request 或邀请其他dev,一起评审代码。
  • 各个项目都有自己完备的cd流程,确保发布过程的正确性,减少人为手工操作的失误。

从以上业界代表公司的改进方式,我们可以看出它们都是从以下几点出发的:

  1. 完整的单元测试覆盖率
    UI自动化测试的覆盖率很难被保证,不断的改变的ui,使使用UI测试来验证产品的功能变得十分麻烦,但是单元测试则不同,各种语言都有自己的测试工具以及测试覆盖率工具帮助我们更好的完善我们的代码质量,我们也可以用接口测试与pact测试来保证第三方集成服务的正确性,所以高覆盖率的单元测试时产品的质量的基础。
  2. 严格的代码审查机制
    facebook,google,微软等公司严格的代码审查机制,是确保代码不被破坏的关键点,不会因为团队成员的某次粗心的提交,造成整个项目的失败。
  3. 强大的代码分析工具
    代码级别的规范化,以及动态与静态扫描,进一步的帮助软件开发人员、质量保证人员查找代码中存在的结构性错误、安全漏洞等问题,从而保证软件的整体质量。与CI,CD的集成,能够让我们尽早的发现代码中存在的错误。

  4. 规范化的测试流程
    各个公司规范化的测试流程,保证项目在每一阶段都能够输出高质量的代码。

  5. 完善的风险控制
    完善的风险控制,不仅仅表现的google与Facebook的A/B测试,也表现在当有任何重大问题时,能够随意的切换到旧的版本,保证产品不因为该问题,就造成宕机。
  6. 实时的监控
    这些行业的巨头,都有着非常强大的运维团队,从产品的开发阶段就开始实施了各种监控手段,监控范围包括编译阶段,部署阶段,产品环境,硬件服务器的状态等,帮助项目的中所有成员及时的发现产品中存在的问题,快速跟踪以及定位问题。

第一篇分析各个公司都采取了那些代码质量改进措施完毕,接下来我会从不同的角度去详细介绍这些改进措施。

capybara5--实现你第一个自动化场景

发表于 2016-09-01

实现你第一个自动化场景

万事俱备,只欠东风,让我们来实现我们一个自动化测试场景,百度上搜索capybara。

1
2
3
4
5
6
7
8
9
10
11
12
13
14
15
describe "i want search capybara", :type => :feature do
context 'i need to open browser' do
it 'should be has an browser'
end
context 'when i input baidu url into the browser textarea' do
it 'should be redirect to the baidu homepage'
end
context 'when i input the capybara into search text ' do
it 'responds with 200 and show the result'
end
end

rspec 与 cucumber完整的使用指南并不包含在本书的范畴,但我会给大家讲解基本的项目架构与语法,帮助大家更好的理解capybara和自动化测试的规范。

rspec方式

对于基于rspec框架的项目,我们首先需要创建spec目录,来将我们的测试文件放置当中,这样做使我们项目代码结构更加清晰。
此外我们还需要创建spec/rspec_help.rb文件帮助我们设置测试的配置信息。

如果你的项目是基于rails的,那么就更简单了,你只需要执行以下命令,系统就帮助我们完成这些基础配置和文件的生成

1
rails generate rspec:install
1
2
3
.rspec
spec/spec_helper.rb
spec/rails_helper.rb

让我正式开始
首先我们需要配置spec_helper.rb文件,
将以下内容复制到spec_helper.rb中,稍后章节中我将具体介绍配置文件中每条代码实际的作用

1
2
3
4
5
6
7
8
9
10
11
12
13
14
15
16
17
18
19
20
21
22
23
24
25
26
27
28
29
30
31
32
33
34
35
36
37
38
39
40
41
42
43
44
45
46
47
48
49
50
51
52
53
54
55
56
57
58
59
60
61
62
63
64
65
66
67
68
69
70
71
72
73
74
75
76
77
78
79
80
81
82
83
84
85
86
87
88
89
90
91
92
93
94
95
96
97
98
99
100
101
102
103
104
105
106
107
108
109
110
111
112
113
114
115
116
117
require "capybara/rspec"
require "capybara"
require "rspec"
require 'pry'
Capybara.default_driver = :selenium
Capybara.app_host = 'http://www.baidu.com'
Capybara.register_driver :selenium do |app| Capybara::Selenium::Driver.new(
app, :browser => :chrome )
end
# This file was generated by the `rspec --init` command. Conventionally, all
# specs live under a `spec` directory, which RSpec adds to the `$LOAD_PATH`.
# The generated `.rspec` file contains `--require spec_helper` which will cause
# this file to always be loaded, without a need to explicitly require it in any
# files.
#
# Given that it is always loaded, you are encouraged to keep this file as
# light-weight as possible. Requiring heavyweight dependencies from this file
# will add to the boot time of your test suite on EVERY test run, even for an
# individual file that may not need all of that loaded. Instead, consider making
# a separate helper file that requires the additional dependencies and performs
# the additional setup, and require it from the spec files that actually need
# it.
#
# The `.rspec` file also contains a few flags that are not defaults but that
# users commonly want.
#
# See http://rubydoc.info/gems/rspec-core/RSpec/Core/Configuration
RSpec.configure do |config|
# rspec-expectations config goes here. You can use an alternate
# assertion/expectation library such as wrong or the stdlib/minitest
# assertions if you prefer.
config.expect_with :rspec do |expectations|
# This option will default to `true` in RSpec 4. It makes the `description`
# and `failure_message` of custom matchers include text for helper methods
# defined using `chain`, e.g.:
# be_bigger_than(2).and_smaller_than(4).description
# # => "be bigger than 2 and smaller than 4"
# ...rather than:
# # => "be bigger than 2"
expectations.include_chain_clauses_in_custom_matcher_descriptions = true
end
# rspec-mocks config goes here. You can use an alternate test double
# library (such as bogus or mocha) by changing the `mock_with` option here.
config.mock_with :rspec do |mocks|
# Prevents you from mocking or stubbing a method that does not exist on
# a real object. This is generally recommended, and will default to
# `true` in RSpec 4.
mocks.verify_partial_doubles = true
end
# This option will default to `:apply_to_host_groups` in RSpec 4 (and will
# have no way to turn it off -- the option exists only for backwards
# compatibility in RSpec 3). It causes shared context metadata to be
# inherited by the metadata hash of host groups and examples, rather than
# triggering implicit auto-inclusion in groups with matching metadata.
config.shared_context_metadata_behavior = :apply_to_host_groups
# The settings below are suggested to provide a good initial experience
# with RSpec, but feel free to customize to your heart's content.
=begin
# This allows you to limit a spec run to individual examples or groups
# you care about by tagging them with `:focus` metadata. When nothing
# is tagged with `:focus`, all examples get run. RSpec also provides
# aliases for `it`, `describe`, and `context` that include `:focus`
# metadata: `fit`, `fdescribe` and `fcontext`, respectively.
config.filter_run_when_matching :focus
# Allows RSpec to persist some state between runs in order to support
# the `--only-failures` and `--next-failure` CLI options. We recommend
# you configure your source control system to ignore this file.
config.example_status_persistence_file_path = "spec/examples.txt"
# Limits the available syntax to the non-monkey patched syntax that is
# recommended. For more details, see:
# - http://rspec.info/blog/2012/06/rspecs-new-expectation-syntax/
# - http://www.teaisaweso.me/blog/2013/05/27/rspecs-new-message-expectation-syntax/
# - http://rspec.info/blog/2014/05/notable-changes-in-rspec-3/#zero-monkey-patching-mode
config.disable_monkey_patching!
# This setting enables warnings. It's recommended, but in some cases may
# be too noisy due to issues in dependencies.
config.warnings = true
# Many RSpec users commonly either run the entire suite or an individual
# file, and it's useful to allow more verbose output when running an
# individual spec file.
if config.files_to_run.one?
# Use the documentation formatter for detailed output,
# unless a formatter has already been configured
# (e.g. via a command-line flag).
config.default_formatter = 'doc'
end
# Print the 10 slowest examples and example groups at the
# end of the spec run, to help surface which specs are running
# particularly slow.
config.profile_examples = 10
# Run specs in random order to surface order dependencies. If you find an
# order dependency and want to debug it, you can fix the order by providing
# the seed, which is printed after each run.
# --seed 1234
config.order = :random
# Seed global randomization in this process using the `--seed` CLI option.
# Setting this allows you to use `--seed` to deterministically reproduce
# test failures related to randomization by passing the same `--seed` value
# as the one that triggered the failure.
Kernel.srand config.seed
=end
end

我们执行以下命令来运行我们的测试

1
2
3
4
5
6
7
8
9
10
11
12
13
14
15
16
17
18
19
20
21
# lqi @ CNlqi in ~/work/test/capybara_demo on git:master x [22:00:31]
$ rspec ./spec/features/baidusearch_spec.rb
***
Pending: (Failures listed here are expected and do not affect your suite's status)
1) i want search capybara i need to open browser should be has an browser
# Not yet implemented
# ./spec/features/bb_spec.rb:9
2) i want search capybara when i input baidu url into the browser textarea should be redirect to the baidu homepage
# Not yet implemented
# ./spec/features/bb_spec.rb:16
3) i want search capybara when i input the capybara into search text responds with 200 and show the result
# Not yet implemented
# ./spec/features/bb_spec.rb:20
Finished in 0.00059 seconds (files took 1.37 seconds to load)
3 examples, 0 failures, 3 pending

我们从测试结果能看出,我们并没有实现任何具体操作步骤,接下就让我们完成这些工作。
将我们测试文件baidusearch_spec.rb修改为以下内容

1
2
3
4
5
6
7
8
9
10
11
12
13
14
15
16
17
18
19
20
21
22
23
24
25
26
27
28
describe "i want search capybara", :type => :feature do
context "the page" do
before do
page.driver.browser.manage.window.resize_to(1440,900) #Mention it here
visit "/"
end
context 'i need to open browser' do
it 'should be has an browser' do
expect(page.driver.browser.browser).to eq :chrome
end
end
context 'when i input baidu url into the browser textarea' do
it 'should be redirect to the baidu homepage' do
expect(page.driver.current_url).to eq('https://www.baidu.com/')
end
end
context 'when i input the capybara into search text ' do
it ' show search the result' do
fill_in 'kw', :with => 'capybara'
click_button '百度一下'
expect(page).to have_content 'Capybara - Wikipedia, the free encyclopedia'
end
end
end
end

再次运行测试
这时浏览器打开并且按照我们测试文件中具体步骤一步一步进行操作和验证,全部通过

1
2
3
4
5
6
# lqi @ CNlqi in ~/work/test/capybara_demo on git:master x [22:26:15] C:1
$ rspec ./spec/features/baidusearch_spec.rb
...
Finished in 5.46 seconds (files took 3.81 seconds to load)
3 examples, 0 failures

cucumber方式

首先我们运行cucumber查看cucumber是否安装正确

1
2
3
# lqi @ CNlqi in ~/work/test/capybara_demo on git:master x [13:42:41]
$ cucumber
No such file or directory - features. You can use `cucumber --init` to get started.

当我们看到以上提示没有文件或者目录时,我们就可以确认cucumber安装成功
接下来让我们初始化cucumber测试目录结构

1
2
3
4
5
6
# lqi @ CNlqi in ~/work/test/capybara_demo on git:master x [11:24:56] C:2
$ cucumber --init
create features
create features/step_definitions
create features/support
create features/support/env.rb

这样就完成目录结构的初始化,我们要将所有feature文件都放到features目录下
support目录下,使我们需要的一些配置文件.

stepdefinitions目录下,是对feature文件中的具体操作实现。因为我们都知道feature文件中只是做了一些描述,具体的执行是放到step definitions下面的文件里面的。
接下来,我们用cucumber完成和上面spec一样的场景。

1
2
3
4
5
Feature: Search for capybara on baidu
Scenario: Search for website of baidu
Given I am on the baidu home page
When I search for "capybara"
Then website of search result are returned

在命令行中运行cucumber命令,
运行上述测试用例,便可以看到下列输出,你可以使用下面的代码段实现步骤定义:

1
2
3
4
5
6
7
8
9
10
11
12
13
14
15
16
17
18
19
20
21
22
23
24
25
26
# lqi @ CNlqi in ~/work/test/capybara_demo on git:master x [14:25:16] C:1
$ cucumber
Feature: Search for capybara on baidu
Scenario: Search for website of baidu # features/baidu_search_capybara.feature:2
Given I am on the baidu home page # features/baidu_search_capybara.feature:3
When I search for "capybara" # features/baidu_search_capybara.feature:4
Then website of search result are returned # features/baidu_search_capybara.feature:5
1 scenario (1 undefined)
3 steps (3 undefined)
0m0.395s
You can implement step definitions for undefined steps with these snippets:
Given(/^I am on the baidu home page$/) do
pending # Write code here that turns the phrase above into concrete actions
end
When(/^I search for "([^"]*)"$/) do |arg1|
pending # Write code here that turns the phrase above into concrete actions
end
Then(/^website of search result are returned$/) do
pending # Write code here that turns the phrase above into concrete actions
end

复制以上代码到具体step.rb文件中,我们新建文件capybara_search_step.rb。
再次运行cucumber命令
现在,您将看到命令行报告,这些步骤已经存在但没有实现:

1
2
3
4
5
6
7
8
9
10
11
12
13
14
15
# lqi @ CNlqi in ~/work/test/capybara_demo on git:master x [14:25:22]
$ cucumber
Feature: Search for capybara on baidu
Scenario: Search for website of baidu # features/baidu_search_capybara.feature:2
Given I am on the baidu home page # features/step_definitions/capybara_search_step.rb:1
TODO (Cucumber::Pending)
./features/step_definitions/capybara_search_step.rb:2:in `/^I am on the baidu home page$/'
features/baidu_search_capybara.feature:3:in `Given I am on the baidu home page'
When I search for "capybara" # features/step_definitions/capybara_search_step.rb:5
Then website of search result are returned # features/step_definitions/capybara_search_step.rb:9
1 scenario (1 pending)
3 steps (2 skipped, 1 pending)
0m0.152s

接下来,我们通过增加少量的代码来使我们自动化运行起来。
首先确保你的env.rb文件配置如下:

1
2
require 'capybara/cucumber'
Capybara.default_driver = :selenium

首先,我们在文件中添加require ‘capybara/cucumber’;
这是我们必须需要加载文件。
之后我们需要告诉capybara使用selenium驱动:

1
Capybara.default_driver = :selenium

再次重申,capybara只是充当一个中间件,适配不同的dirver,使我们能够兼容任何的驱动程序,例如(Selecting the Driver,
RackTest,
Selenium,
Capybara-webkit,
Poltergeist)这里我们选择selemium webdriver 是因为它是目前最流行的开源浏览器自动化工具,很多公司的自动化框架都是基于它之上的二次开发而成,例如appium,淘宝的Automan X,网易Dagger等。

如果我们不设置驱动,将会得到以下错误

1
2
3
4
5
6
7
8
9
10
11
12
13
14
15
16
17
18
19
20
21
# lqi @ CNlqi in ~/work/test/capybara_demo on git:master x [17:13:47] C:2
$ cucumber
rack-test requires a rack application, but none was given (ArgumentError)
/Users/lqi/.rbenv/versions/2.2.2/lib/ruby/gems/2.2.0/gems/capybara-2.8.0/lib/capybara/rack_test/driver.rb:17:in `initialize'
/Users/lqi/.rbenv/versions/2.2.2/lib/ruby/gems/2.2.0/gems/capybara-2.8.0/lib/capybara.rb:509:in `new'
/Users/lqi/.rbenv/versions/2.2.2/lib/ruby/gems/2.2.0/gems/capybara-2.8.0/lib/capybara.rb:509:in `block in <top (required)>'
/Users/lqi/.rbenv/versions/2.2.2/lib/ruby/gems/2.2.0/gems/capybara-2.8.0/lib/capybara/session.rb:85:in `call'
/Users/lqi/.rbenv/versions/2.2.2/lib/ruby/gems/2.2.0/gems/capybara-2.8.0/lib/capybara/session.rb:85:in `driver'
/Users/lqi/work/test/capybara_demo/features/support/env.rb:12:in `<top (required)>'
/Users/lqi/.rbenv/versions/2.2.2/lib/ruby/gems/2.2.0/gems/cucumber-2.4.0/lib/cucumber/rb_support/rb_language.rb:96:in `load'
/Users/lqi/.rbenv/versions/2.2.2/lib/ruby/gems/2.2.0/gems/cucumber-2.4.0/lib/cucumber/rb_support/rb_language.rb:96:in `load_code_file'
/Users/lqi/.rbenv/versions/2.2.2/lib/ruby/gems/2.2.0/gems/cucumber-2.4.0/lib/cucumber/runtime/support_code.rb:142:in `load_file'
/Users/lqi/.rbenv/versions/2.2.2/lib/ruby/gems/2.2.0/gems/cucumber-2.4.0/lib/cucumber/runtime/support_code.rb:84:in `block in load_files!'
/Users/lqi/.rbenv/versions/2.2.2/lib/ruby/gems/2.2.0/gems/cucumber-2.4.0/lib/cucumber/runtime/support_code.rb:83:in `each'
/Users/lqi/.rbenv/versions/2.2.2/lib/ruby/gems/2.2.0/gems/cucumber-2.4.0/lib/cucumber/runtime/support_code.rb:83:in `load_files!'
/Users/lqi/.rbenv/versions/2.2.2/lib/ruby/gems/2.2.0/gems/cucumber-2.4.0/lib/cucumber/runtime.rb:253:in `load_step_definitions'
/Users/lqi/.rbenv/versions/2.2.2/lib/ruby/gems/2.2.0/gems/cucumber-2.4.0/lib/cucumber/runtime.rb:61:in `run!'
/Users/lqi/.rbenv/versions/2.2.2/lib/ruby/gems/2.2.0/gems/cucumber-2.4.0/lib/cucumber/cli/main.rb:32:in `execute!'
/Users/lqi/.rbenv/versions/2.2.2/lib/ruby/gems/2.2.0/gems/cucumber-2.4.0/bin/cucumber:8:in `<top (required)>'
/Users/lqi/.rbenv/versions/2.2.2/bin/cucumber:23:in `load'
/Users/lqi/.rbenv/versions/2.2.2/bin/cucumber:23:in `<main>'

默认情况下,capybara被用来测试rack 应用。rack 是一个设计非常巧妙的中间件,被用作在rails与sinatra框架做全栈的Client/Server集成测试,并且没有什么HTTP的开销,从而是测试能够快速运行。稍后,我们将详细介绍capybara如何测试在rails与sinatra的应用测试。
接下来我们的任务就是你在步骤定义用Ruby代码调用capybaraAPI驱动测试。
将以下代码复制到你的capybara_search_step.rb中

1
2
3
4
5
6
7
8
9
10
11
12
13
Given(/^I am on the baidu home page$/) do
visit 'https://www.baidu.com/'
end
When(/^I search for "([^"]*)"$/) do |search_term|
fill_in 'kw', :with => search_term
click_on 'su'
end
Then(/^website of search result are returned$/) do
page.should have_content 'capybara'
end

在我们分析代码之前,让我们先运行测试,看看会发生什么。像往常一样,在命令行中输入cucumber。
希望你能看到chrome打开,并且跳转到baidu首页,之后搜索到capybara结果并返回。
恭喜你,你已经利用capybara完成了第一个全栈的集成测试。

在我们深入了解capybara丰富的API之前,让我们简要的回顾一下每个步骤的内容,这里你可以看到capybra如何优雅而简洁使用api,代码字面含义已经向我们展示它在干什么,不需要多解释。cucumber和capybra配合起来使用,具有良好的可读性,项目中的任何一个角色都能够当前场景做了哪些事情,非常适合应用于自动化和维护工作。
第一行代码告诉capybara通知driver(selenium webdriver)
打开一个浏览器并跳转到我们提供的链接地址:

1
visit 'https://www.baidu.com/'

接下来,我们需要输入查询条件,点击搜索按钮,所以我们告诉capybara去让driver在页面上查找搜输入栏,并填写搜索条件。

1
2
3
fill_in 'kw', :with => search_term
click_on 'su'

这里唯一的困惑是fill_in 方法中使用’kw’这个关键字,当你代码告诉capybara去在页面上寻找
这个关键字时,capybara使用了一种’猜测’的机制。
也就是说capybra试图在DOM元素各种属性中找到你要求的。在这个例子中,我们知道baidu搜索表栏的id属性kw,这是我们需要在代码中提供的。
最后,我们需要检查返回的搜索结果是否正确。为此,我们使用capybara的内置RSpec匹配器。如果你不知道RSpec,rspec官方文档是你最好的选择(http://rspec.info/),与传统断言不同是当条件不满足时,会抛出异常,而不是只是返回false

1
page.should have_content 'capybara'

最后需要注意的是,have_content方法的匹配器内置了一个默认的等待。这是非常有用的,因为如果查找的内容我是通过JavaScript异步加载而成的话(而不是在初始页面就加载完成),capybara在我们设置默认等待时间重试,看它是否存在。我们将在后面的章节介绍如何处理异步JavaScript的问题。

总结,本章目标是让你认识capybra,以及配置它的运行环境,ruby和rubygems以及相关依赖。最后,我们通过一个简单的场景来编写自动化,来加强我们的学习。

capybara4--安装cucumber

发表于 2016-08-30

capybara是一个简单的API,它提供了抽象层在你真实自动化库之上。如果它帮助,认为capybara是你的翻译,你告诉它做一些事情,它将优雅的将命令转换为你应用驱动的API。

所以当我们使用capybara进行翻译时,我们需要告诉capybara做什么并且需要一个API自动化库去进行翻译。
capybara是一个非常灵活的库,
通过这本书我们将看到它在各种场景中应用。然而。目前为止最常见的情景是应用cucumber作为capybara测试驱动,去驱动selenium webdriver 开展浏览器自动化。
当cucumber被调用来解析这些简单易懂的英语场景时,它将使用正则表达式去将这些匹配

cucumber介绍

cucumber是一种可以使用文本描述语言来执行自动测试用例的工具,使用的语言叫做Gherkin.

Gherkin用于描述软件的行为而不需要了解具体的实现,使用Gherkin主要有两个目的文档和自动测试用例(我们希望能够和手工测试用例也统一)。 Gherkin支持超过40种语言,包括英文、中文。 Gherkin可以在任何地方新增注释,注释以#开头,每一个文件都是已.feature结尾,在feature文件中输入功能描述、场景、步骤,当执行这个功能时每一个步骤都需要编写ruby代码块来实现具体的功能,当前cucumber支持多种语言,除了ruby还可以使用java、javascript来编写具体定义层的实现。

以下是一个cucumber 场景的例子

Feature: Search for Videos on Baidu

Scenario: Search for Videos
    Given I am on the  baidu home page
    When I search for "capybara"
    Then search result are returned

我们设置可以采用中文实现场景
中文的话最前面必须增加# language: zh-CN

1
2
3
4
5
6
7
8
9
10
11
12
13
# language: zh-CN
功能:第一个中文程序
中文实现
场景:中文实现场景
假如当前是中文
当输入是测试
那么能看到中文测试

下面的流程图说明了从cucumber到底层驱动如何实现,capybara在整个流程里面充当是中间价的作用。

安装

1
gem install cucumber

如果你使用的是 bundler,只是需要添加以下代码到Gemfile:

1
2
3
group :test do
gem 'cucumber'
end

初始化features目录:

1
cucumber --init

查看完帮助列表:

1
cucumber --help

运行所有features:

1
cucumber

Cucumber-Rails

如果你使用capybara 来测试rails应用,你应该安装cucumber-rails gem 而不是标准的rails gem。
这个gem需要capybara和cucumber作为依赖。
所以当你安装cucumber-rails gem时,会自动安装这些依赖,我们只需要运行以下命令

1
gem install cucumber-rails

如果你使用bundle,只需要将以下代码添加进gemfile:

1
2
3
4
5
group :test, :development do
gem 'cucumber-rails', :require => false
# database_cleaner is not required, but highly recommended
gem 'database_cleaner'
end

然后运行

1
bundle install

运行生成器帮助我们生成目录

1
rails generate cucumber:install

capybara3--rspec配置

发表于 2016-08-30

rspec配置

我们知道Capybara 只是是一个用来以模拟用户对web应用的操作来测试web应用的工具包,不能真正的称之为测试框架,它需要其他的测试驱动框架来帮助我们完成测试工作。所以我们需要一个测试驱动框架.

RSpec由Steven Baker开发并在2005年发布,全面支持Ruby程序的BDD开发测试方式,并且对于Rails程序有着良好的支持,针对View,Controller和Model每一层都有良好的支持。RSpec目前的最新版本是:3.5。

它在 BDD 流程的开发中被用来写高可读性的测试,引导并验证你开发的应用程序。

minitest与rspec都是ruby和rails比较流行的框架。这里我们选择rspec。

安装rspec很简单,打开command line运行一下操作:

1
gem install rspec

或者将rspec 添加到gemfile里

1
gem 'rspec'

执行bundle install 来安装
如果你的项目采用的时rails,那么rspec-rails 或许更适合你

在gemfile里添加

1
2
3
group :development, :test do
gem 'rspec-rails', '~> 3.4'
end

执行 bundle install

初始化测试目录

1
rails generate rspec:install

这增加了以下文件用于配置:

1
2
3
.rspec
spec/spec_helper.rb
spec/rails_helper.rb

capybara2--准备环境

发表于 2016-08-26

ruby环境配置

capycara
Capybara 需要 Ruby 1.9.3或之后的版本. 所以首先我们需要在我们的操作系统中,配置ruby运行环境

windows

  1. 下载 & 安装 Ruby
    从http://rubyinstaller.org/或者 http://railsinstaller.org/ 下载已经打包好的安装程序。
    1.1安装 ruby版本
  2. 安装 DevKit
    从 http://rubyinstaller.org/downloads/下载安装DevKit
    2.1 RubyInstaller Development Kit (DevKit)的安装
    在使用RubyGems安装Ruby on Rails的同时,还有几个一起被安装的类库。这些类库中,有一些是保持C语言编写的代码的形式来发布的,它们需要通过使用“gcc”编译器等结合环境一起来编译,但在Windows上是不能用gcc来编译的。
    安装了本次所介绍的“RubyInstaller Development Kit (DevKit)”后,编译器就可以很容易地安装使用所需的类库。

Ruby环境配置

  1. 在windows中配置环境变量

    RUBY_HOME=rubyinstaller_dir (实际的ruby所在路径)

    在path中添加 %RUBY_HOME%\bin

  2. 在命令行下运行 ruby –version,如果显示ruby版本信息说明安装正常。

多版本ruby环境配置

利用uru,这个工具可以帮助我们在windows系统上 管理多个ruby版本
下载安装uru

  1. 安装uru
    解压uru到某一目录
    例如C:\tools下
    运行以下命令安装

    1
    C:\tools> uru_rt admin install
  2. 安装ruby版本,可以安装任意个ruby版本

  3. 在uru中注册ruby版本

1
2
3
4
5
6
7
C:\> uru admin add c:\ruby\jruby-1.7.18\bin\
---> Registered jruby at `c:\ruby\jruby-1.7.18\bin` as `1718`
C:\> uru ls
1718 : jruby 1.7.18 (1.9.3p551) 2014-12-22 625381c on Java HotSpot(TM) ...
193 : ruby 1.9.3p551 (2014-11-13) [i386-mingw32]
215 : ruby 2.1.5p273 (2014-11-13 revision 48405) [x64-mingw32]

详细操作命令查看
http://www.neverletdown.net/2015/08/managing-multiple-ruby-versions-with-uru.html

强烈不建议用windows来开发,原因请查看
https://bitbucket.org/jonforums/uru

linux(Ubuntu)或者mac os更适合你用来开发。
详细请看 https://ruby-china.org/topics/1020

linux-ubuntu

Installing Ruby

第一步安装配置ruby环境所需要的一些基础库

1
2
sudo apt-get update
sudo apt-get install git-core curl zlib1g-dev build-essential libssl-dev libreadline-dev libyaml-dev libsqlite3-dev sqlite3 libxml2-dev libxslt1-dev libcurl4-openssl-dev python-software-properties libffi-dev

利用工具来管理的ruby版本,rbenv 就是一个很好的工具

1
2
3
4
5
6
7
8
9
10
11
12
13
14
cd
git clone https://github.com/rbenv/rbenv.git ~/.rbenv
echo 'export PATH="$HOME/.rbenv/bin:$PATH"' >> ~/.bashrc
echo 'eval "$(rbenv init -)"' >> ~/.bashrc
exec $SHELL
git clone https://github.com/rbenv/ruby-build.git ~/.rbenv/plugins/ruby-build
echo 'export PATH="$HOME/.rbenv/plugins/ruby-build/bin:$PATH"' >> ~/.bashrc
exec $SHELL
rbenv install 2.3.1
rbenv global 2.3.1
ruby -v
https://gorails.com/setup/ubuntu/16.10

mac os

利用homebrew 来安装管理mac的应用
安装 Homebrew

首先,我们需要安装homebrew。homebrew 允许我们方便从源码安装和编译软件包
当homebrew需要安装xcode 命令行工具,输入yes.打开命令行并且运行以下命令:

1
ruby -e "$(curl -fsSL https://raw.githubusercontent.com/Homebrew/install/master/install)"

Installing Ruby

1
brew install rbenv ruby-build

Add rbenv to bash so that it loads every time you open a terminal

1
2
echo 'if which rbenv > /dev/null; then eval "$(rbenv init -)"; fi' >> ~/.bash_profile
source ~/.bash_profile

Install Ruby

1
2
3
rbenv install 2.3.1
rbenv global 2.3.1
ruby -v

安装capybara

安装系统依赖库

在某些操作系统中ruby环境可能需要一些第三方库的支持,通常是出于性能方面的原因,ruby是一种解释性语言所以在处理某些任务时,例如解析XML会非常慢,这时把这些任务交给第三方库处理,效率就会成倍增加。
对于windows平台,你不用担心第三依赖库的问题,不过你要确保您已经安装了Ruby DevKit;
详细说明如何做到这一点,请参阅http://rubyinstaller.org/add-ons/ devkit

capybara依赖于nokogirl,一个流行的基于ruby的XML的解析器,该库可能需要以下第三方库的支持:
• libxml2
• libxml2-dev • libxslt
• libxslt-dev
对于不同的操作系统安装这些库的方式可能略有不同,对于linux 例如Ubuntu 可以使用apt-get ,对于redhat 请使用yum install 对于mac os x 那么brew 是你最好的选择。
完成这些第三方依赖后 我们就可以安装capybara了

添加以下的代码到你的Gemfile里,并且运行bundle install。

1
gem 'capybara'

什么是Bundle

相当于多个RubyGems批处理运行。在配置文件gemfilel里说明你的应用依赖哪些第三方包,他自动帮你下载安装多个包,并且会下载这些包依赖的包.
http://bundler.io/

capybara1-capybara简介

发表于 2016-08-26

capybara简介

capybara是一个ruby的gem,它是一个用来测试web应用的工具包,使用它可以模拟用户对web应用的操作。它可以通过CSS或xpath选择器选中页面上的元素,然后对这些元素应用一些操作,从而实现模拟用户行为。

底层driver的实现

基于底层driver的基础上,提供一套统一的 界面交互api,如visit, right_click,hover等。它内置 Rack::Test 和 Selenium 支持,也支持其他驱动。WebKit 通过外部 gem 的形式支持。

底层的driver有很多,可以是完全打开浏览器方式的driver(如:RackTest,selenium-webdriver),也可以是基于headless webkit 的 driver(如:capybara-webkit, poltergeist).

capybara 优点

● 无需配置 对于 Rails 和 Rack 应用而言,开箱即用。
● 符合直觉的 API 模拟真实用户行为。
● 可替换后端 可以替换测试后端,例如从快速的 headless 模式切换到实际的浏览器,无需更改测试。
● 强力同步 你不用手动等待异步过程结束。

因为capyybara提供了以下好处:
● 这是一个更高层次的API,这意味着当你使用不同driver时,例如(headless或者browser)可以使用同样的API处理动态页面或静态HTML.
● 它是专门为U自动化测试web应用而设计的程序,
● 因此它拥有十分有用的断言的方法判断页面是否正确。
● 当我们测试真实的浏览器时,他会自动帮助我们处理许多棘手的异步问题
● 它被设计用于测试机架的应用,因此它会开机并为您管理后台服务器
● 它为设计为rack应用的测试框架,所以它将引导和管理后台服务。

gatling官方文档翻译5

发表于 2016-06-29

第五篇

http://gatling.io/docs/2.2.2/migration_guides/2.0-to-2.1.html

Migrating from 2.0 to 2.1
Global changes
Scala 2.11
Gatling is now built with Scala 2.11. If you’re using Scala IDE, make sure you’re using a version compatible with Scala 2.11.

Compiler runs standalone
Gatling itself doesn’t compile the Simulations anymore and expects that the simulations are already compiled. This means that gatling.sh/gatling.bat and the Maven plugin runs the compiler prior to running Gatling. Consequently, a few options in gatling.conf have been removed:

gatling.core.disableCompiler
gatling.core.zinc.jvmArgs
Please note that, as this change implied that the Maven Plugin was heavily modified so that it compiles the simulations separately prior to running Gatling, you’ll need to upgrade the Maven Plugin to its version 2.1.0 too.

Percentiles
Gatling now publishes 4 percentiles instead of 2. These percentiles are published in the reports and in the Graphite integration module. Beware that keys in gatling.conf file have been translated:

Gatling 2.0:
percentile1 = 95
percentile2 = 99
Gatling 2.1+:
percentile1 = 50
percentile2 = 75
percentile3 = 95
percentile4 = 99
Core
Mute mode
The “mute mode” option, which was previously restricted to the SBT Plugin, is now also usable by the bundle scripts and the Maven Archetype.

Assertions
Validating assertions in combination with the reports-only / ro option does not require to pass the simulation (using -s) for which the assertions will be validated anymore.

Throttling
Throttling now automatically adds a maxDuration of either the simulation throttling duration, or the minimum of the scenarios throttling durations.

HTTP
Parameters
Form parameters are no longer specific to POST method, you can use them with all methods.

Request Bodies Directory
The directory name was changed from request-bodies to bodies as it now can host both request bodies and response bodies. The latter one are now captured by the recorder, and can be used as template for checking the response body.

CLI option was renamed from rbf to bdf.

Checks
Deprecated dontValidate was dropped in 2.1 as previously announced. Please use optional instead.

Protocol
Deprecated baseHeaders was dropped in 2.1 as previously announced. Please use headers instead.

Maven Archetype
Due to some necessary changes to allow Gatling to use Scala 2.11, you’ll have to update IDEPathHelper.scala, Engine.scala and Recorder.scala if you’re using the Maven archetype.

Either generate a new project with the 2.1.1 archetype (there was a bug in 2.1), or override your classes with the ones here. If you choose the latter, don’t forget to fix the simulationPackage in Recorder.scala.

SBT Plugin
The SBT Plugin’s test framework has been moved to the core project in 2.1. As a consequence, the test framework name has be modified to follow the naming conventions of all core modules and share its versionning.

The SBT Plugin will also share the same versionning schema as all other Gatling modules, and has been renamed to ‘gatling-sbt’.

The new coordinates are therefore :

“io.gatling” % “gatling-sbt” % “2.1.0” for the SBT Plugin
“io.gatling” % “gatling-test-framework” % “2.1.0” for the testing framework.

从2.0 合并到2.1
全局变化
Scala 2.11
gatling 现在用2.11 构建,如果你使用Scala IDE, 确认你是使用的版本能够兼容scala2.11.

Compiler runs standalone
编译器独立的运行

gatling本身不再编译模拟器和预测模拟已经编译。

这就意味着 gatling.sh/gatling.bat 和maven插件编译在运行gatling之前。因此,一些选项在gatling.conf 已经被移除

请注意,这种变化意味着Maven插件大量修改,单独编译仿真运行gatling之前,你需要升级版本2.1.0的Maven插件。

Percentiles
gatling 发布4位百分数来代替2位。
这些百分位数发布在生成的报告和图表的集成模块
注意键在gatling.conf 文件已经被翻译。

Gatling 2.0:
percentile1 = 95
percentile2 = 99
Gatling 2.1+:
percentile1 = 50
percentile2 = 75
percentile3 = 95
percentile4 = 99
Core

Mute mode

“静音模式”选项,该选项以前局限于SBT插件,现在也可用bundle的脚本和Maven Archetype。
Assertions

验证断言结合the reports-only / ro option不需要通过仿真(using- s)的断言将被验证了。

Throttling
节流现在自动添加一个maxDuration仿真节流的持续时间、节流时间或最低的场景。
HTTP
Parameters
形式参数不再是特定于POST方法,您可以使用它们在全部的方法。
Request Bodies Directory
目录更名从请求体的body,因为它现在可以主机请求body和响应。后者现在被记录,并可以用作模板检查响应的body。

CLI option被重新命名从 rbf 到 bdf.

Checks
此前宣布弃用dontValidate下降2.1。请使用optional。

Protocol
此前宣布弃用baseHeaders下降2.1。请使用headers。

Maven Archetype

由于一些必要的改变,允许gatling使用Scala 2.11中,你将不得不更新IDEPathHelper.scala, Engine.scala and Recorder.scala。如果你使用Maven archetype 。

SBT Plugin
SBT插件的测试框架已经被转移到2.1的核心项目。因此,测试框架的名称已被修改遵循所有核心模块的命名约定和分享它的版本。

SBT插件还将共享相同的版本模式和其他gatling模块,并重新命名为“gatling-sbt”。
因此,新坐标:
“io.gatling” % “gatling-sbt” % “2.1.0” 关于 the SBT 插件
“io.gatling” % “gatling-test-framework” % “2.1.0” 关于测试框架.

12345
seven

seven

小qa 在thoughtworks苦苦挣扎中

42 日志
16 标签
RSS
© 2017 seven
由 Hexo 强力驱动
主题 - NexT.Pisces