接上节 我们继续学习
回到router
我们再来看看add路径
最后调用的是一个 new.vue
|
|
nv-head设置标题
内容部分
一个option标签来选择具体的分类,一个输入栏 一个textarea
回到router
我们再来看看add路径
最后调用的是一个 new.vue
|
|
nv-head设置标题
内容部分
一个option标签来选择具体的分类,一个输入栏 一个textarea
接下来我们要看看router
topic router指向的是topic vue components
依然是有一个fix header 和list中一样
我们继续看看第二部分,构成了页面内容的只要部分
非常简单主要是进行topic的展示 回复 更新等
接上一节代码
我们首先去看看nvhead component
import nvHead from ‘../components/header.vue’;
其实就是 header.vue
ok我们一行一行代码过
fixHead来自于list.vue中传递过来的参数
show来自于 data()
click 调用showMenus()
|
|
通过一些参数来定制header的样式
|
|
click方法调用 openmenu
|
|
messageCount 来自于messagfe.vue
|
|
|
|
router-link 指向 add 路由
:show-menu=”show” :page-type=”pageType” :nick-name=”nickname” :profile-url=”profileimgurl”
调用方法 传参数 返回其值
上面基本的header 组件已经详尽介绍
下来让我回到list中继续
list 中 第二部分由一个html5 section标签构成
由一个无序例表组成
<h3 v-text="item.title"
                           :class="getTabInfo(item.tab, item.good, item.top, true)"
                           :title="getTabInfo(item.tab, item.good, item.top, false)">
                   </h3>
设置样式
其他也没什么了 都去 item对象中取值
##通过一个简单vue项目了解vue整个流程
大神写的一个高仿cnodejs
直接clone
启动服务(http://localhost:8020)
然而我们并不是让你们看如何这个页面如何好看,那没啥用
还是进入code中,才能理解其中的玄学
好的编辑器是成功的一半,所以我选vscode,你呢 哈哈
好了 进入主题 先看项目结构
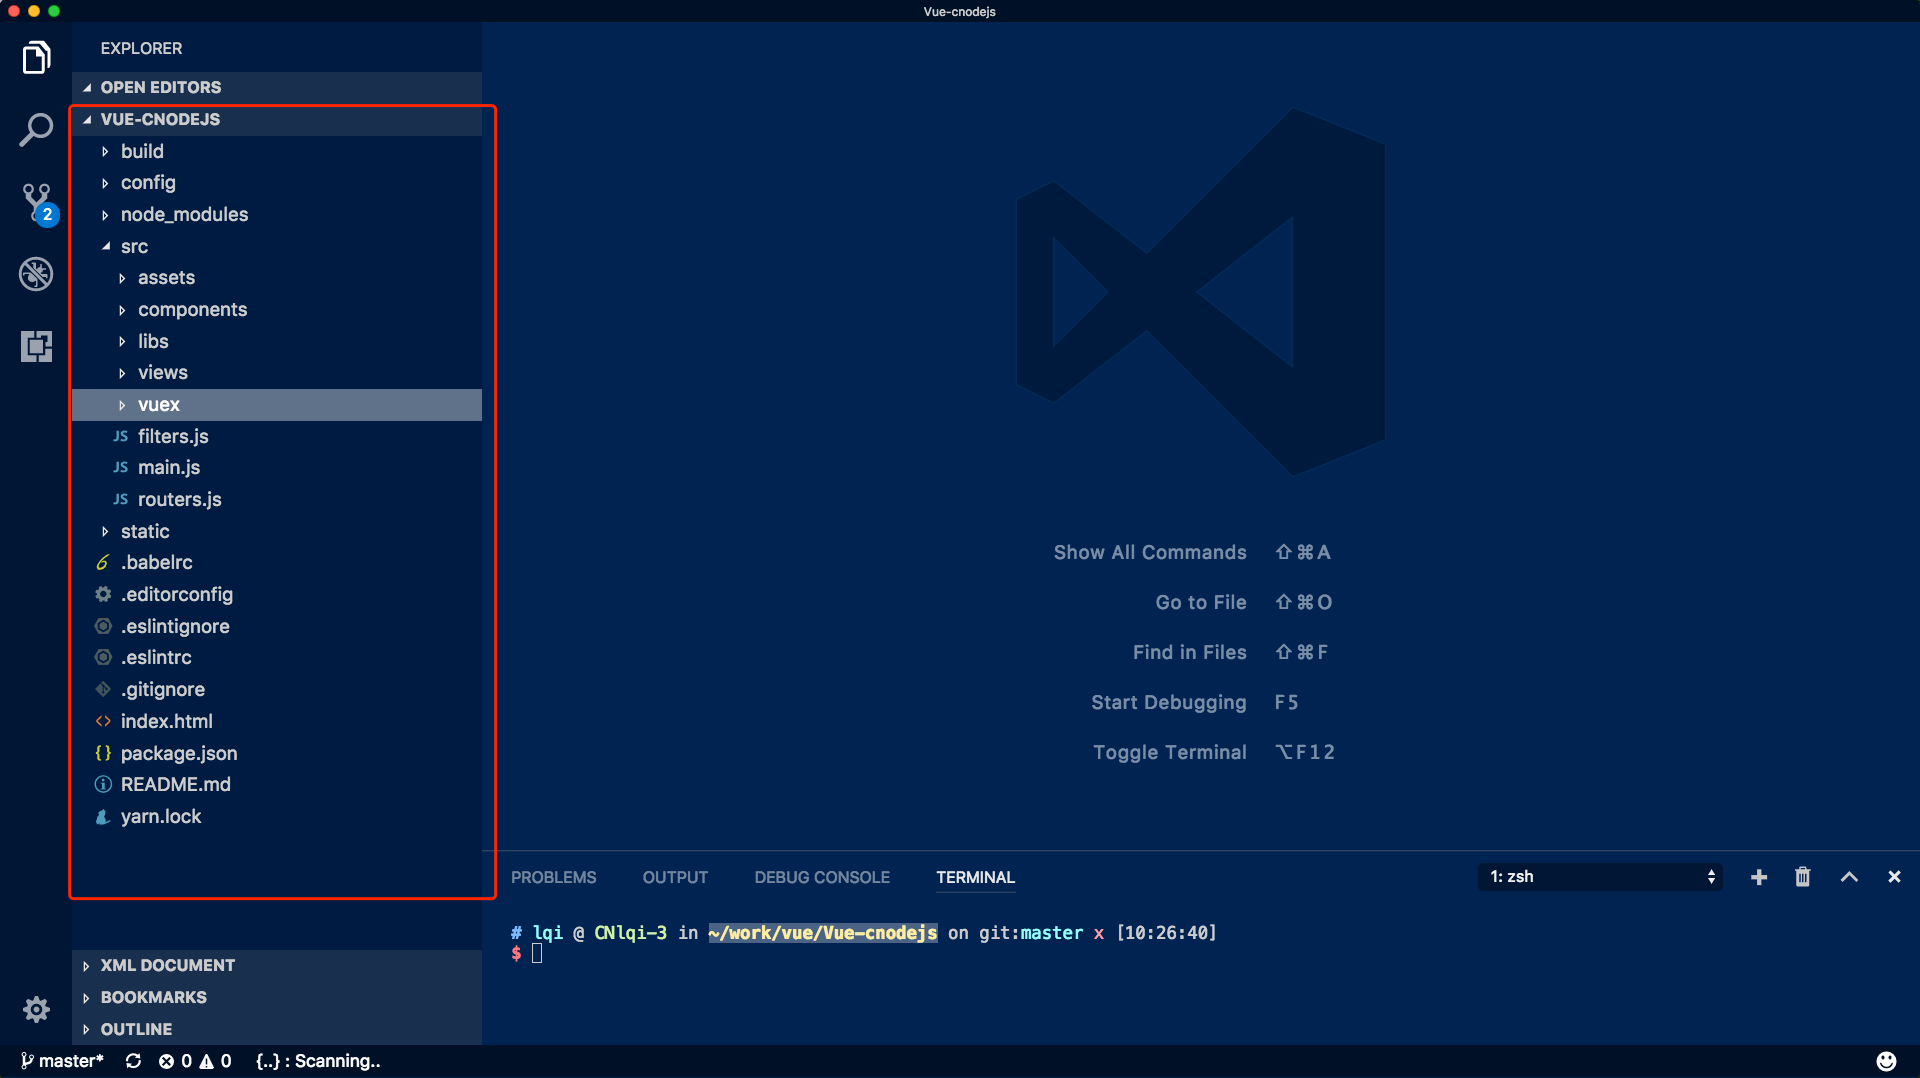
采用 vue2 vue-router2 vuex 组件思想构建了整个项目
先来看看 main.js main文件为整个文件的入口
这就是整个main文件 只是将vuex store 与router 最后都实例化到vue对象中并挂在到id为app的节点下
|
|
上面定义了系统所有的路由路径,以及需要实现懒加载的路由
我们先看看系统由多少组件组合而成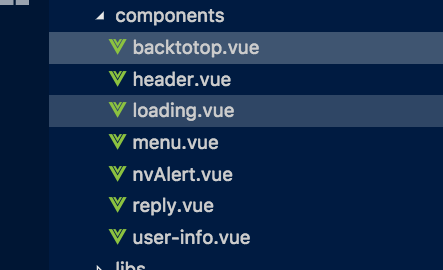
再来看看 views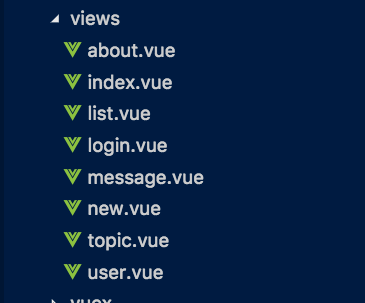
回到我们的router 当我们进入一个应用时,首先呈现在我们眼前的应该是index.
我们看看router的代码
而component 则是来自 index.vue
ok 我们看看 index.vue
index.vue 只是利用mount去向$router push一个{ name: ‘list’}对象
设置了一个异步操作 2秒后 跳转到list页面
在来看看 index.html
他是整个SPA的基础页面
将真个应用会挂载的id 为app 这个节点下。
再来看看index跳转的list页面
利用了2个component nvHEAD nvTop
下一篇 继续讲解 list view
首先引入vue.js和vue-router.js:
然后创建两个组件构造器Home和About:
App.vue
|
|
调用构造器VueRouter,创建一个路由器实例router。
|
|
page1.vue
|
|
page2.vue
实现步骤:
* npm安装vue-router
* Vue.use(VueRouter)全局安装路由功能
* 定义路径数组routes并创建路由对象router
* 将路由注入到Vue对象中
* 在根组件中使用<router-link>定义跳转路径
* 在根组件中使用<router-view>来渲染组件
* 创建子组件
router-link标签用于页面的跳转
当点击这个router-link标签时 router-view就会渲染路径为/page1的页面。
注意:router-link默认是一个a标签的形式,如果需要显示不同的样子,可以在router-link标签中写入不同标签元素,如下显示为button按钮。
如果使用 v-bind 指令,还可以在 to 后面接变量,配合 v-for 指令可以渲染导航菜单
如果对于所有 ID 各不相同的用户,都要使用 home 组件来渲染,可以在 routers.js 中添加动态参数:
{
path: ‘/home/:id’,
component: Home
}
这样 “/home/user01”、”/home/user02”、”/home/user03” 等路由,都会映射到 Home 组件
然后还可以使用 $route.params.id 来获取到对应的 id
|
|
|
|
也可以通过JS代码控制路由的界面渲染,方法如下:
实际情况下,有很多按钮在执行跳转之前,还会执行一系列方法,这时可以使用 this.$router.push(location) 来修改 url,完成跳转
|
|
|
|
|
|
组件可以扩展HTML元素,封装可重用的HTML代码,我们可以将组件看作自定义的HTML元素。
要注册一个全局组件,可以使用 Vue.component(tagName, options)。例如:
组件在注册之后,便可以作为自定义元素
|
|
你不必把每个组件都注册到全局。你可以通过某个 Vue 实例/组件的实例选项 components 注册仅在其作用域中可用的组件:
这种封装也适用于其它可注册的 Vue 功能,比如指令。
DOM 模板解析注意事项
当使用 DOM 作为模板时 (例如,使用 el 选项来把 Vue 实例挂载到一个已有内容的元素上),你会受到 HTML 本身的一些限制,因为 Vue 只有在浏览器解析、规范化模板之后才能获取其内容。尤其要注意,像
在自定义组件中使用这些受限制的元素时会导致一些问题,例如:
自定义组件
应当注意,如果使用来自以下来源之一的字符串模板,则没有这些限制:
<script type="text/x-template">
JavaScript 内联模板字符串
.vue 组件
因此,请尽可能使用字符串模板。
构造 Vue 实例时传入的各种选项大多数都可以在组件里使用。只有一个例外:data 必须是函数。实际上,如果你这么做:
那么 Vue 会停止运行,并在控制台发出警告,告诉你在组件实例中 data 必须是一个函数。但理解这种规则为何存在也是很有益处的,所以让我们先作个弊:
由于这三个组件实例共享了同一个 data 对象,因此递增一个 counter 会影响所有组件!这就错了。我们可以通过为每个组件返回全新的数据对象来修复这个问题:
由于这三个组件实例共享了同一个 data 对象,因此递增一个 counter 会影响所有组件!这就错了。我们可以通过为每个组件返回全新的数据对象来修复这个问题:
在 Vue 中,父子组件的关系可以总结为 prop 向下传递,事件向上传递。父组件通过 prop 给子组件下发数据,子组件通过事件给父组件发送消息。看看它们是怎么工作的。
使用 Prop 传递数据
组件实例的作用域是孤立的。这意味着不能 (也不应该) 在子组件的模板内直接引用父组件的数据。父组件的数据需要通过 prop 才能下发到子组件中。
子组件要显式地用 props 选项声明它预期的数据:
传递
HTML 特性是不区分大小写的。所以,当使用的不是字符串模板时,camelCase (驼峰式命名) 的 prop 需要转换为相对应的 kebab-case (短横线分隔式命名):
如果你使用字符串模板,则没有这些限制。
与绑定到任何普通的 HTML 特性相类似,我们可以用 v-bind 来动态地将 prop 绑定到父组件的数据。每当父组件的数据变化时,该变化也会传导给子组件:
你也可以使用 v-bind 的缩写语法:
如果你想把一个对象的所有属性作为 prop 进行传递,可以使用不带任何参数的 v-bind (即用 v-bind 而不是 v-bind:prop-name)。例如,已知一个 todo 对象:
然后:
将等价于:
初学者常犯的一个错误是使用字面量语法传递数值:
因为它是一个字面量 prop,它的值是字符串 “1” 而不是一个数值。如果想传递一个真正的 JavaScript 数值,则需要使用 v-bind,从而让它的值被当作 JavaScript 表达式计算:
我们可以为组件的 prop 指定验证规则。如果传入的数据不符合要求,Vue 会发出警告。这对于开发给他人使用的组件非常有用。
要指定验证规则,需要用对象的形式来定义 prop,而不能用字符串数组:
Vue.component(‘example’, {
props: {
// 基础类型检测 (null 指允许任何类型)
propA: Number,
// 可能是多种类型
propB: [String, Number],
// 必传且是字符串
propC: {
type: String,
required: true
},
// 数值且有默认值
propD: {
type: Number,
default: 100
},
// 数组/对象的默认值应当由一个工厂函数返回
propE: {
type: Object,
default: function () {
return { message: ‘hello’ }
}
},
// 自定义验证函数
propF: {
validator: function (value) {
return value > 10
}
}
}
})
type 可以是下面原生构造器:
String
Number
Boolean
Function
Object
Array
Symbol
type 也可以是一个自定义构造器函数,使用 instanceof 检测。
当 prop 验证失败,Vue 会抛出警告 (如果使用的是开发版本)。注意 prop 会在组件实例创建之前进行校验,所以在 default 或 validator 函数里,诸如 data、computed 或 methods 等实例属性还无法使用。
我们知道,父组件使用 prop 传递数据给子组件。但子组件怎么跟父组件通信呢?这个时候 Vue 的自定义事件系统就派得上用场了。
使用 v-on 绑定自定义事件
每个 Vue 实例都实现了事件接口,即:
使用 $on(eventName) 监听事件
使用 $emit(eventName) 触发事件
Vue 的事件系统与浏览器的 EventTarget API 有所不同。尽管它们的运行起来类似,但是 $on 和 $emit 并不是addEventListener 和 dispatchEvent 的别名。
另外,父组件可以在使用子组件的地方直接用 v-on 来监听子组件触发的事件。
不能用 $on 侦听子组件释放的事件,而必须在模板里直接用 v-on 绑定,参见下面的例子。
下面是一个例子:
我们可能会需要对一个 prop 进行“双向绑定”。
如下代码
会被扩展为:
当子组件需要更新 foo 的值时,它需要显式地触发一个更新事件:
this.$emit(‘update:foo’, newValue)
v-model 指令在表单控件元素上创建双向数据绑定。
v-model 本质上不过是语法糖,它负责监听用户的输入事件以更新数据,并特别处理一些极端的例子。
v-model 会忽略所有表单元素的 value、checked、selected 特性的初始值。因为它会选择 Vue 实例数据来作为具体的值。你应该通过 JavaScript 在组件的 data 选项中声明初始值。
对于要求 IME (如中文、日语、韩语等) (IME 意为“输入法”)的语言,你会发现 v-model 不会在 ime 输入中得到更新。如果你也想实现更新,请使用 input 事件。
|
|
|
|
单个勾选框,逻辑值:
多个勾选框,绑定到同一个数组:
|
|
|
|
单选列表:
多选列表 (绑定到一个数组):
|
|
动态选项,用 v-for 渲染:
|
|
|
|
|
|
|
|
|
|
|
|
|
|
v-on 可以接收一个定义的方法来调用。
除了直接绑定到一个方法,也可以用内联 JavaScript 语句:
|
|
内联语句处理器中访问原生 DOM 事件。可以用特殊变量 $event 把它传入方法:
在事件处理程序中调用 event.preventDefault() 或 event.stopPropagation() 是非常常见的需求。
Vue.js 为 v-on 提供了事件修饰符。通过由点 (.) 表示的指令后缀来调用修饰符。
.stop
.prevent
.capture
.self
.once
|
|
Vue 允许为 v-on 在监听键盘事件时添加关键修饰符:
你也可以通过将它们转换到 kebab-case 来直接使用由 KeyboardEvent.key 暴露的任意有效按键名作为修饰符:
在上面的例子中,处理函数仅在 $event.key === ‘PageDown’ 时被调用。
可以用如下修饰符开启鼠标或键盘事件监听,使在按键按下时发生响应。
例如:
|
|
.exact 修饰符应与其他系统修饰符组合使用,以指示处理程序只在精确匹配该按键组合时触发。
|
|
我们用 v-for 指令根据一组数组的选项列表进行渲染。v-for 指令需要使用 item in items 形式的特殊语法,items 是源数据数组并且 item 是数组元素迭代的别名。
v-for 还支持一个可选的第二个参数为当前项的索引。
|
|
of 替代 in 作为分隔符,因为它是最接近 JavaScript 迭代器的语法
|
|
你也可以提供第二个的参数为键名:
第三个参数为索引:
|
|
Vue 包含一组观察数组的变异方法,所以它们也将会触发视图更新。这些方法如下:
push()
pop()
shift()
unshift()
splice()
sort()
reverse()
你打开控制台,然后用前面例子的 items 数组调用变异方法:example1.items.push({ message: ‘Baz’ }) 。
变异方法 (mutation method),顾名思义,会改变被这些方法调用的原始数组。相比之下,也有非变异 (non-mutating method) 方法,例如:filter(), concat() 和 slice() 。这些不会改变原始数组,但总是返回一个新数组。当使用非变异方法时,可以用新数组替换旧数组:
example1.items = example1.items.filter(function (item) {
return item.message.match(/Foo/)
})
你可能认为这将导致 Vue 丢弃现有 DOM 并重新渲染整个列表。幸运的是,事实并非如此。Vue 为了使得 DOM 元素得到最大范围的重用而实现了一些智能的、启发式的方法,所以用一个含有相同元素的数组去替换原来的数组是非常高效的操作。
Vue 不能检测对象属性的添加或删除:
对于已经创建的实例,Vue 不能动态添加根级别的响应式属性。但是,可以使用 Vue.set(object, key, value) 方法向嵌套对象添加响应式属性。例如,对于:
你可以添加一个新的 age 属性到嵌套的 userProfile 对象:
你还可以使用 vm.$set 实例方法,它只是全局 Vue.set 的别名:
有时你可能需要为已有对象赋予多个新属性,比如使用 Object.assign() 或 _.extend()。在这种情况下,你应该用两个对象的属性创建一个新的对象。所以,如果你想添加新的响应式属性,不要像这样:
this.userProfile = Object.assign({}, this.userProfile, {
age: 27,
favoriteColor: ‘Vue Green’
})
data: {
numbers: [ 1, 2, 3, 4, 5 ]
},
computed: {
evenNumbers: function () {
return this.numbers.filter(function (number) {
return number % 2 === 0
})
}
}
data: {
numbers: [ 1, 2, 3, 4, 5 ]
},
methods: {
even: function (numbers) {
return numbers.filter(function (number) {
return number % 2 === 0
})
}
}
|
|
|
|
|
|
No todos left!
|
|
<my-component
v-for=”(item, index) in items”
v-bind:item=”item”
v-bind:index=”index”
v-bind:key=”item.id”
></li>
Vue.component(‘todo-item’, {
template: ‘\
前段时间我们大概介绍了一下模板语法,今天我们要详细介绍模板语法中比较常用的一些。
v-if 指令条件渲染指令,根据其后表达式的bool值进行判断是否渲染该元素
与v-else 添加一个“else 块”
所以,v-if指令只渲染他身后表达式为true的元素
|
|
v-else 元素必须紧跟在带 v-if 或者 v-else-if 的元素的后面,否则它将不会被识别。
v-else-if,顾名思义,充当 v-if 的“else-if 块”,可以连续使用:
相当于一个for-each
|
|
|
|
v-show 与v-if类似,只是会渲染其身后表达式为false的元素,而且会给这样的元素添加css代码:style=”display:none”;
v-if 是“真正”的条件渲染,因为它会确保在切换过程中条件块内的事件监听器和子组件适当地被销毁和重建。
v-if 也是惰性的:如果在初始渲染时条件为假,则什么也不做——直到条件第一次变为真时,才会开始渲染条件块。
相比之下,v-show 就简单得多——不管初始条件是什么,元素总是会被渲染,并且只是简单地基于 CSS 进行切换。
一般来说,v-if 有更高的切换开销,而 v-show 有更高的初始渲染开销。因此,如果需要非常频繁地切换,则使用 v-show 较好;如果在运行时条件很少改变,则使用 v-if 较好。
当 v-if 与 v-for 一起使用时,v-for 具有比 v-if 更高的优先级。